Design for Survey Category Checklist
A survey from the Checklist category is completed by your business users. The use case here is the actual checklist, where you ask your employees about their activities through targeted questions
Navigation for User - Survey
1. Question Around with Surveys 1.1. Creating a Survey 1.2. Design for Surveys 2. Design for Category Checklist 2.1. Question Types 2.2. Further options for questions 2.3. Branching 2.4. Attachments for Questions 2.5. Dynamically Display Answer Options 2.6. Actions and Tabs 3. Design for category Products 3.1. Design for Survey Category Products 3.2. Product Determination 4. Design for category Registered Products 5. Design for Competitors 6. Design for Competitor Products 7. Design for category Satisfaction 8. Validation Rules with Exceptions 9. Language Settings 10. Score 11. Follow Up Actions 11.1. Follow-up Tasks and Follow-up Tickets 11.2. Follow-Up Sales Quotes and Sales Orders 12. Question Bank 13. Usage of Surveys 14. Reporting on Surveys 14.1. Tab Results 14.2. Reports
A Checklist Survey can be used for example, to attach it to a service ticket and give the technician a checklist to see if he has completed all the checkpoints. In the following subchapters, the question types and all other setting options for the checklist are presented and explained in detail.
2.1. Question Types
There are two approaches for inserting question items in Cloud 4 Customer. The first approach is to add from a Question Bank. The second approach is via the Add Button, which can be done in the Design tab of your Survey.
First, you will get a message, with the following indications: Please enter a question. Please enter a question type. All question types are introduced below:
Question Type: Amount
You have two options for the Amount question type. The manually entered amount – Derivation Method shall be empty – and the calculated amount – Derivation Method shall be Calculation.
Manual Amount
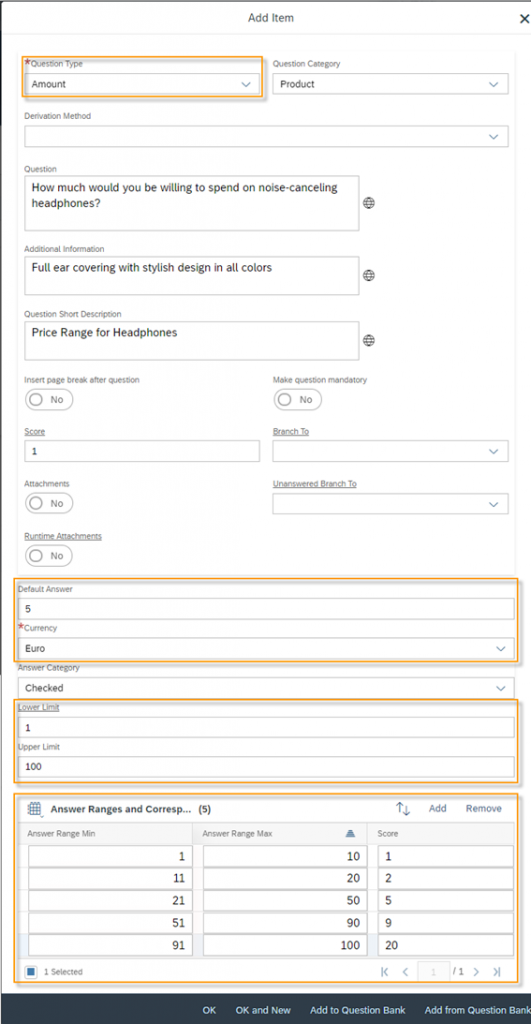
For the manual amount you can define a Default Answer, a Lower Limit and Upper Limit and of course the Currency. The last thing you can do is to enter different score values for value ranges under the section of Answer Ranges and Corresponding Score Values. All about Scores will be explained later.
Calculated Amount
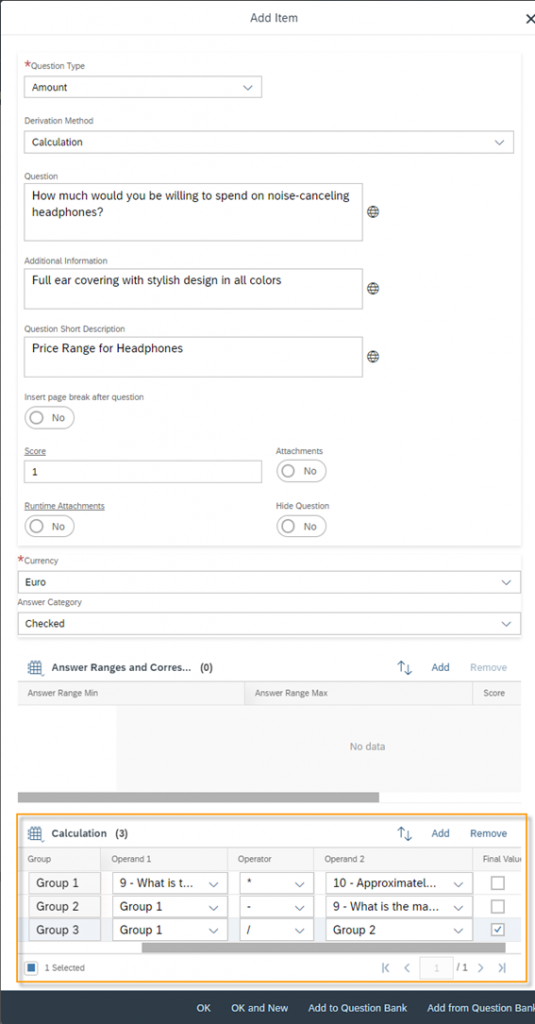
For calculation purposes, you can have a value calculated for the answer to your question based on other questions or partial results. For this purpose, the operators multiplication, division, addition, and subtraction are available to them. If you select Calculation for the Derivation Method, the Calculation section will be available when you create the Question Type. Here you can add several calculation steps (=groups) using the Add button. Later, you can use a group as an Operand to continue calculating with this subtotal. When you have reached the last calculation step, mark it as Final Value so that the result is entered as an answer in the survey.
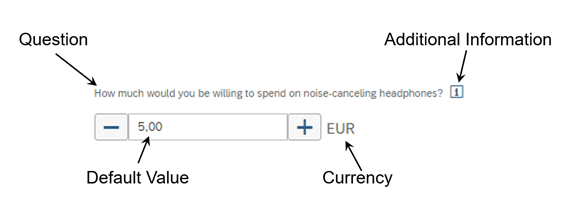
Design of the Question Type Amount in the survey
Creation Form for Question Type Amount
Question Type: Attributes
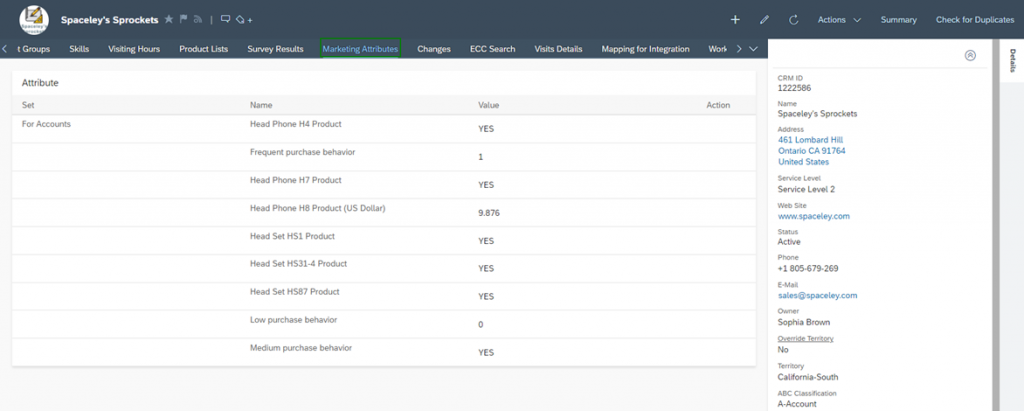
With this question type you have the possibility to change marketing attributes during a survey for customers and contacts. This is always useful when you receive important information during a survey that leads to a new image of the customer or contact. For example, you find out that the customer is more and more inquiring about alternatives to your products on the market. So, it would also make sense to initiate marketing measures to further bind this customer or contact person to you. In the Business Object Account, you will find in the tab of Marketing Attributes all necessary information you can also involve in the Question Type of Attributes in your Survey.
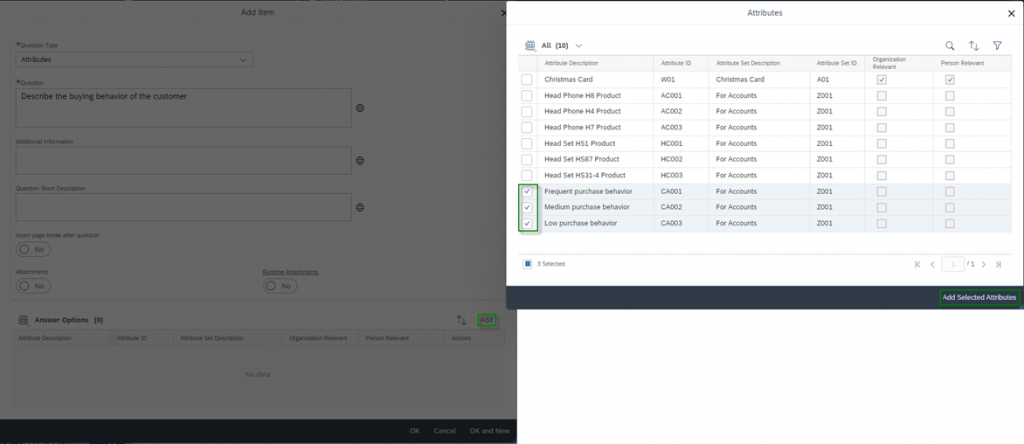
Design of the Question Type Attributes in the survey
Here the Marketing Set For Accounts was added and specifically the three attributes Low purchase behavior, Medium purchase behavior and Frequent purchase behavior. In a survey this part looks exactly like on the customer and can be edited during the survey. After submitting the survey, these attributes are also adjusted on the customer or contact person.
Creation Form for Question Type Attributes
Question Type: Date
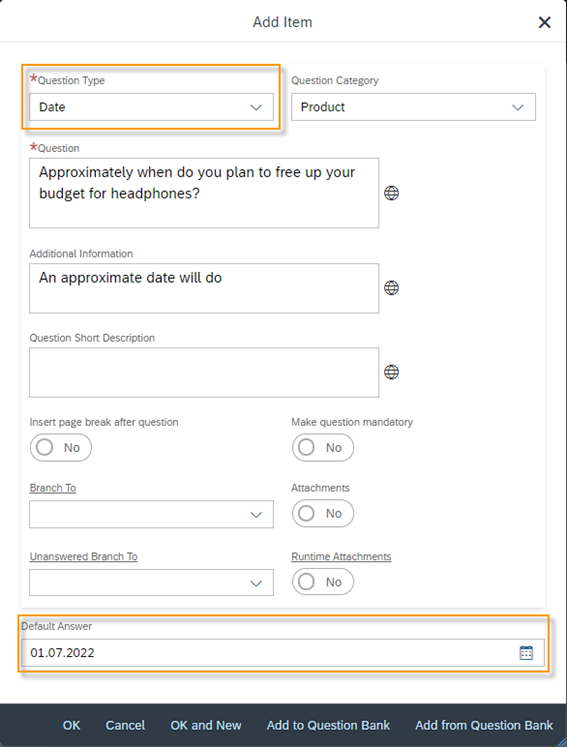
To get an overview of a time area, questions in your survey with a date query are useful. This way you can determine a median value after the successful implementation and have a target picture about when something will be realized. Select as the Question Type Date. For the Date Type you can specially define a Default value for your survey.
Design of the Question Type Date in the survey
Creation Form for Question Type Date
Question Type: Date Range
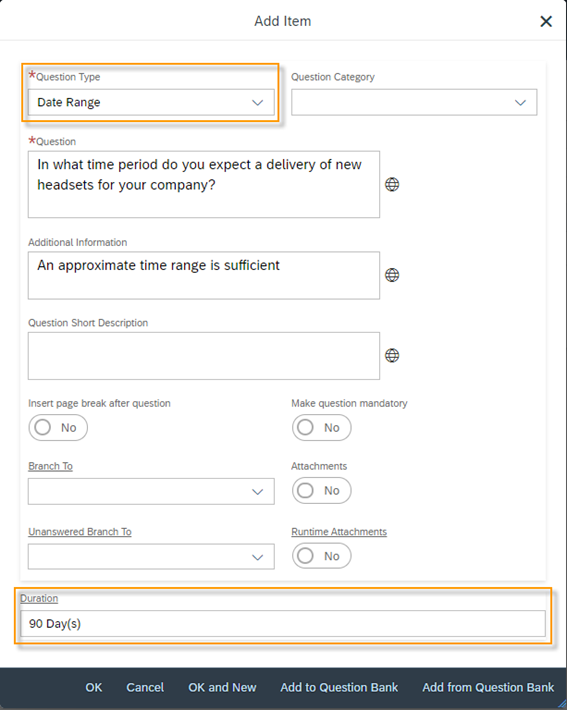
A time range consists of two dates. The From date and the To date. This type of question is useful when you want to get an overview of time ranges. Select as the Question Type Date Range. You can specify a Duration in days specifically for this question type – for example 15 Day(s), 30 Day(s), etc., important is the unit Day(s) in exactly this notation, as other units are not allowed. A filled length will set off an automatism when the survey is executed. As soon as a user enters the from date, the to date is automatically set based on the Duration. For example, if you set the Duration to 90 Day(s) and the user enters 01/01/2023 as the from date, then the to date will automatically be set to 04/01/2023.
Design of the Question Type Date Range in the survey
Creation Form for Question Type Date Range
Question Type: Matrix
Typically, questions in a survey have only answer options. The Matrix Question Type, however, is a summary of several sub-questions, where each sub-question can be answered individually by the survey participant – for example, using a predefined scale of answer options. A typical example of such a scale is the Likert scale. The Likert scale is a survey method used in questionnaires to find out customers’ personal opinions. In the process, survey participants read a pre-formulated statement on a topic. They then indicate on a multi-level scale how strongly they think the statement applies.
When creating a Matrix for your survey, you can enter your sub-questions in the Rows Section of the creation form and the possible answers for your sub-questions in the Columns section. Each Row or Column entry can be deleted by clicking on the Trash Icon ![]() , move the entry Up
, move the entry Up ![]() above the previous value or Down
above the previous value or Down ![]() . To do this, simply hover the entry you want to edit.
. To do this, simply hover the entry you want to edit.
Question Type Matrix in the survey
Creation Form for Question Type Matrix
You can use the Show Answer As field to select different options how the answers should be displayed and what kind of answer the respondent can give. Radio Button is set by default – so when you leave the field empty.
Show Answer As: Radio Button
Only one answer column can be selected
Show Answer As: Checkbox
Multiple answer columns can be selected
Show Answer As: Numeric Value
You can enter one numeric value per column. This cannot be limited – for example, upper and lower limits or intervals. Entering text is not allowed in this case and will be removed automatically.
Show Answer As: Text Value
Any amount of text can be entered per column. Clicking on the cell opens a Comment field where the answer can be formulated and confirmed with Done.
Show Answer As: Dropdown List
If you select this as this answer option, then you have to fill out the possible answers for the Dropdown Menu under the Response Options section while editing the Question.
The respondent can then select the appropriate answer from the dropdown in the survey.
Question Type: Multiple Choice (select one)
The Multiple Choice Question Type is flexible, intuitive, and gives you clean data that is easy to analyze. Multiple choice questions with only one possible answer are effective when you ask respondents to select their favorite or least favorite option from a given list, or the option that comes closest to their opinion. This question type is an alternative to the matrix question type.
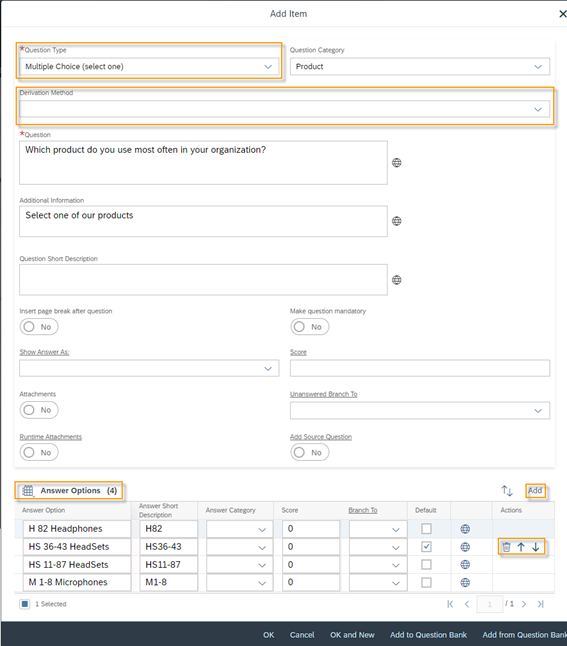
When creating a Multiple Choice (select one) for your survey you can choose between options to be filled in manually or calculated options. For the manual one, leave the field Derivation Method empty.
Manual Multiple Choice (select one)
You can create new Answer Options by clicking on the Add Button. Which each Answer Option you define the option itself, an Answer Short Description, an Answer Category, a Score, a Branch To and select if this option should be the Default. Each Answer Option can be deleted by clicking on the Trash Icon ![]() , move the entry Up above the previous value
, move the entry Up above the previous value ![]() or Down
or Down ![]() . To do this, simply hover the entry you want to edit. For the Show Answer As option you can select between Radio Button, Dropdown List and Toggle Button.
. To do this, simply hover the entry you want to edit. For the Show Answer As option you can select between Radio Button, Dropdown List and Toggle Button.
Calculated Multiple Choice (select one)
The calculation works exactly as described for the Question Type Amount.
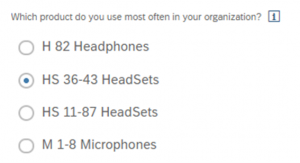
Question Type Multiple Choice (select one) in the survey
Special Case Show Answer As Toggle Button
Here the selected answer is highlighted in another font and background color. For this case a minimum of two and a maximum of three possible answers are allowed.
Creation Form for Question Type Multiple Choice (select one)
Question Type: Multiple Choice (select multiple)
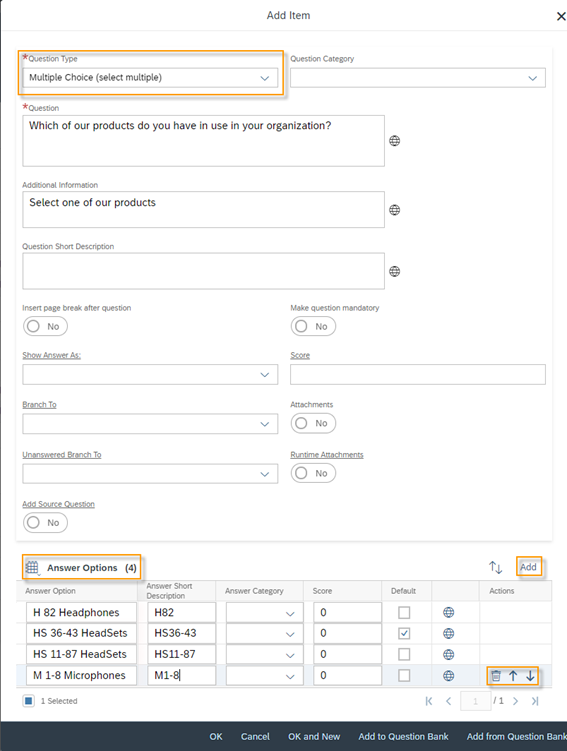
The Multiple Choice Question Type with several answers have a different purpose than those with only one answer option. Here, respondents can select all answer options that apply to them – they are no longer forced to choose one option. The logic in SAP Sales Cloud when creating a Multiple Choice (select multiple) is exactly like the question type Multiple Choice (select one). For the field Show Answer As you can select between Checkbox and Dropdown List, both options are explained in detail for Question Type Matrix.
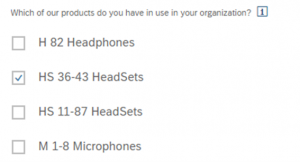
Question Type Multiple Choice (select multiple) in the survey
Creation Form for Question Type Multiple Choice (select multiple)
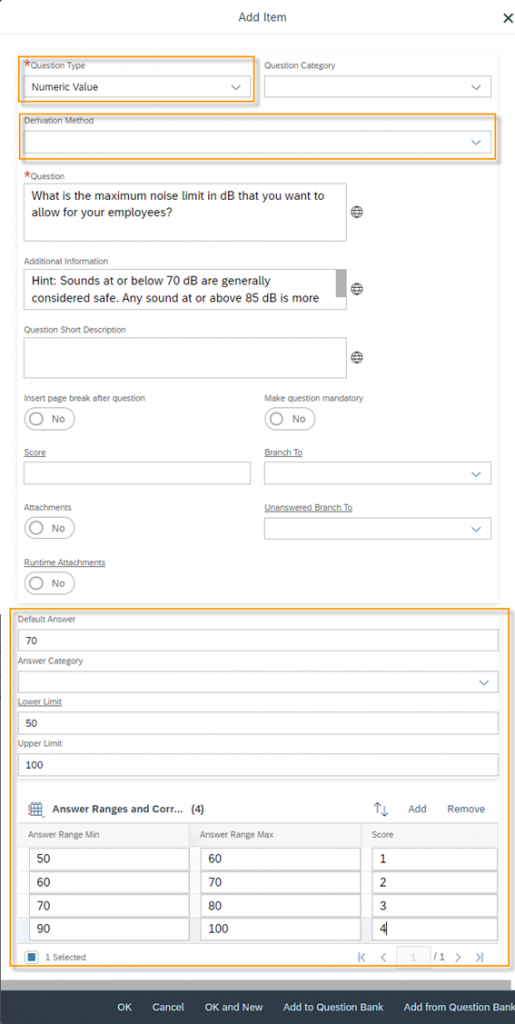
Question Type: Numeric
The Numeric Question Type basically works just like the Amount question type. The difference between numeric and amount is that numeric does not require a currency. Here you also have two options, the manually entered numeric value – Derivation Method shall be empty – and the calculated numeric value – Derivation Method shall be Calculation.
Manual Numeric Value
For the manual numeric value, you can define a Default Answer, a Lower Limit and Upper Limit.
Calculated Numeric Value
The calculation works exactly as described for the Question Type Amount.
Design of the Question Type Numeric in the survey
Creation Form for Question Type Numeric
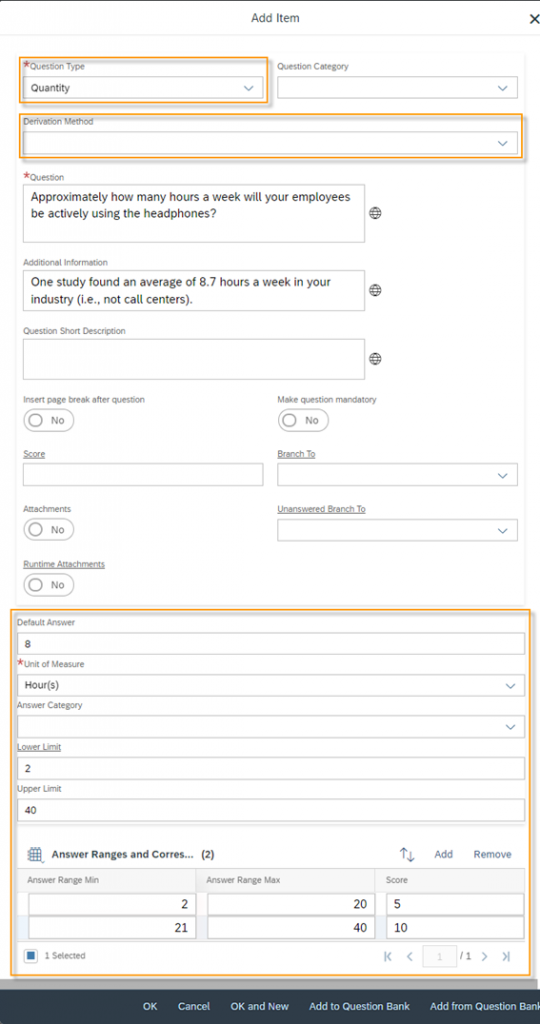
Question Type: Quantity
The Quantity Question Type also works just like the Amount question type. The difference again is the unit. While the amount question type always asks for a currency as a unit, the Quantity question type asks for various units – such as time units, length units, percentages, etc. Here again you also have two options, the manually entered numeric value – Derivation Method shall be empty – and the calculated numeric value – Derivation Method shall be Calculation.
Manual Quantity Value
For the manual numeric value, you can define a Default Answer, a Lower Limit and Upper Limit.
Calculated Quantity Value
The calculation works exactly as described for the Question Type Amount.
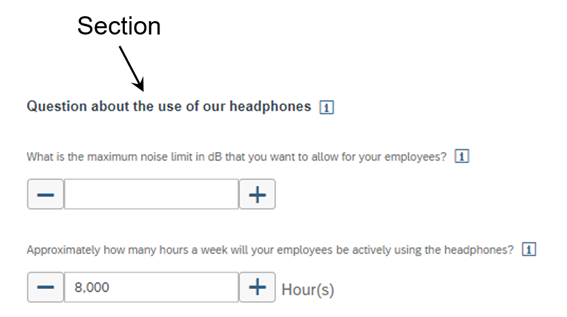
Design of the Question Type Quantity in the survey
Creation Form for Question Type Quantity
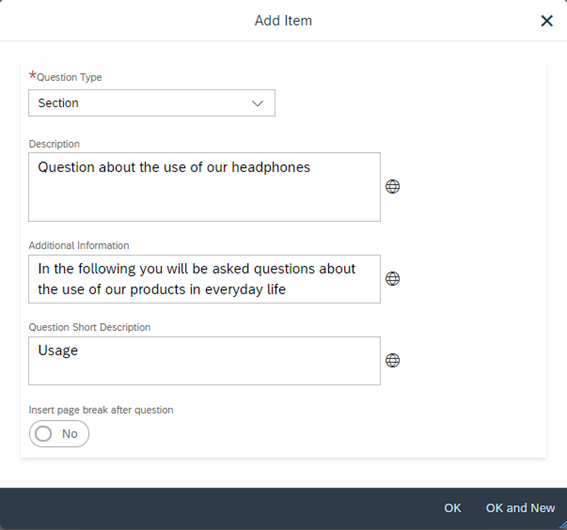
Question Type: Section
The Section Question Type is basically not a question, but as a type of section in your survey it is an important component. You can use Sections to divide your survey into multiple areas and thus group questions. The important thing to understand here is that when you create your questions for your survey in the Design tab, make sure that you arrange the related questions to a Section underneath. You can use the Move Up ![]() or Move Down
or Move Down ![]() Buttons to arrange the questions in the correct order. In the following an example is visualized. Here you can see those questions 2 to 7 are subordinated to the first section and questions 9 and 10 to the second section.
Buttons to arrange the questions in the correct order. In the following an example is visualized. Here you can see those questions 2 to 7 are subordinated to the first section and questions 9 and 10 to the second section.
Question Type Multiple Choice (select multiple) in the survey
Creation Form for Question Type Multiple Choice (select multiple)
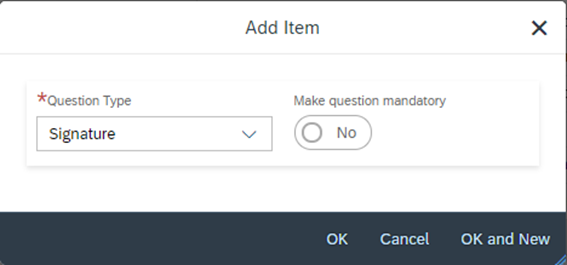
Question Type: Signature
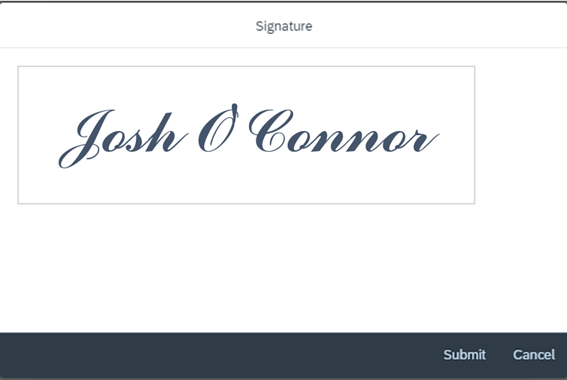
The Question Type Signature is like the Question Type Section also not a real question, nevertheless again an important part of a survey, especially if you want your survey to be signed. There are several reasons why a survey should be signed. On the one hand, for internal surveys you could see which employee has filled out this survey. If you use surveys in the service area, customers can confirm the work of your assemblers with a signature during a service use. The signature is not a direct part in your survey, but after the survey is submitted. After that the popup for the signature appears, which can now be signed.
Signature, which will be display when submitting a survey
Creation Form for Question Type Signature
Question Type: Text
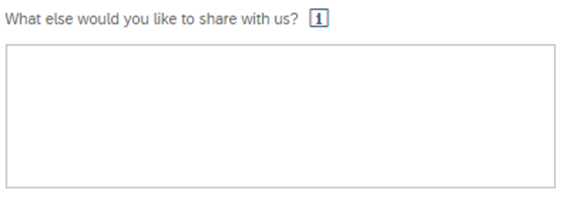
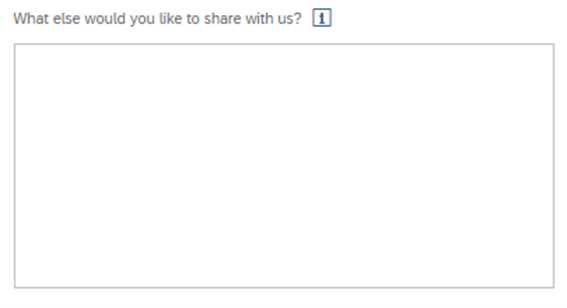
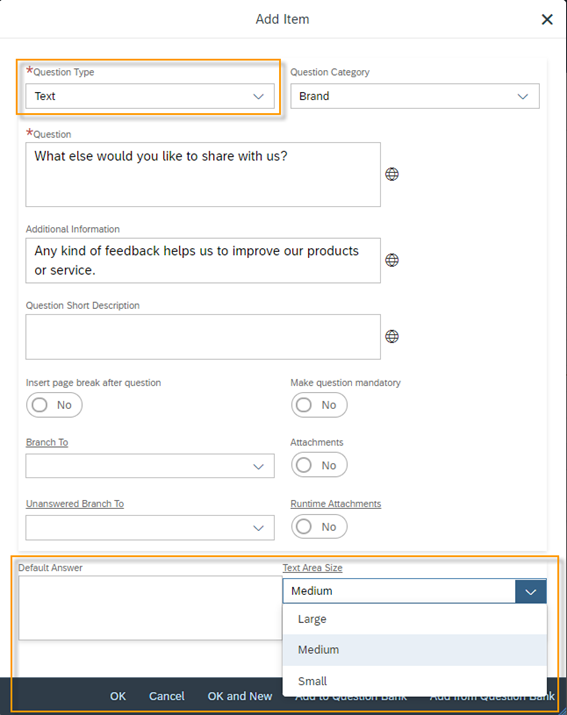
The Text Question Type allows you to capture short and open responses from respondents. You have the possibility to specify a Default Answer and to determine the size of the text field. Choose between Small, Medium and Large for Text Area Size.
Question Type Text in the survey
Text Area Size: Small – One Line
Text Area Size: Medium – Five Lines
Text Area Size: Large – Nine Lines
Creation Form for Question Type Text
In the table below you will find an overview of all question types and their specific setting options.
Question Type | Specific setting for this type of question |
Amount | · Default Answer · Lower Limit · Upper Limit · Answer Category · Currency · Score Values |
Attribute | · Marketing Attributes |
Date | · Default Answer |
Date Range | · Duration |
Matrix | · Rows · Columns |
Multiple Choice (select multiple) | · Answer Options |
Multiple Choice (select one) | · Answer Options |
Numeric Value | · Default Answer · Lower Limit · Upper Limit · Answer Category · Score Values |
Quantity | · Default Answer · Lower Limit · Upper Limit · Answer Category · Unit of Measure · Score Values |
Section | – |
Signature | – |
Text | · Default Answer · Text Area Size o Small o Medium o Large |
2.2. Further options for questions
In each survey you can add new questions to your survey in the Design tab using the Add button. Besides the specific question type setting – which you have just learned in the previous chapters – you will also find general setting options for the questions. The general setting options are explained in the following.
The Question
Each question you want to ask respondents consists of three main parts, the Question, the Additional Information and the Question Short Description. The question will be displayed in your Survey and is mandatory when creating a new Question. When adding Additional Information an Info Icon will be displayed next to your question. If you leave the Additional Information empty, this icon will not be displayed in your survey. When a respondent is clicking on this icon, a popup with the information will be shown. The Question Short Description is for internal use only, e.g. for reporting, and will never be shown in the survey. You can use this Description to describe the target of the question or other notes you may have.
Example of an Additional Information popup, which can be confirmed – after reading – with the OK Button:
Make question mandatory
Except for Attributes, Matrix and Section question types, you can set all question types to mandatory. However, think carefully about which questions you really want to make mandatory, as respondents may find it annoying if they have to answer all the questions, even though you only have a suitable answer to some of them. Mandatory questions are marked with a red asterisk in front of the question.
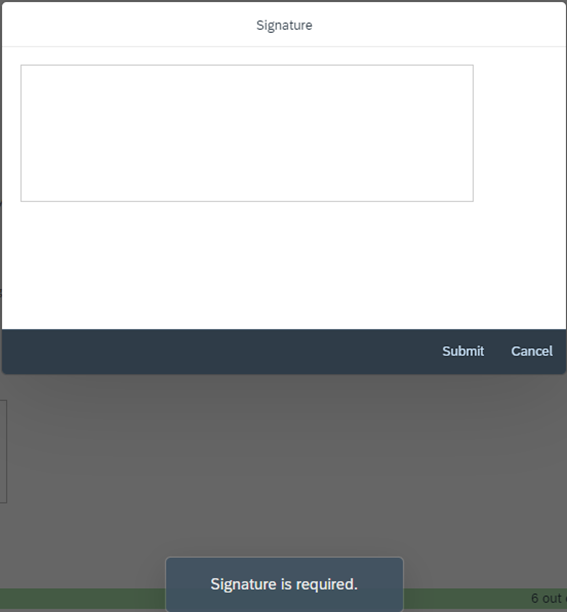
A survey can only be submitted if all mandatory questions are answered – which means not empty, in other words. The special case of the signature – which is only requested after submitting a survey – must then be filled in. If you click Submit on the signature without filling it in, you will receive the error message: Signature is required.
Insert page break after question
You can split your survey into several pages. This makes sense if you are asking about different topics on these pages. This way, the respondent gets to feel a kind of change and can mentally prepare for the new topic. It is recommended to work with sections when using a new page. After the last question of a topic, you can set the Insert page break after question indicator to enable. When you add pages to your survey, you will find two additional layout components. The first one is on the left bottom. There you will find the number of pages and the total number of pages. Second, on the right bottom you will find a Previous and a Next Button, to navigate through the different pages of your survey.
Question Category
You have the possibility to categorize your question with the data field Question Category. This makes sense to keep an overview of your question. At the same time, you can create evaluations of your questions. This gives you an impression of which question category is answered most often, for example.
Answer Category
Like the Question Category, you also have the possibility to categorize the answers with the data field Answer Category. You can do this only if you provide the answers to the respondents. So, in the case of multiple-choice question types.
2.3. Branching
Branching is used to let respondents skip one or more questions and jump to a different question. This feature is useful when you want to send respondents down different paths in your survey. In SAP Sales Cloud you can branch based on a given answer or in general when a question is answered or also not answered.
General Branching
For the most Question Types – except for Section, Matrix and Signature – you will find the List Data Fields Branch To and Unanswered Branch To. You can select in both fields any question of your Survey or the entry End of Survey. Branch To means when the respondent answers your question the path of your survey will lead him to the Question, which you selected in this field. If the respondent left the question unanswered the path will lead him to the Question which you selected in the field Unanswered Branch To. If you set a question as mandatory, then of course it makes no sense that you select a question for Unanswered Branch To.
Branching based on a given Answer
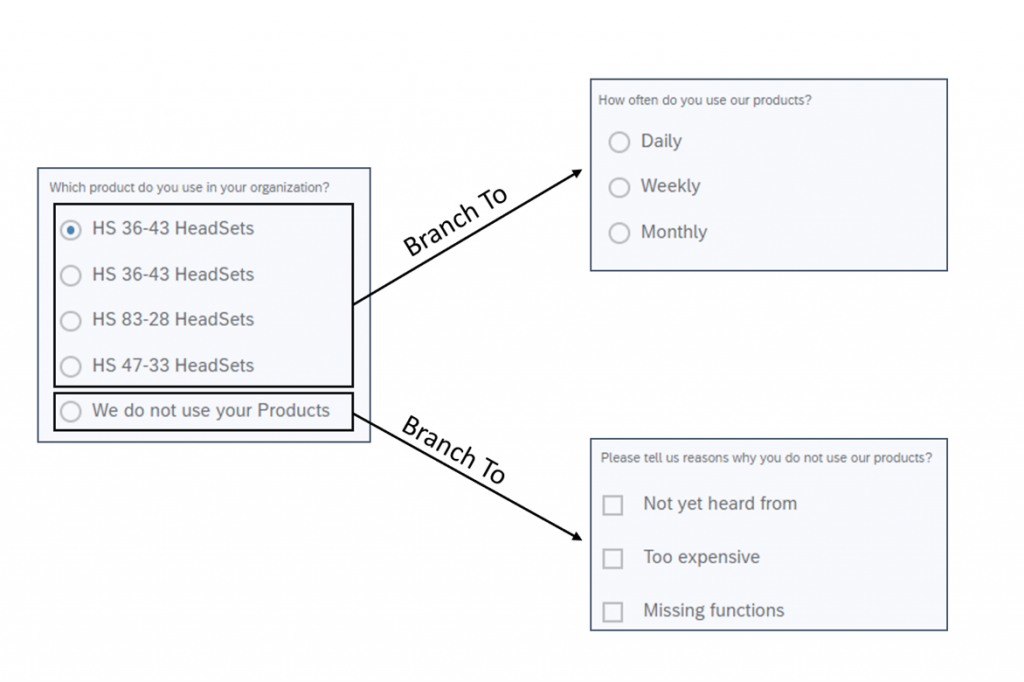
For the Multiple Choice (select one) question type, you can branch based on a selected answer to a question in your survey. The easiest way to explain why this feature has a lot of advantages is to use an example:
Let’s assume you ask which of your products the respondent uses. They can choose between four of your products or tick that they do not use any of your products. The first four answers lead the respondent to the question of how satisfied he is with your product. However, if the respondent ticks that he does not use any of your products, you can ask him why.
In the editing mode of this Question Type you can set up your suitable path in the section of Answer Options where you will find the setting for Branch To.
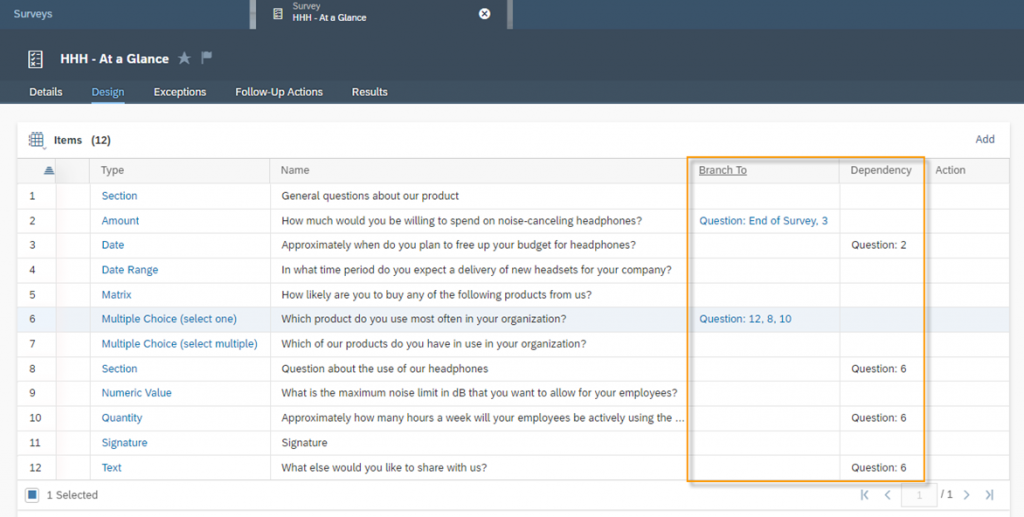
In the Design tab in your survey, you will find an overview of all questions. The branching is also displayed here. You will find the Branch To and Dependency information columns in this table. Dependency describes when another question branches to this question, e.g. Question 9 has a Dependency to Question 6.
2.4. Attachments for Questions
Attachments are helpful tools to support your question with visualizations or informational material. You can attach all common file types to your question, such as images, PDFs, Power Point presentations, etc. Once you use attachments with your question, the respondent will see the Attachment ![]() icon next to the question
icon next to the question
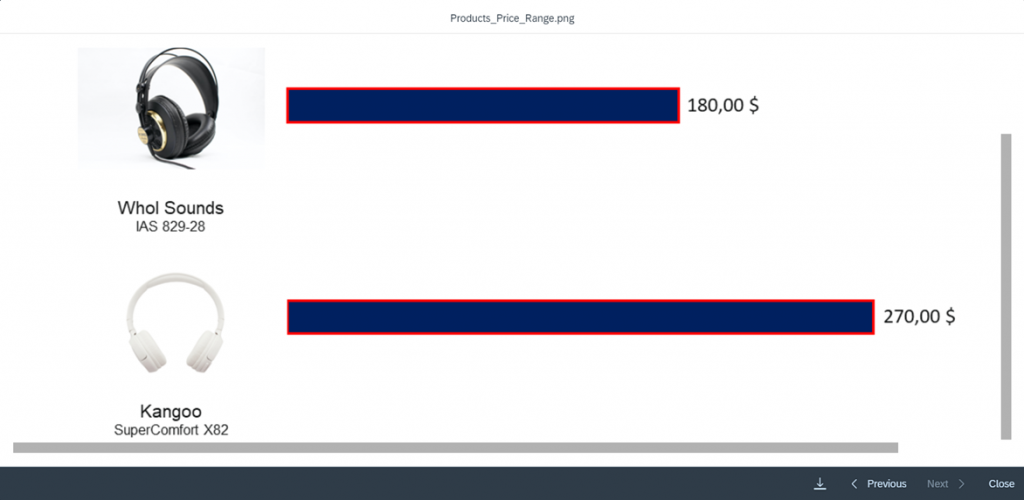
By clicking on the attachment icon, a popup opens where the attachments are displayed in a kind of slideshow. Images are displayed directly in this preview, while other attachments such as PDFs can be downloaded via the Download ![]() icon. With the Next and Previous Button, you can slide back and forward through the different documents attached to this question. By clicking Close you will get back to the survey.
icon. With the Next and Previous Button, you can slide back and forward through the different documents attached to this question. By clicking Close you will get back to the survey.
To add Attachments to your question, first you have to activate the Attachment indicator. When this is activated, you will find in the bottom of the two new sections: Planogram Attachment Categories and Attachments.
Section: Planogram Attachment Categories
With the Planogram Attachment Category Attachments from account-level will be displayed during the survey. Select multiple Attachment Categories which you would like to have available to view.
Section: Attachments
You can add multiple Attachments to your question by clicking the Add Button. In this way you can also assign a Type to the Attachment such as Catalog Pictures, Product Specification and many more. With the Trash ![]() Action you can remove Attachments later if you don’t need them anymore.
Action you can remove Attachments later if you don’t need them anymore.
All attachments that are added to your questions are displayed in detail and in a kind of overview in the Work Center View Related Attachments. Here you can see the documents and in which survey they were used. At the same time, you can download attachments here. To do so, simply select an Attachment or multiple and click the Download Button in the top right. (Note: When you select multiple Attachment a zip folder will be downloaded, which contains the selected documents)
Runtime Attachments
In some cases, it is useful to answer a question with an attachment – for example an image or a PDF file. Thus, the answer to this question can be supported. With the Runtime Attachments indicator, you can decide whether it is possible to allow attachments for this question. If this indicator is enabled, you will find an Attachment ![]() Icon next to the question. Right next to this icon you will find a Number that shows you as an overview how many attachments are attached to this question by the respondent. Click on the Attachment Icon to attach files to this question.
Icon next to the question. Right next to this icon you will find a Number that shows you as an overview how many attachments are attached to this question by the respondent. Click on the Attachment Icon to attach files to this question.
2.5. Dynamically Display Answer Options
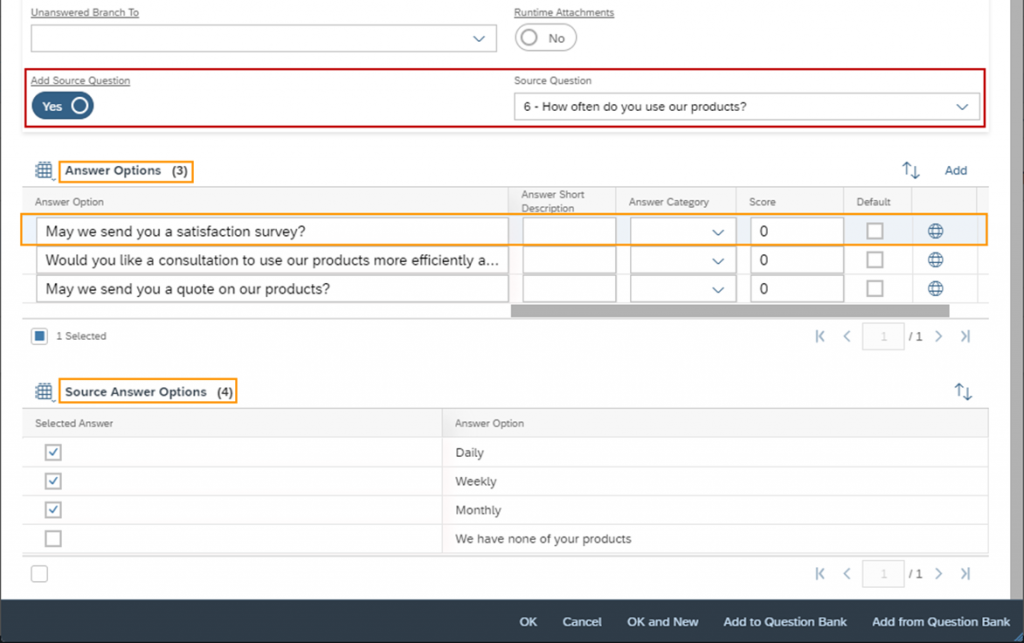
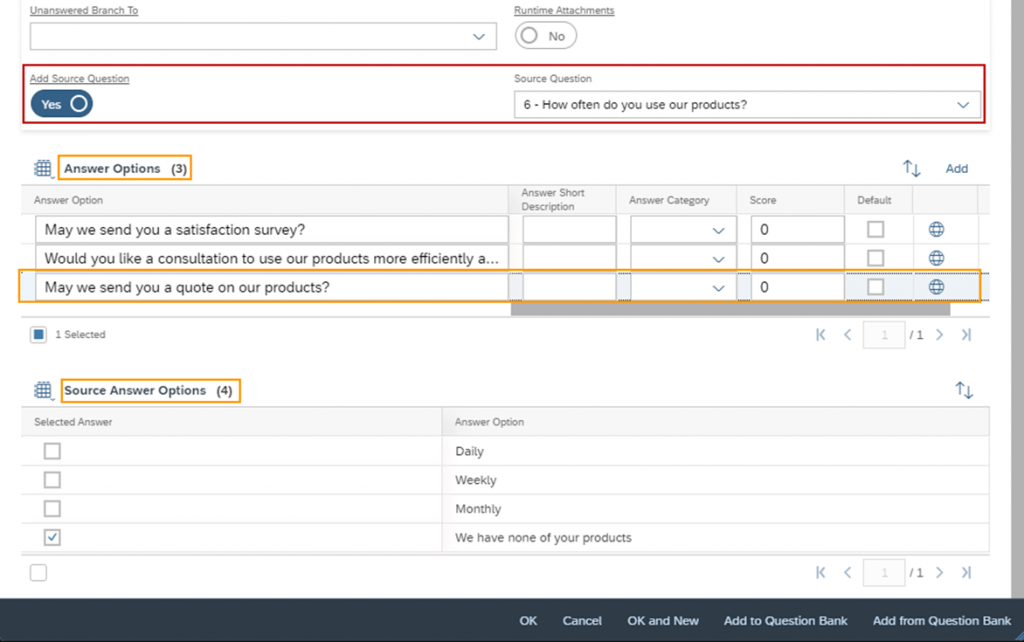
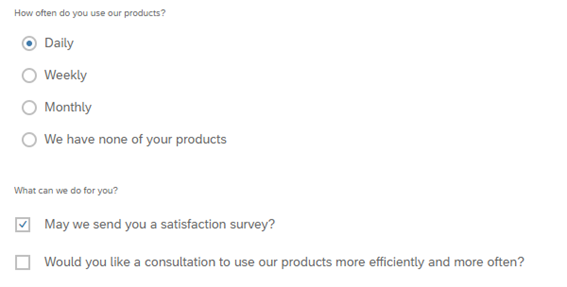
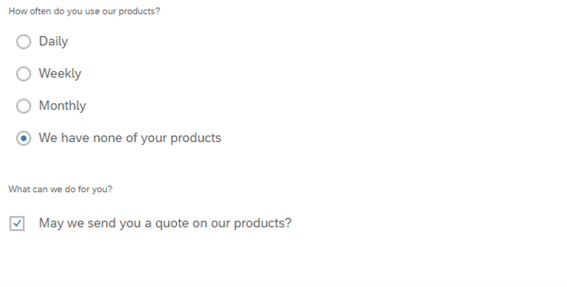
Based on a selected answer, follow-up questions can dynamically have answer options available to the respondent. For this feature you have to enable the Indicator Source Question while adding or editing a question. This feature works for the Question Types Multiple Choice (select multiple) and Multiple Choice (select one). The figure below gives you an idea about the flow of this function. If the answer Daily, Weekly or Monthly is selected, the two first answer options of the question What can we do for you becomes visible. If the answer We have none of your products is selected, then only the May we send you a quote on our products? option of this question will be available.
Let’s realize this figure in Cloud 4 Customer. As a first step we create the Source Question, which has to be of the Type Multiple Choice (select one). Add a new Question in the Design tab of your survey of this type and add the four shown answer options. Then add the second question – which is this case Multiple Choice (select multiple). In the bottom of the question enable the Toggler Add Source Question and select the Source Question. Enter – as a next step – the Answer Options. Now you can assign a Source Answer Option to each Answer Option. The two screenshots below show you two examples of this feature:
Settings for Answer Options – May we send you a satisfaction survey?
Settings for Answer Options – May we send you a quote on our products?
If you now simulate the survey, the result will look like this:
Settings for Answer Options – May we send you a satisfaction survey?
Settings for Answer Options – May we send you a quote on our products?
2.6. Actions and Tabs
A Survey can have three different kinds of Status: Active, In Preparation or Obsolete. All of them can be set via the Actions Button in the Survey. The default status after creation is In Preparation. Once the status is set to Activate and the first result is submitted, anymore you are not able to set it back to In Preparation, where you can edit your survey. A useful function – which can be found also under the Actions menu -, is that you can copy an existing survey. This function saves you a lot of work, when you want to create a new survey based on an old one.
With the Simulation button you can simulate how your survey looks and is structured. You should check regularly while creating the survey, if it looks exactly as you have conceptualized it. Especially before you activate the survey, you should simulate the survey again. This is of course also helpful to get a feeling for the usability of the business users or your customers when filling out your survey.
All the tabs of a survey will be explained to you in more detail in the chapters below.
The Customer Experience team at Camelot ITLab deals with exciting and challenging CRM related topics every day and serves a large portfolio of different customers from a wide range of industries. Trust in this collaboration and feel free to contact us at tlil@camelot-itlab.com.
Was this article helpful?
If you like our content we would highly appreciate your review on Trustpilot
#SAP C4C #SAP Cloud 4 Customer #Cloud 4 Customer #Cloud for Customer #SAP Sales Cloud #Sales Cloud #Survey #Question #Type #Question Type #Design #Question Bank #Amount #Derivation Method #Derivation #Calculation #Default Answer #Lower Limit #Upper Limit #Answer Ranges #Operand #Attributes #Marketing Attributes #Date #Date Range #Matrix #Radio Button #Checkbox #Numeric Value #Text Value #Dropdown List #Options #Multiple Choice (select one) #Multiple Choice #Toggle Button #Multiple Choice (select multiple) #Show Answer As #Numeric #Quantity #Section #Signature #Text #Mandatory #Page Break #Question Category #Answer Category #Branching #Branch To #Attachments

