Search
Close this search box.

Follow-Up Actions of Surveys

Follow-Up Actions of Surveys

In an indirect survey, business users provide answers to specific questions either through research or by asking customers, for example, during a customer visit. In C4C you have the possibility to automatically generate follow-up actions.

You can select the option of a Follow-up Task for all survey categories – except for Satisfaction, as this is used for emails. For a detailed list of Follow-up Actions, see the table below.

Survey Category

Follow-up Items

Preconditions

Follow-Up Item Details

Further Follow-Up Actions

Checklist

Task

Exception

Task Subject

Competitor

Task

Exception

Task Subject

Competitor Products

Task

Exception

Task Subject

Others

Task

Exception

Task Subject

Opportunity

Task

Exception

Task Subject

Products

Task

Exception

Task Subject

Create Sales Quote

Create Sales Order

Registered Products

Task

Exception

Task Subject

Ticket

Exception

Description

Ticket

Exception

Subject

Satisfaction

Has no Follow-Up Actions

11.1. Follow-up Tasks and Follow-up Tickets

In the Details tab of your survey, you will find the two important indicators for follow-up actions – Follow-up Tasks and Attach summary to Follow-up Task.

You can use Exceptions as a condition to trigger automatic creation of Follow-up Task, if the Indicator Follow-up Tasks in the Details tab of your survey is enabled. In the first step make sure, that you have added Exceptions to your Survey. In the following example, the Question In Use is selected as a Exception. Define a Description for this Exception and select the Exception Value, which is in this example the value No. This means that if the question is answered with no, the exception takes effect.

In the next step, navigate to the Follow-Up Actions tab of your survey. Add a new item using the Add button in the Follow-Up Items section and select Task as the Type.

In the next step, in the Preconditions section, select the exception that you want to use as a condition for the Follow-up Task.

Next, use the Add button to add a new entry in the Follow-Up Item Details section. As Attribute select the Task Subject – which is the only attribute. Then select the Question for the Task Subject. This means, that the given answer will be used as the Subject of the Follow-up Task. You can use for this Feature the Question Types Multiple-Choice single select and Text.

To be sure that this is entered, you must mark this question as mandatory in the system. To do this, click on this question in the Design tab and enable the Make Question Mandatory indicator. If this is not enabled, you will receive the following error message: Attribute Task Subject is mandatory for a follow-up task. Please maintain in follow-up item details.

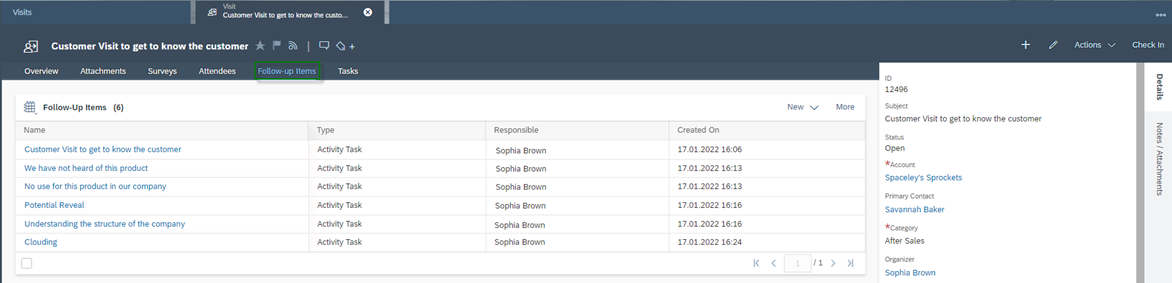
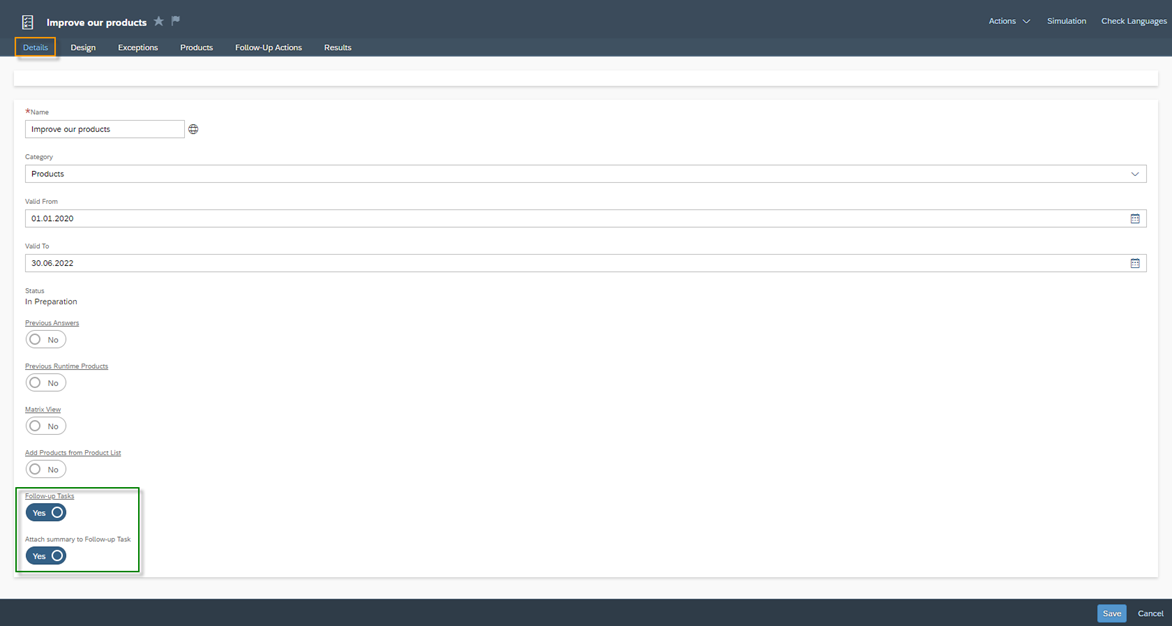
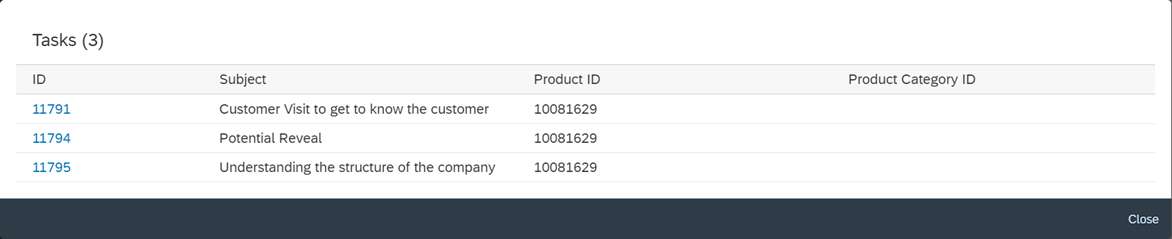
In the footer of your survey, you will find two important action buttons. The first one is Create Task. With these, respondents can manually add a task. This copies the data – such as the subject – from the business object to which the survey is being conducted – for example, a customer visit. The second action button is the Task Overview Icon . Right next to the Icon you will find a number of Follow-up Tasks. When you click on this action button a popup will appear, where you will find an overview of all follow-up items manually added.

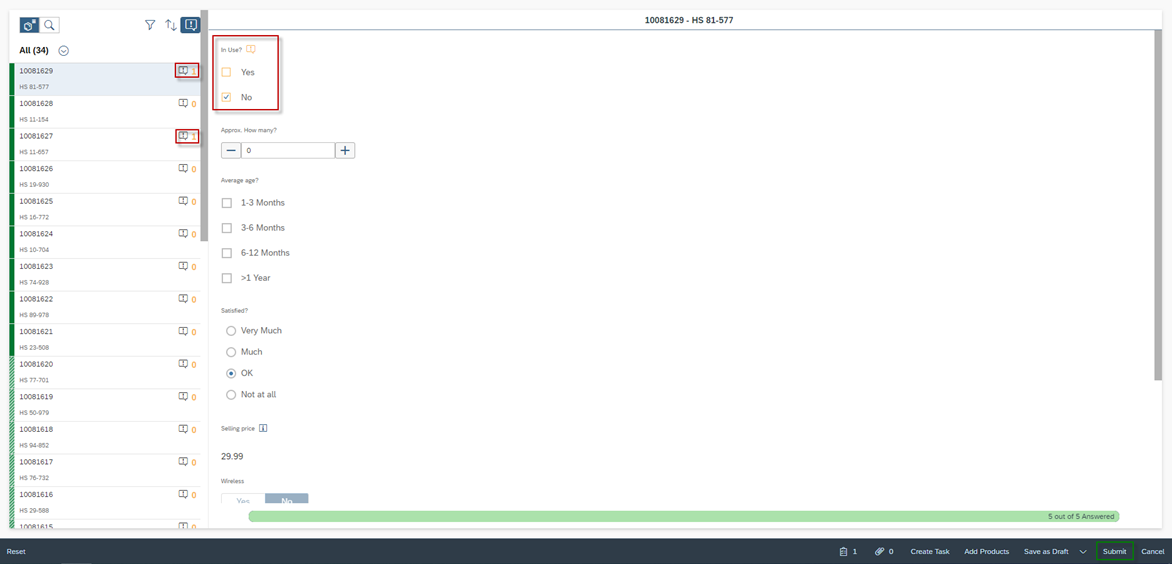
The automatically generated Follow-Up tasks are generated as soon as the survey is Submitted. When completing the survey, you can also click on the Exception Icon  in the top left to validate the given answers and to see where a follow-up task will be created. In the figure below you can see that a Follow-Up Task is generated for the first product in the sequence and for the third. Here there is a 1 next to the Exception Icon.

You can also find all follow-up tasks collected in the business object – where you have filled in and submitted the survey – in tab Follow-up Items.

You have the option to attach a summary of the filled-out survey in the form of a PDF to follow-up activities. To do this, enable the Attach summary to Follow-up Task indicator in the Details tab of your survey. This feature only works for the automatically generated Follow-up Tasks based on a Survey Exception. In the Attachments section of this task, you will find the PDF, which has the name Survey-Results with the parameter of the Datetime, when the survey was submitted.

An example of how this summarized PDF looks like you can see in the figure below.

Note: You can create Follow-up Tickets for the Survey Category Registered Products in the exact same way as for Follow-up Tasks.

11.2. Follow-Up Sales Quotes and Sales Orders

For the survey of the category Products, you can also create Follow-Up Items in form of a Sales Quote or a Sales Order. There are several use cases, when such a follow‑up action makes sense. An example would be, you are in a customer visit and it becomes clear that the customer does not have one of your products in use, but still shows interest in it. With a follow-up quote, you can quickly provide these customers with all the technical and commercial information about this product. A second use case would be that you conduct a phone survey with the customer and they tell you that their inventory is too low for one of your products. This way you can trigger an order directly from the survey.

To use this feature, navigate to the Follow-Up Actions tab in your survey. In the Actions section, add a new entry using the Add button. Select the Follow-Up Action Create Sales Quotes or Create Sales Orders. You can also create multiple entries in one survey – for example, create a Follow-Up Quote AND a Follow-Up Order. The follow-up action is always triggered based on a Question. This question is used as a condition – in the shown example the question In Use. The only question type allowed is multiple choice (select one). In addition to the question, you must now select the Answers under which the follow-up action is to be triggered. In the example shown, the answer Yes. At least, select the recommended quantity for the products in the Quantity Proposal data field. Here you can select all question from the type of Quantity – in the shown example How much needed.

After submitting the Survey, go in the Business Object in the tab of Sales Orders. In the shown example below a Survey for the Customer Visit Customer Inventory was submitted. Click on New to create a New Sales Order as Follow-Up Action.

Fill in all relevant fields, to create a sales order. In the sales order you will find the Item lines tab, where you can add products to this sales order. Click the Quick Add Products button to add products from your survey.

The first step takes you to the overview area to add products. Click on the Survey button here.

On the left you can select one or more Surveys from which you want to add the products. On the right you can add Products. In the Proposed Quantity data field, the quantity entered during the survey to question How much needed is entered. After adding the products, the sales order can be completed and sent to the customer as an order confirmation.

The process for Sales Quotes works exactly the same.

Do you need consulting from our experts?

The Customer Experience team at Camelot ITLab deals with exciting and challenging CRM related topics every day and serves a large portfolio of different customers from a wide range of industries. Trust in this collaboration and feel free to contact us at tlil@camelot-itlab.com.

Was this article helpful?

If you like our content we would highly appreciate your review on Trustpilot


#SAP C4C #SAP Cloud 4 Customer #Cloud 4 Customer #Cloud for Customer #SAP Sales Cloud #Sales Cloud #Survey #Signed #Follow-Up #Follow Up #Follow Up Action #Exception #Preconditions #Follow-Up Item Details

Receive the latest news

Subscribe To our SAP Sales & Service Cloud Newsletter

Get notified about new articles