Data Workbench Basics and Overview
If you are interested on how the Data Workbench works, you will find the answer here
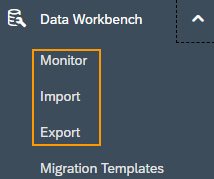
This article is about the basic functions of the data workbench, for this I will focus on the areas Monitor, Import and Export.
Monitor
The Monitor is basically an overview table of all Imports and Exports made. It contains information as the Type, object, created on date, number of errors, status and a few more. There are two Status you’ll find in the Monitor: finished and interrupted. Please note that finished does not mean finished without errors. Interrupted means that the Import/Export did not work at all. If there were errors occurring, they can be downloaded as an excel export by clicking on the number under Errors:

Besides errors there are also warnings. They can be downloaded the same way as errors, just click on the number under Warnings. Warnings occur when importing a file and indicate something you should look at, but the import went through nonetheless.
All imported and exported files can be downloaded by clicking on the file name. It contains a hyperlink, with which a CSV-file can be downloaded.
The Task Name can be useful when reporting a problem with the Data Workbench in an incident. Always refer to it, so that the SAP has an example which they can work with.
Import
The import function is mainly used for creating new objects or updating existing ones. There are also other possibilities like uploading attachments, but for giving an overview I’ll stick to the two main functions. Other cases will be explained in separate posts.
Some important information ahead: all excel files which shall be imported must be saved as a CSV-file and need to be coded in UTF-8. After saving the excel file open it in the editor and check if it’s already in UTF-8, if not change it to UTF-8 with the editor.
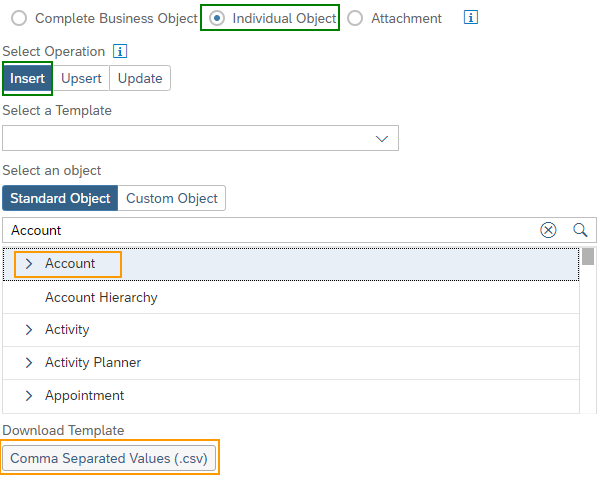
If you want to create new objects go into the Import area, select Individual Object and Insert. Then select the object which shall be uploaded, let’s say for example Accounts. As soon as the object is selected there will be folder with templates available for download. It contains several excel sheets such as template with all fields of the object and another one with field definitions.
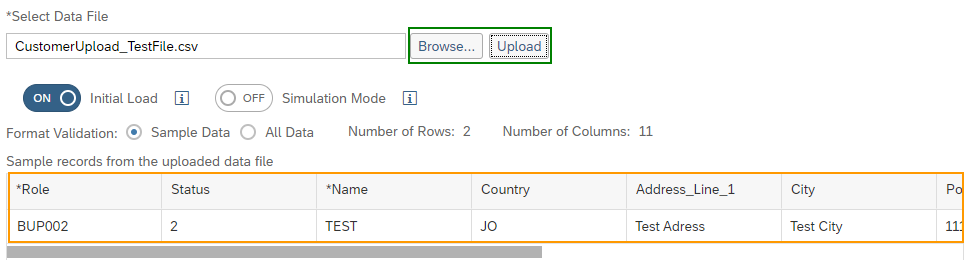
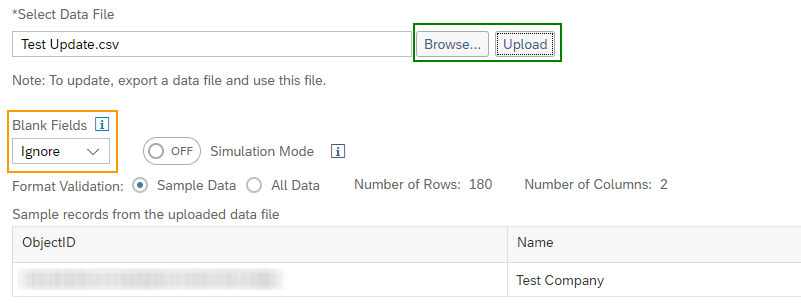
In the next screen you have to upload the CSV-file, which you want to use, by using the Browse button. Keep in mind that it has to be a CSV-file in UTF-8, otherwise an error will occur here. Then select Upload and small overview table will appear, where you can check the data from your file. This table only shows a sample from the CSV-file, not all data.
We continue by clicking Next in the bottom right of the screen. On the next page the mapping from the fields in the CSV-file to the fields in CRM has to be checked and confirmed by again selecting Next, the following screen can be skipped. At last click Import on the bottom right of the last screen, switch to the Monitor and wait for your upload to finish.
Updating objects works very similar to creating new ones. First select Update under Select Operation as shown above, then again select the object. From there on it’s pretty much the same as uploading objects, but with lesser steps. Upload your CSV-file, check the overview table, click on next and in the following screen the Import can already be started. Regarding Blank fields, there are the options are Ignore and Update. If Update is selected, blank fields from the CSV are translated to CRM, so in case there was any information in the CRM it gets deleted. Selecting Ignore is the common choice in most cases, because it prevents this from happening.
Export
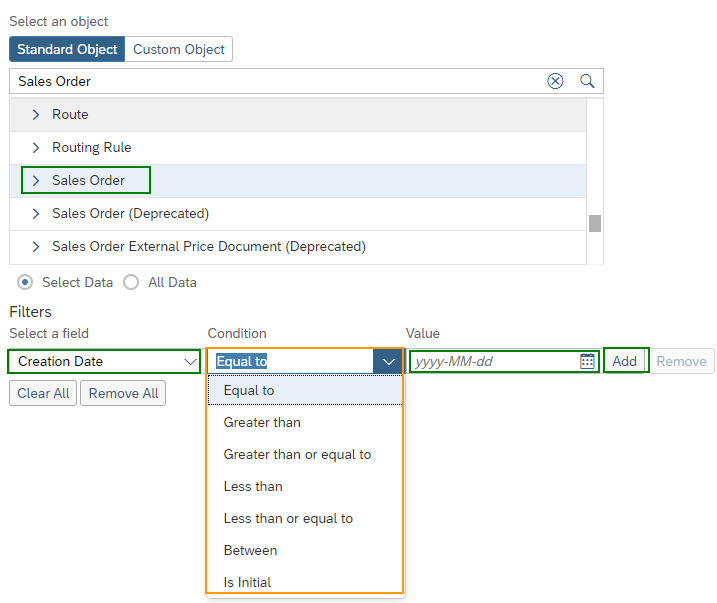
Regarding the usage of filters I want to share some personal experience: It seems that CRM has some trouble when 3 or more filters are used, because in the following screen the number of items ready for downloading will be zero. My personal advice here is to use only one or maybe two filters for best functionality, the rest can be done in the excel file itself.
After selecting the object and setting up filters jump into the next screen by clicking Next. Again a small overview table with sample data will be displayed and the export can be started.
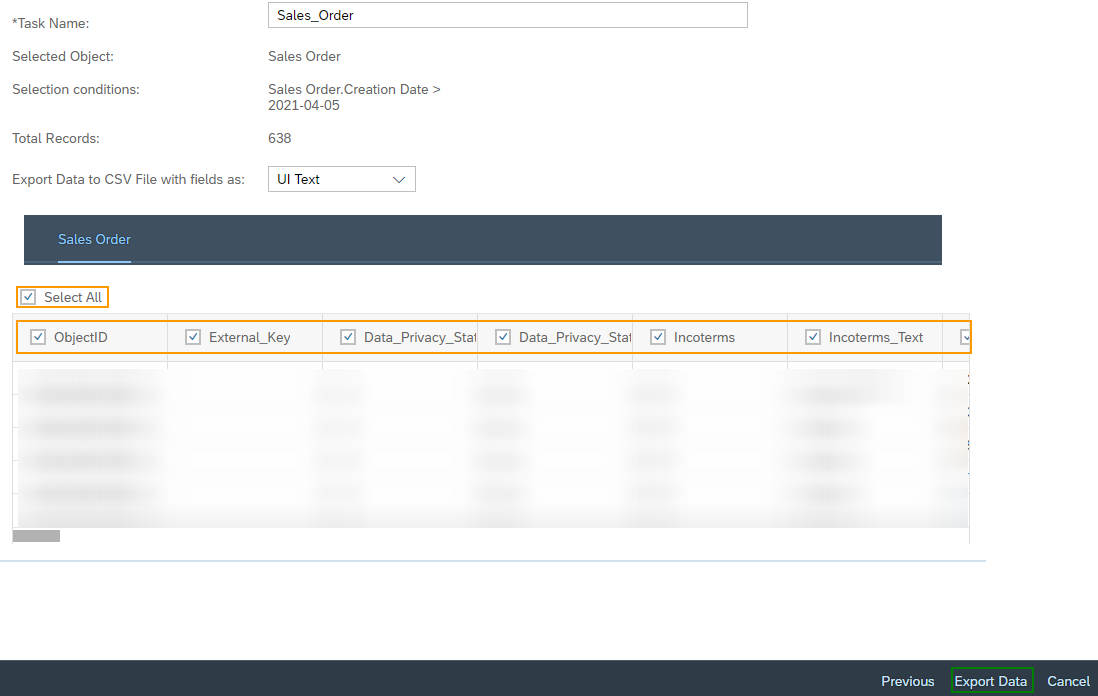
Here can also be specified which fields shall be downloaded, so if e.g. only the ObjectID is required only put the checkmark behind ObjectID.
Once the export has been started, once again head over to the monitor and wait for the export to finish. Then download your excel file as described above.
Notation of data types via the Data Workbench
When using the Data Workbench, it is important to understand how the syntax of each data type is structured. In this chapter, the individual data types and their properties are explained.
Amount
An amount always consists of three components in the Data Workbench. The amount itself, the currency as code and the currency as text. To import amount data types, the amount and the currency as code are sufficient. In ISO 4217 you will find all currency codes.
Note:
- Separate the digits before and after the decimal point with a period.
- The currency and the amount itself are single database entries
Notation:
AmountDigit,AmountCurrency
###.##,ISO4217 3 Letter Currency Code
Example:
AmountDigit,AmountCurrency
350.99,USD
129.5,EUR
Date
The Date data type consists of the year (Y), month(M) and day(D) without the time.
Notation:
YYYY-MM-DD
Example:
2022-05-01
2021-12-31
Date/Time
The Date data type consists of the year, month, day and the time. The time consist of Hours (H), minutes (M) and seconds (S). The Date and the Time are separated by a capitalized T.
Note:
- The long time T format specifier. It simply separates the Date with Time
- Z stands for Zero Hour Offset (00:00) – also known as Zulu Time
- The time zone for a specific Business Object is noted in a separated data field
Notation:
YYYY-MM-DDTHH:MM:SSZ
Example:
2022-05-01T16:30:45Z
2021-12-31T23:59:59Z
Decimal Number
Is a number without a unit, which can be used with or without decimal digits.
Notation:
###.##
Example:
123.00
1099.99
Every email address consists of three components: the local-part, the @ symbol and the domain name. Since special characters can occur in an email address, always use quotation marks at the beginning and end of the email address for secure upload with Data Workbench.
Notation:
“local-part@domain-name”
Example:
“hello@c4ciseasy.com”
“sales@sprockets.com”
ID
An ID always includes a unique object number from the SAP Sales Cloud. This object number may be an employee, a contact person, a customer, etc.
Indicator
An indicator is a Boolean that has only two states: True or False. Write these values either completely in upper case (TRUE/FALSE) or completely in lower case (true/false).
List
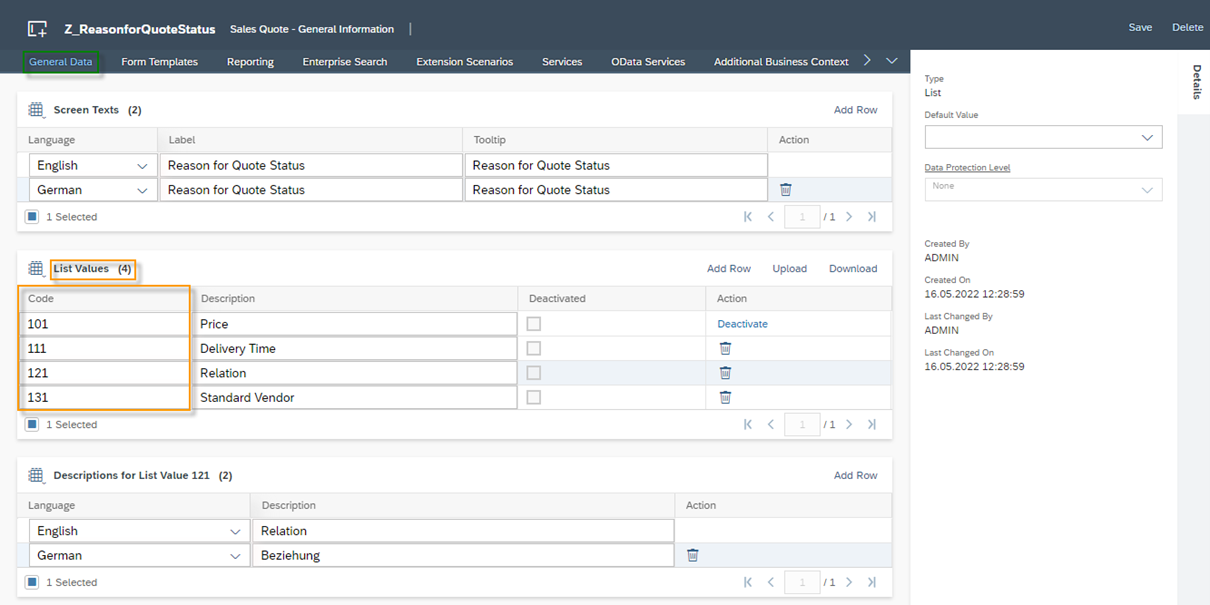
A list consists of several entries, and the Business User can only select one entry in the system. Each entry in turn consists of a code and a description. In the Data Workbench, you will therefore always find these two entries for this data type. Here, too, it is always recommended to work with the code, since this can be interpreted unambiguously by the system. In the figure below you can find a data field of type List. In the left column you can find the Code and in the right column the Description. Below you will find the appropriate translation per custom system language.
Multivalued List
A Multivalued List is basically like a list. The difference here is that the Business User can select multiple entries. Consequently, you will also find several comma-separated entries in the data column in the Data Workbench. In the syntax of a csv file, you must mark these entries with apostrophes so that they count as a single entry.
Notation:
“CODE1,CODE2,CODE3”
Quantity
A quantity always consists of three components in the Data Workbench. A decimal number, a unit as code and the unit as a text. To import quantity data types, the decimal number and the unit as code are sufficient. The Unit could be a length, weight, etc.
Units:
Unit | Unit | Unit | Unit | Unit | Unit | Unit | Unit |
5B | Batch | GLL | Gallon (US) | MMK | Square millimiter | TNE | Ton (metric ton) |
ACT | Activity | GRM | Gram | MMT | Millimeter | WEE | Week |
ANN | Year | HUR | Hour(s) | MON | Month | XBG | Bag |
CMK | Square centimeter | INH | Inch | MTK | Square meter | XBO | Bottle, non-protected, cylindrical |
CMT | Centimeter | KGM | Kilogram | MTQ | Cubic meter | XBX | Box |
DAY | Day(s) | KMT | Kilometer | MTR | Meter | XCI | Canister |
DZN | Dozen | KT | Kit | ONZ | Ounce | XCR | Crate |
E49 | Working day(s) | LBR | Pound | P1 | Percent | XCS | Case |
EA | Each | LTN | Tonne (UK) or long ton (US) | PR | Pair | XCT | Carton |
FOT | Foot | LTR | Liter | SEC | Second [unit of time] | XPK | Package |
FTQ | Cubic foot | MIN | Minute [unit of time] | SMI | Mile (statute mile) | XPX | Pallet |
GLI | Gallon (UK) | MLT | Milliliter | STN | Ton (US) or short ton (UK/US) | XSX | Set |
YRD | Yard |
Notation:
QuantityDigit,QuantityUnit
###.##,UNIT
Example:
QuantityDigit,QuantityUnit
356.5,KG
Text
For the data type Text you are allowed to use letters, characters, special characters, numbers and spaces
Time
The time data type consists of Hours (H), minutes (M) and seconds (S).
Note:
- The time zone for a specific Business Object is noted in a separated data field
Notation:
HH:MM:SS
Example:
16:30:45
20:15:00
Web Address
Every web address consists at least of two components: the scheme (e.g. https, http, etc.) and the domain name. Since special characters can occur in an web address, always use quotation marks at the beginning and end of the web address for secure upload with Data Workbench.
Notation:
” Scheme://Domain name/Path/”
Example:
“https://www.c4ciseasy.com/image1.png”
“https://www.sprockets.com”
Do you need consulting from our experts?
The Customer Experience team at Camelot ITLab deals with exciting and challenging CRM related topics every day and serves a large portfolio of different customers from a wide range of industries. Trust in this collaboration and feel free to contact us at tlil@camelot-itlab.com.
Was this article helpful?
If you like our content we would highly appreciate your review on Trustpilot
#SAP C4C #SAP Cloud 4 Customer #Cloud 4 Customer #Cloud for Customer #Data #DataWorkbench #Workbench #Import #Export #Monitor #Administrator