Data Workbench
Attachment Upload
Uploading Attachments into CRM is a more complex process and requires help of a few VBA macros. This article explains how to upload attachments without generating any errors.
To get a better understanding an example will be used, here: how to upload customer attachments. All regulations and the procedure stay the same for uploading attachments of other business objects.
Before getting to the Import itself some preparations must be made. First a new folder must be created, the name of it doesn’t matter as well as where it is located. This folder hast to contain the attachment documents and a CSV file called manifest, this one will be explained later. Collect all attachments and copy them into the freshly created folder. Regarding the name of these documents there a few aspects to be considered:
- Only latin letters are allowed, if your language is using special characters then replace them (e.g. german ö to oe, etc.)
- Do not use dashes, the system doesn’t accept documents with such in its name
- Do not leave spaces, mark spaces between words with underscores. Hyphens should also be possible, but underscores should be used if possible, as they do not cause problems during the upload
If these requirements are not already met, the documents have to be renamed. To do this use a VBA macro, otherwise this would have to be done manually. The code for the macro is the following:
Sub renamefile()

Dim oFSO As Object, oFolder As Object, oFile As Object

Dim path1 As String, name1 As String, name2 As String

Dim fn1 As String, fn2 As String

Dim i As Integer

i = 1

Set oFSO = CreateObject("Scripting.FileSystemObject")

path1 = "C:\\Desktop\CustomerAttachments\"     ' replace with your path!

Set oFolder = oFSO.GetFolder(path1)

For Each oFile In oFolder.Files

name1 = oFile.Name

name2 = Replace(name1, ChrW(8212), "_")     ' ferrule

name2 = Replace(name2, "Ä", "Ae")           ' special german characters

name2 = Replace(name2, "Ö", "Oe")

name2 = Replace(name2, "Ü", "Ue")

name2 = Replace(name2, "ä", "ae")

name2 = Replace(name2, "ö", "oe")

name2 = Replace(name2, "ü", "ue")

name2 = Replace(name2, "ß", "ss")

name2 = Replace(name2, " ", "_")            ' blank space

name2 = Replace(name2, "-", "_")            ' hyphen

name2 = Replace(name2, "&", "and")          ' and

name2 = Replace(name2, ",", "")             ' comma

name2 = Replace(name2, "+", "and")          ' plus

fn1 = path1 & name1

fn2 = path1 & name2

Name fn1 As fn2

Cells(i, 1) = name1       ' old file name in column A

Cells(i, 2) = name2       ' new file name in column B

i = i + 1

Next oFile

End Sub
Remember to adapt the folder path in the code, then enter it into the VBA section of excel and execute it. Now all document names are eligible for the import. In the next step the manifest has to be created. The manifest is a CSV file in UTF-8 coding, which has to be named manifest.csv with no capitalized letters (no other name possible!). It requires the following information (for accounts):
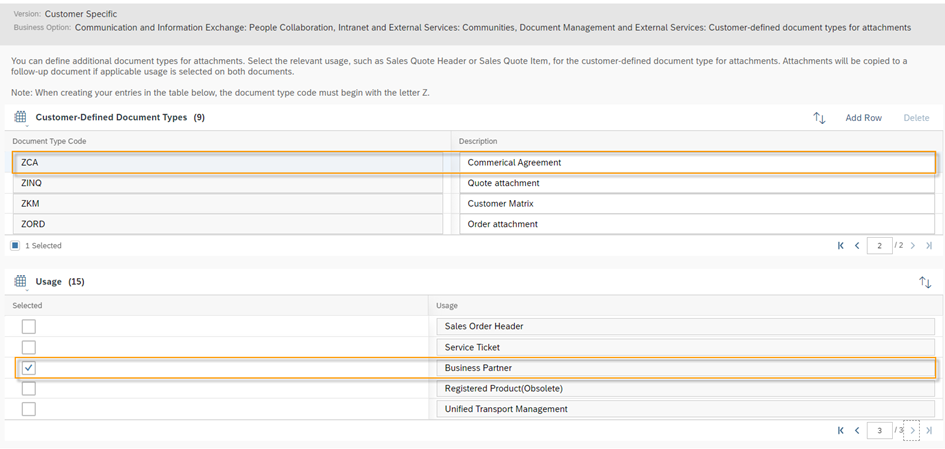
In this case the CorporateAccountExternalKey is the same as the ObjectID of the Account. The WebLink is a link referring to a website and is an optional information, which can be left empty. To get an overview of all attachment types (and to find the codes for these types) navigate to the Work Center View Implementation Projects in the Business Configuration Work Center, select the current solution and open the activity list.

Search for the keyword “attachment” and open the task Customer-defined document types for attachments.

Here all document types from every objects can be checked.
To get the file pathes and document names another VBA macro can be used. After putting all documents in the new folder mentioned above, run the following macro:
Sub LoopThroughFiles ()

Dim oFSO As Object
Dim oFolder As Object
Dim oFile As Object
Dim i As Integer

Set oFSO = CreateObject("Scripting.FileSystemObject")
Set oFolder = oFSO.GetFolder("C:\\Desktop\CustomerAttachments\")

For Each oFile In oFolder.Files

 	Cells(i + 1, 1) = oFile.Name

    	i = i + 1

Next oFile
End Sub
As before, remember to adapt the folder path. This macro will get all file paths. By copying these and deleting the format (e.g. “.pdf”) you also get the file names. Take this information and put it into the manifest. Save this file in CSV format and UTF-8 coding. In case excel doesn’t save the file in UTF-8 right away, use the Windows Editor to do this.

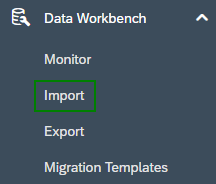
Now generate a ZIP folder, which contains all attachment documents and the manifest. Store it in the same folder as the documents and the manifest. After this has been done we can head over to the SAP Sales Cloud to set up the Import. For this navigate to the Import Work Center View of the Data Workbench Work Center.
Select Attachment and the object, e.g. Account attachments.
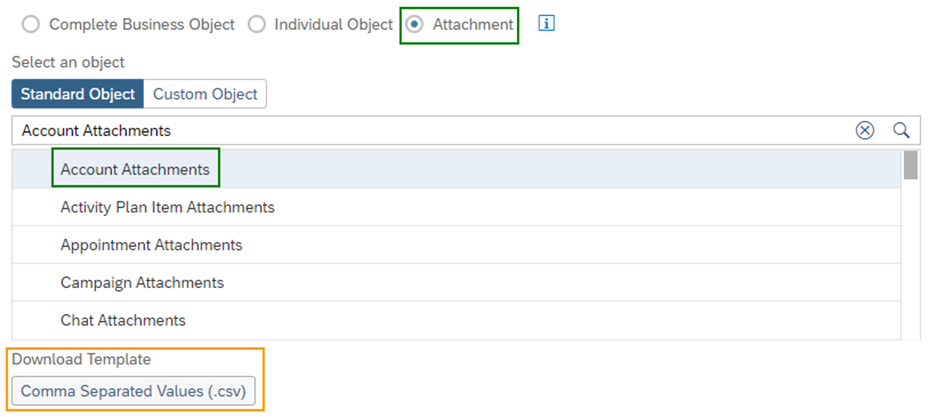
After selecting the object there will be a folder available for download, which contains a Code List for the Type Codes, a file with field definitions and a template for the manifest. These documents can be very helpful, especially when it’s the first time uploading attachments.
In the following screen upload the ZIP folder, containing the manifest and attachment documents, by using the Browse and Upload buttons. Check the overview table, which appears after uploading the ZIP folder, for any mistakes and turn the Simulation Mode OFF.

At last check the final overview screen, give the task a name (or leave the auto-generated one) and start the Upload by clicking on Import. Now head over to the Monitor, wait for the Import finish and check for errors and warnings.
Do you need consulting from our experts?
The Customer Experience team at Camelot ITLab deals with exciting and challenging CRM related topics every day and serves a large portfolio of different customers from a wide range of industries. Trust in this collaboration and feel free to contact us at tlil@camelot-itlab.com.
Was this article helpful?
If you like our content we would highly appreciate your review on Trustpilot
#SAP C4C #SAP Cloud 4 Customer #Cloud 4 Customer #Cloud for Customer #Data #DataWorkbench #Workbench #Import #Export #Monitor #Administrator #Attachments #AttachmentUpload #Upload