Understand The Basics as a User
Filter/Query
If you are using SAP Sales Cloud as a User, it is essential that you understand the basics before you go into detail. Basically, it's important to understand how the Cloud is structured, how you can quickly find information - i.e. Search and Filter - how to personalize your information so that you can work with it perfectly and how to use the Feed function, Calendar and Messages.
Navigation for User - Understand the Basics
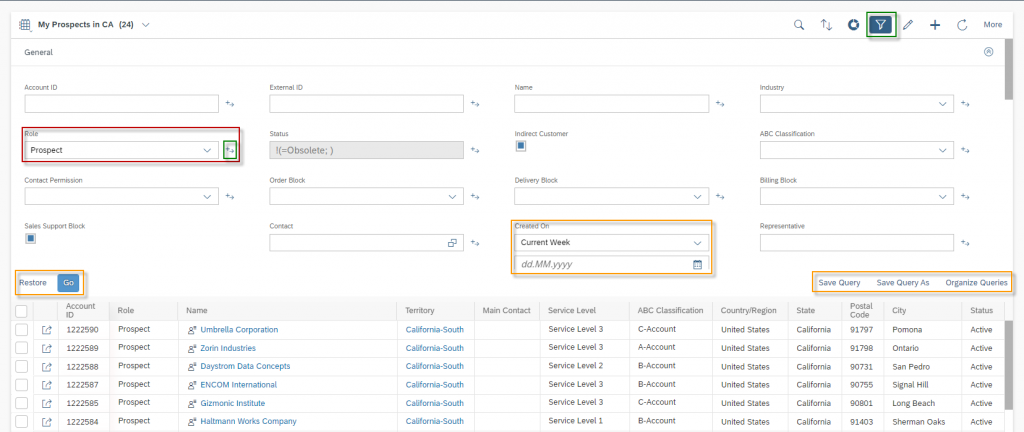
Each Work Center View offers the option to set and manage different Queries. Clicking the Advanced Search button opens the filter options above the tabular view shown in below figure. When you click the Advanced Search button ![]() again the filter options will be closed. The matching search term for the desired field can simply be entered or selected in this area.
again the filter options will be closed. The matching search term for the desired field can simply be entered or selected in this area.
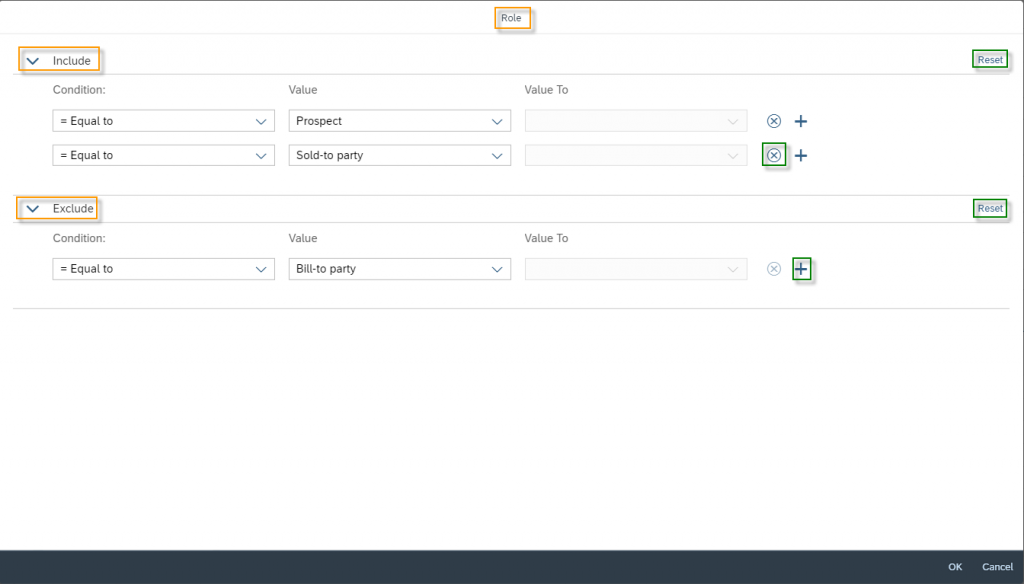
More advanced filtering options can be applied to a field by clicking on the More Options ![]() button. Here it is possible to Include and/or Exclude multiple search terms. The following example shows that the role should be filtered by the values Prospect and Sold-to party. With a click on the Add button
button. Here it is possible to Include and/or Exclude multiple search terms. The following example shows that the role should be filtered by the values Prospect and Sold-to party. With a click on the Add button ![]() more rows can be added and with a click on the Remove button
more rows can be added and with a click on the Remove button ![]() single rows can be removed. If the user presses Reset, all rows will be removed on Include or Exclude.
single rows can be removed. If the user presses Reset, all rows will be removed on Include or Exclude.
The following table shows which conditions can be set for data fields
Condition
=
>
>=
<
<=
…
|
is initial
Explanation
Equal to
Greater than
Greater than or equal to
Less than
Less than or equal to
Between
Contains pattern
Is empty
Data Fields
All
Number
Number
Number
Number
Number
Text & Number
All
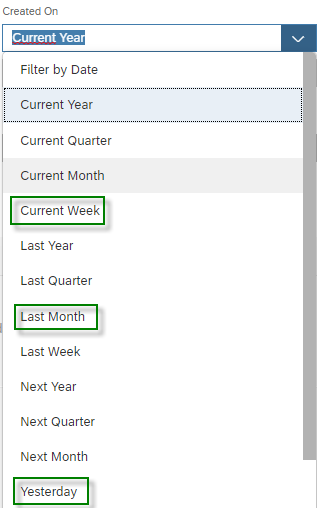
For each date field, the user can distinguish between two different filter options. The first option would be to select Filter by Date and enter a fixed date. Of course, it is still possible to work with several conditions via More Options – however, this filter option always remains static. The second option is very suitable if the query is to be built dynamically. Open the dropdown at a date field and you can now select a dynamic date filter such as Current Week, Last Month or Yesterday.
It is also important to understand how a field of type Indicator can be filtered. An indicator knows only two states: True or False or in other words Enable and Disable. The following illustration explains what has to be considered:
Means that the Sales Support Block field is either enabled or disabled
Means that the Sales Support Block field is disabled
Means that the Sales Support Block field is enabled
If the Business User wants to create a new Query, it makes sense to start from the All Query, which means that the Business User sees all entries in the Work Center View unfiltered. The danger of filtering from another Query, of course, is that this Query already excludes data that might be of interest to the User. As an example, you could imagine that the Business User is filtering from the Accounts In My Terrtories Query and wants to see all A Accounts. However, the User would also like to see the Accounts outside of their sales territories, in which case they would not be able to see them.
Let’s assume in an example that the User wants to see all Prospects classified as A‑Accounts, because they have high sales potential. The filter settings can be confirmed by clicking the Go Button. The number in brackets after the Query Name always indicates how many entries were found. As you can see, from the Account database of 67,359 Accounts, there are a total of 15 Accounts that meet these criteria. By clicking on Restore (bottom left corner) all settings done before saving will be undo.
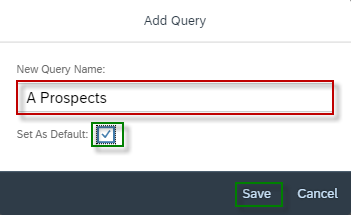
By clicking on the Button Save Query As it is possible to save this filter settings. The advantage is when you need to have more often an overview about this Accounts, that you do not have to do this again any time. When clicking the button a pop up appears where you can enter a Name for this Query and set this Query as a default by enabling Set As Default. This option means that whenever you navigate to the Work Center View Accounts this filter will apply automatically and you will see always first all A‑Prospects. Confirm the setting with Save.
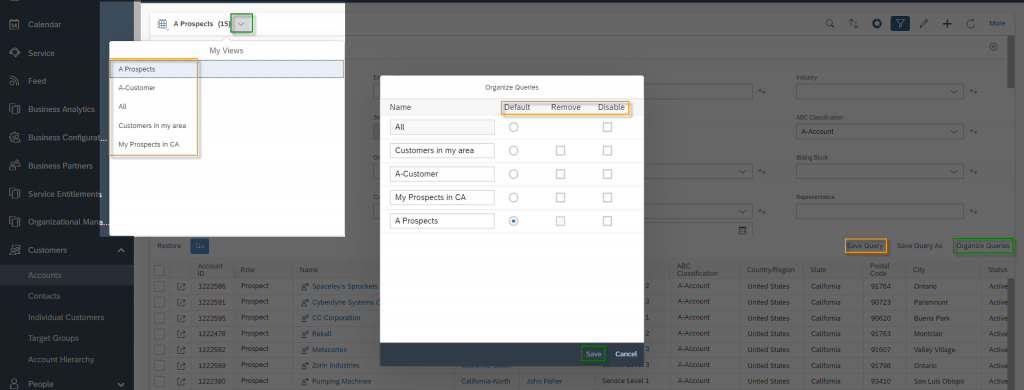
All settings you have made for your Queries can be managed using the Organize Queries button. Here you can customize the Names of your Queries, change the Default, Remove or Disable Queries. The difference between removing and disabling is that with removing the Query is deleted and with deactivating the filter is only no longer visible in the selection, but can be reactivated at any time. The Queries where the name is grayed out are Queries provided by the Administrator. In this example the filter All. These Queries cannot be deleted, only deactivated. By clicking Save you confirm the changes in the organization of your Queries. In the top left corner of the Work Center View you can see all the Queries you have set by clicking on the downward pointing arrow. Here you can see not only your own Queries, but also the Queries provided by the Administrator. Here you can see only the selection of active Queries. The Save Query button remains as the last to be explained option. This can be used if an existing Query – which was set up by a Business User – is to be overwritten.
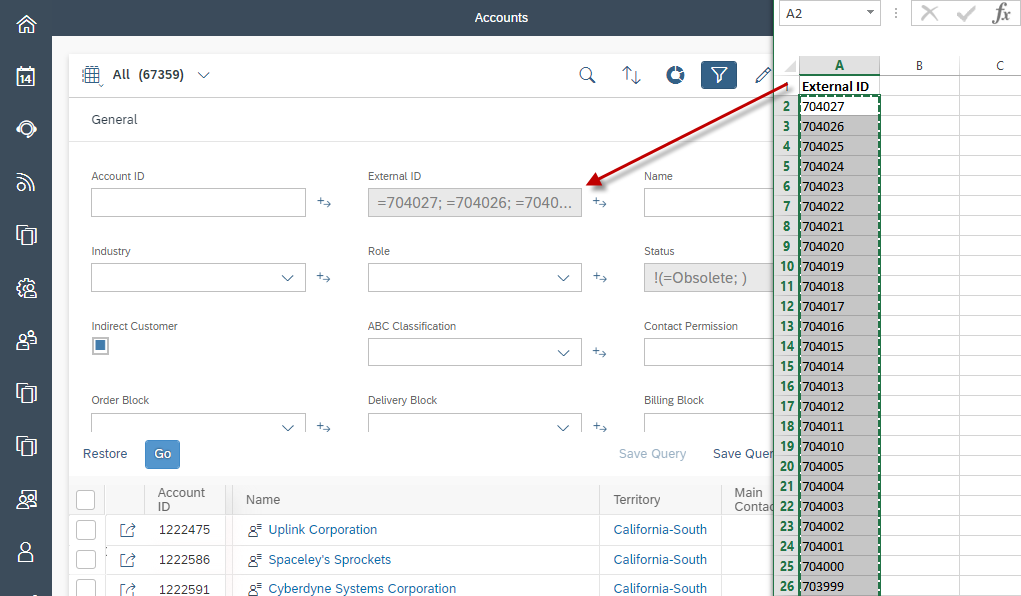
What is also still possible – and is also a useful function – to copy data from Excel and paste it into a text field. SAP Sales Cloud automatically recognizes that there are different search terms and separates them quite automatically. This is also possible from other file types like Word or TXT files.
The Customer Experience team at Camelot ITLab deals with exciting and challenging CRM related topics every day and serves a large portfolio of different customers from a wide range of industries. Trust in this collaboration and feel free to contact us at tlil@camelot-itlab.com.
Was this article helpful?
If you like our content we would highly appreciate your review on Trustpilot
#SAP C4C #SAP Cloud 4 Customer #Cloud 4 Customer #Cloud for Customer #Sales Cloud #Basics #Filter #Query

