Search
Close this search box.

Creation of a Workflow

Workflows
Creation of a Workflow

Workflows are a wonderful way to increase the degree of automation of the SAP Sales Cloud and SAP Service Cloud - without any programming at all. Thus, the usage of workflows is completely assigned to the no-code segment and are to be understood like "if-then-rules"

They offer the possibility to trigger field updates, actions or to send notifications, E-Mails or messages when defined criterias are met. In the following a few example logics are listed, which can be implemented with workflows:

  • When a quote is created with a total over 100,000 USD, the sales manager receives an E-Mail for informing him proactively
  • When a ticket is escalated, it is automatically reassigned to the responsible service manager
  • When the status of an Opportunity changes, all involved employees are receiving a notification

The Workflow Rules Work Center View is in the Administrator Work Center. Here you’ll find an overview table, which by default shows all Active Workflows.

For each Workflow withing the OWL you will find following information:

Description

The description of the workflow should be chosen explicitly. This way, it can be quickly recognized what this workflow is about. This can be maintained in any system language.

Business Object

For each workflow, you must select the Business Object for which it is valid. Here is the complete list of all possible Business Objects:

Account

E-Mail

Time Report

Activity Task

Incident

Sales Order

Appointment

Individual Customer

Sales Quote

Assignment

Installation Point/Registered Product

Service E-Mails

Call List

Installed Base

Ticket

Campaign

Leads

Time Report

Contact

Opportunity

Transport Request

Content Transfer

Phone Call

Visit

Deal Registration

Sales Data


Type

The type of the workflow specifies which action should be triggered when the conditions have been met. There are the following types:

Action – In some Business Objects you will find an action menu item. This often includes global actions for the respective Business Object. You can also trigger these via workflows. The Business Object Account is shown here as an example. There are actions of type Change Image, Block, Set as Obsolete and Derive Territory

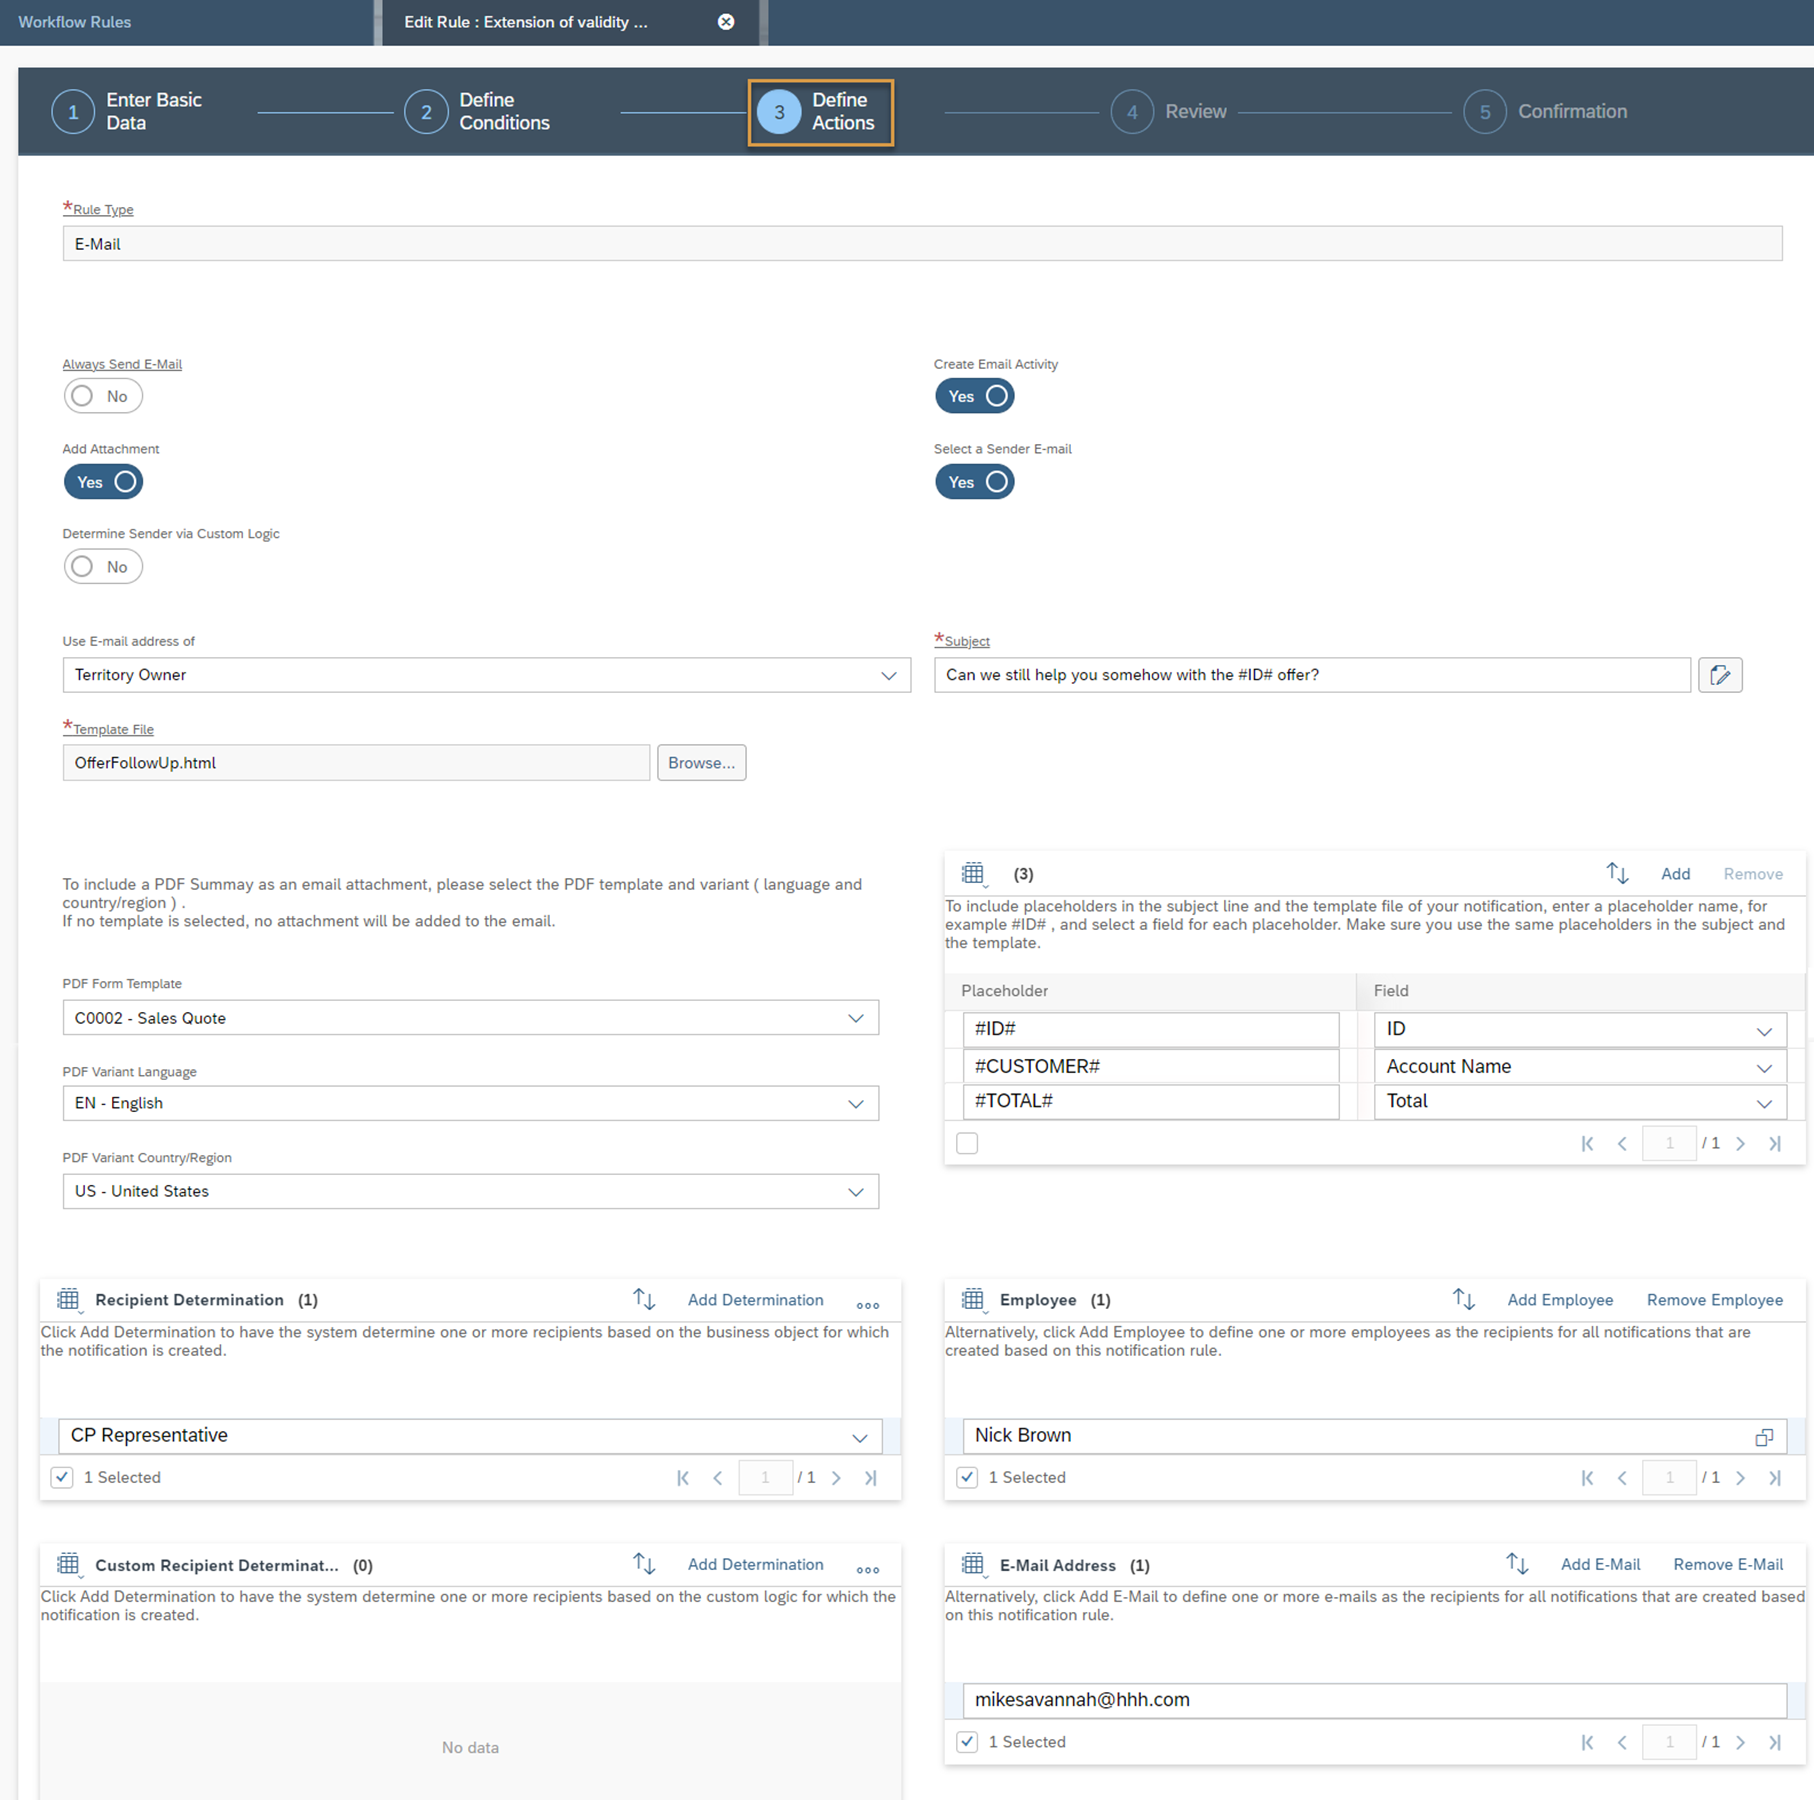
E-Mail – An E-Mail will be sent to recipients. These can be set statically (e.g. always to mail@provider.com) or dynamically (e.g. always to the service technician of a ticket)

Field Update – Setting of field values

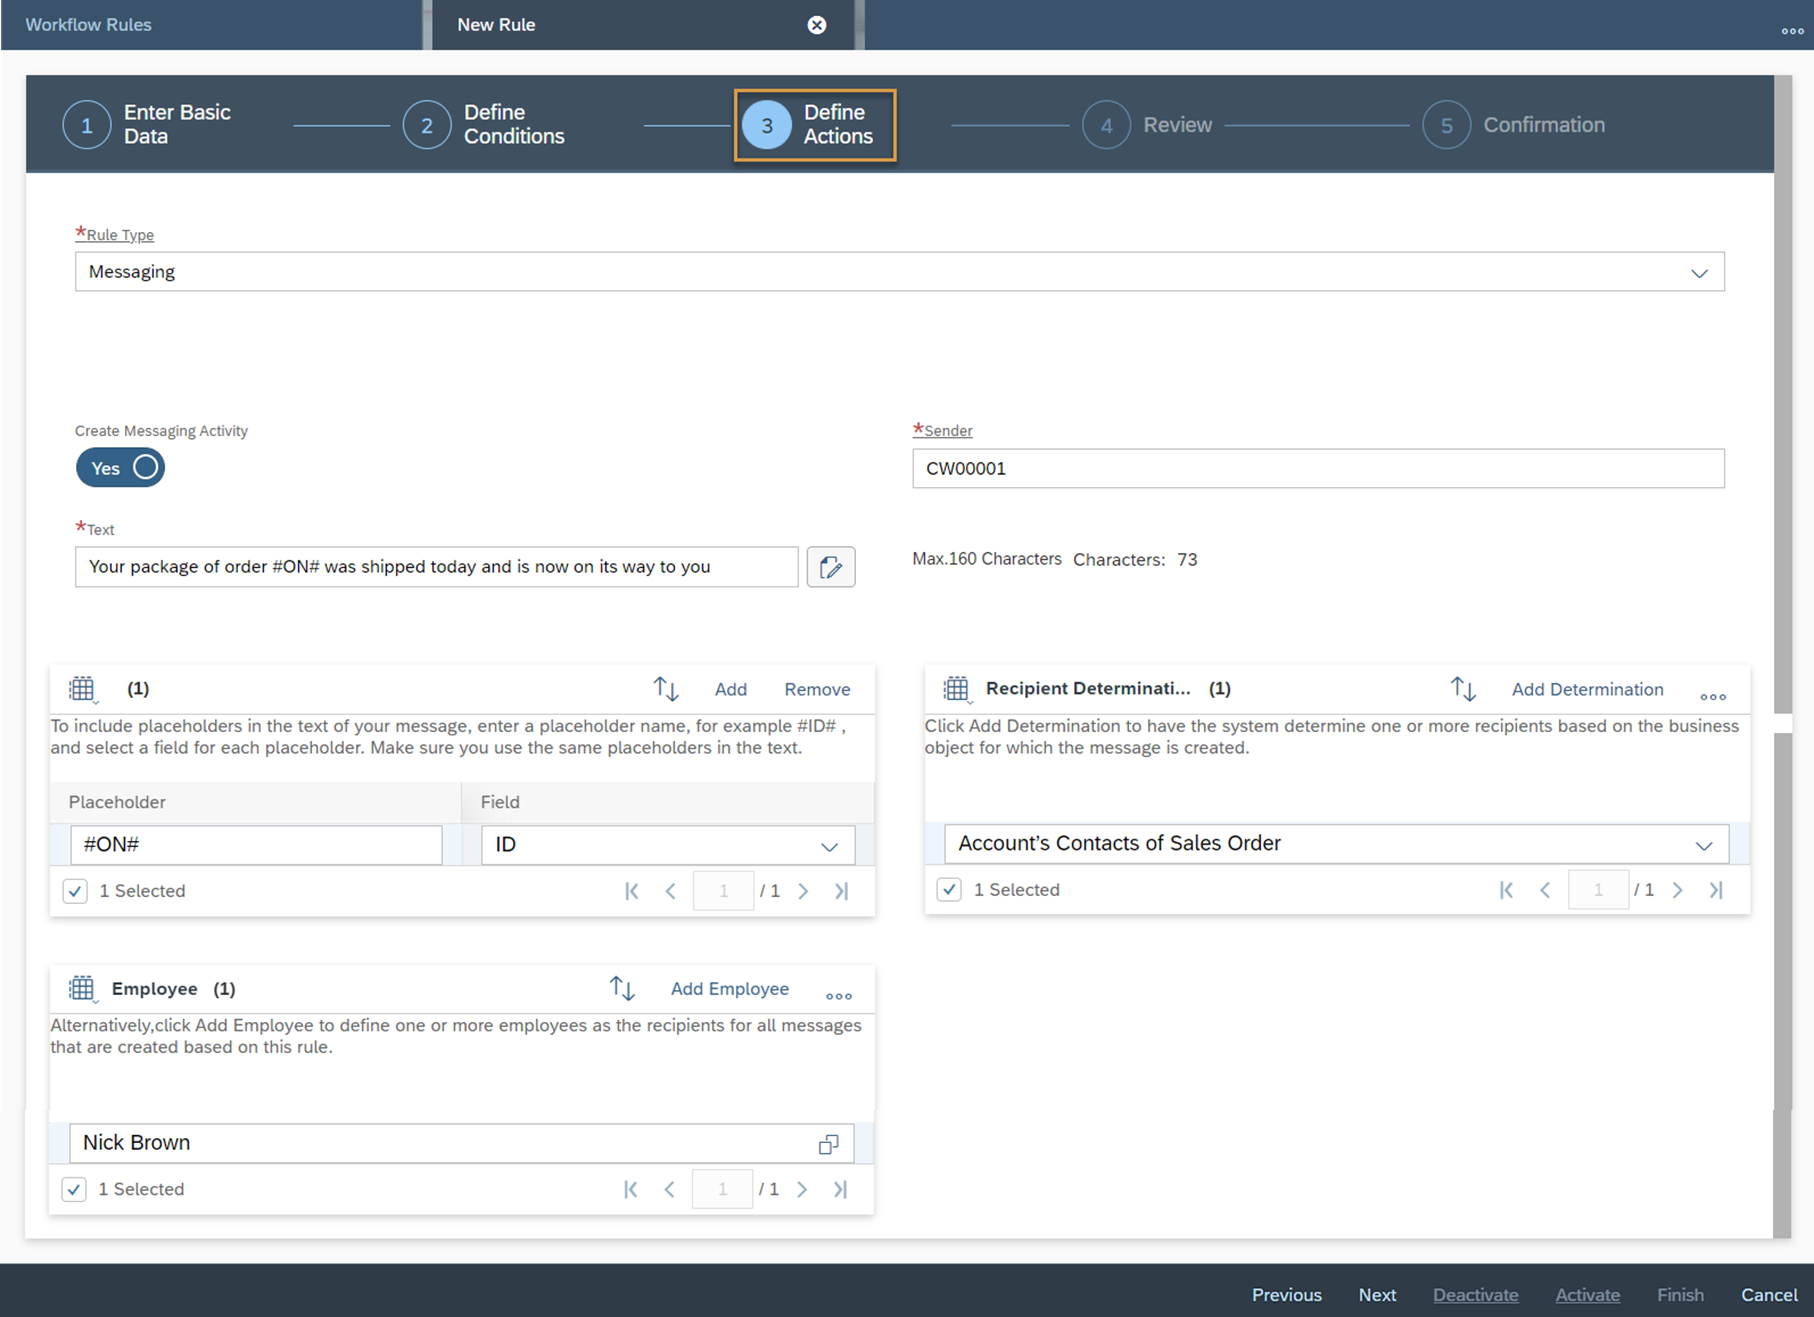
Messaging – A SMS will be sent to recipients. These can be also set statically or dynamically

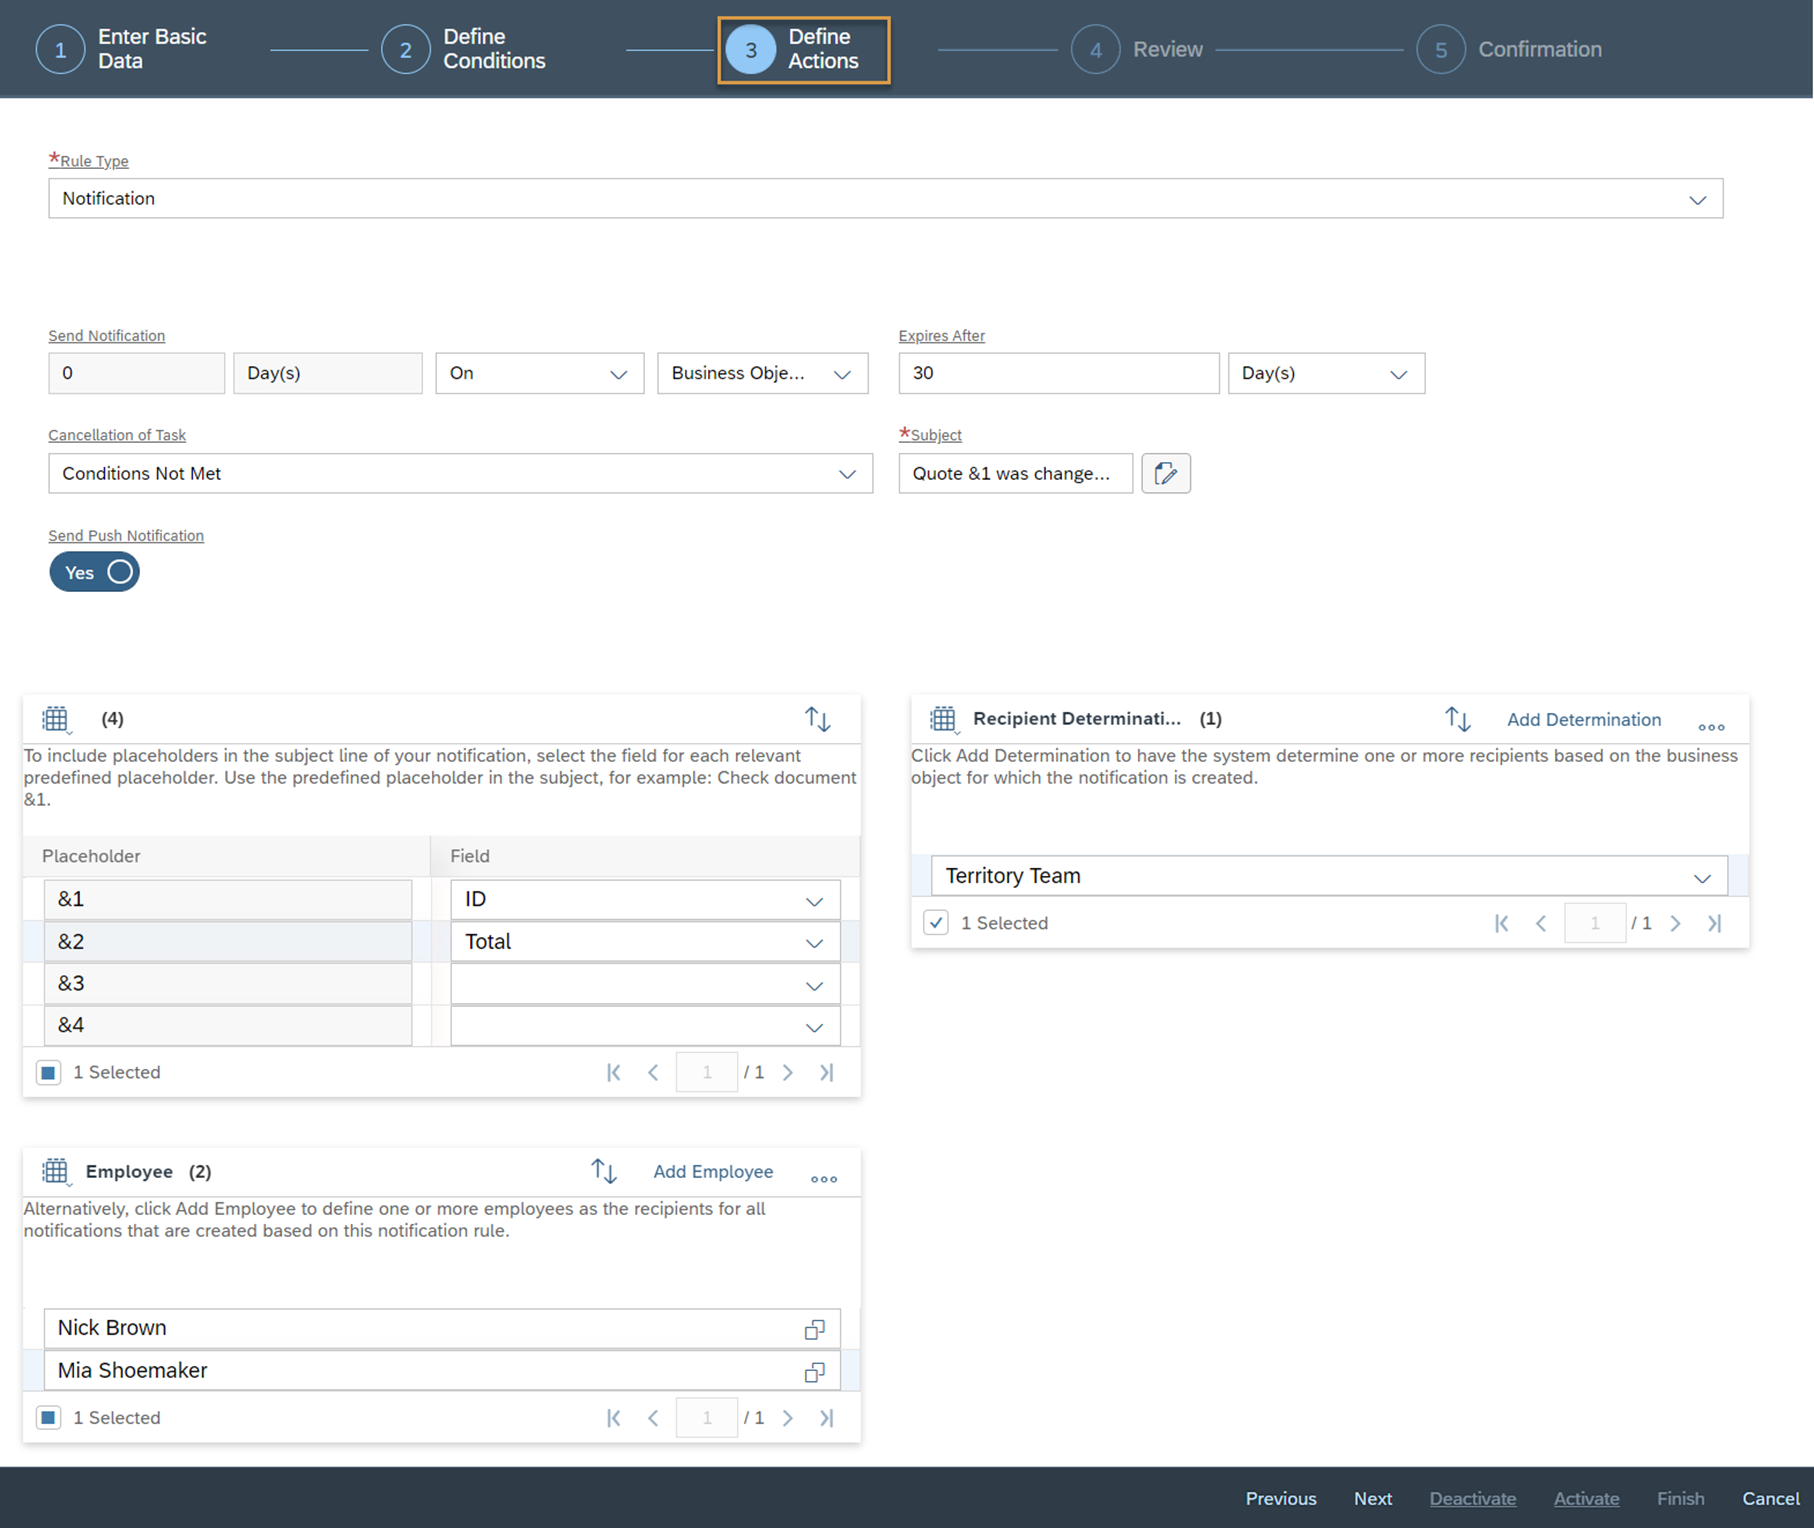
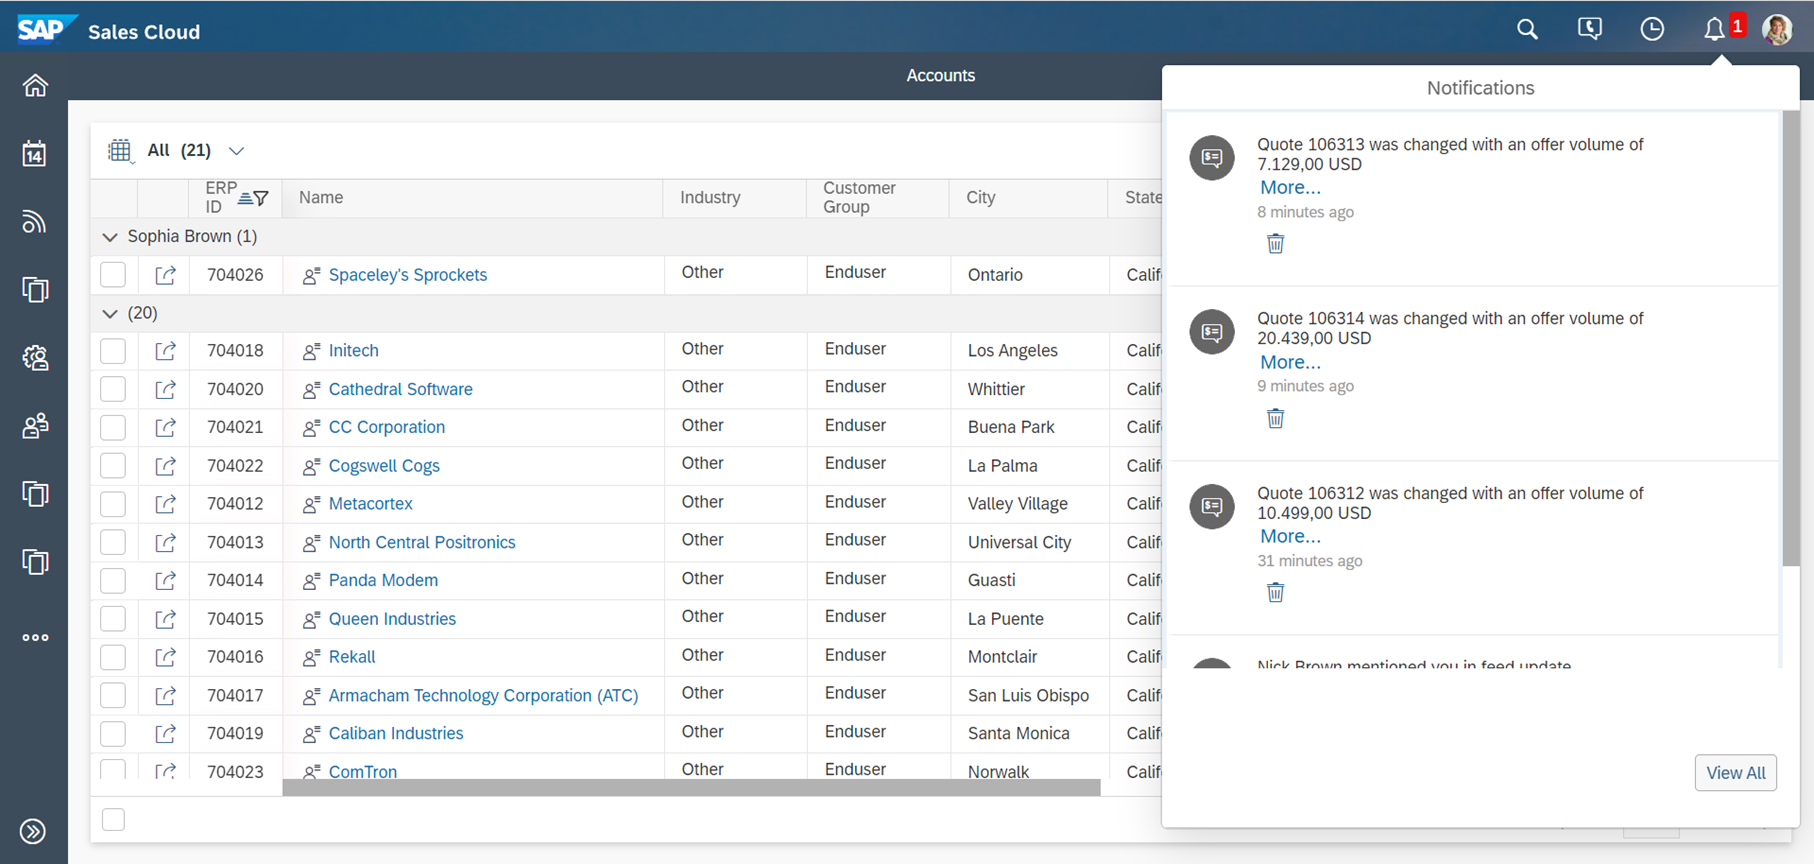
Notification – A Notification will be sent to recipients. These can be also set statically or dynamically

Social Media – A Social Media Post, e.g. on Facebook can be triggered
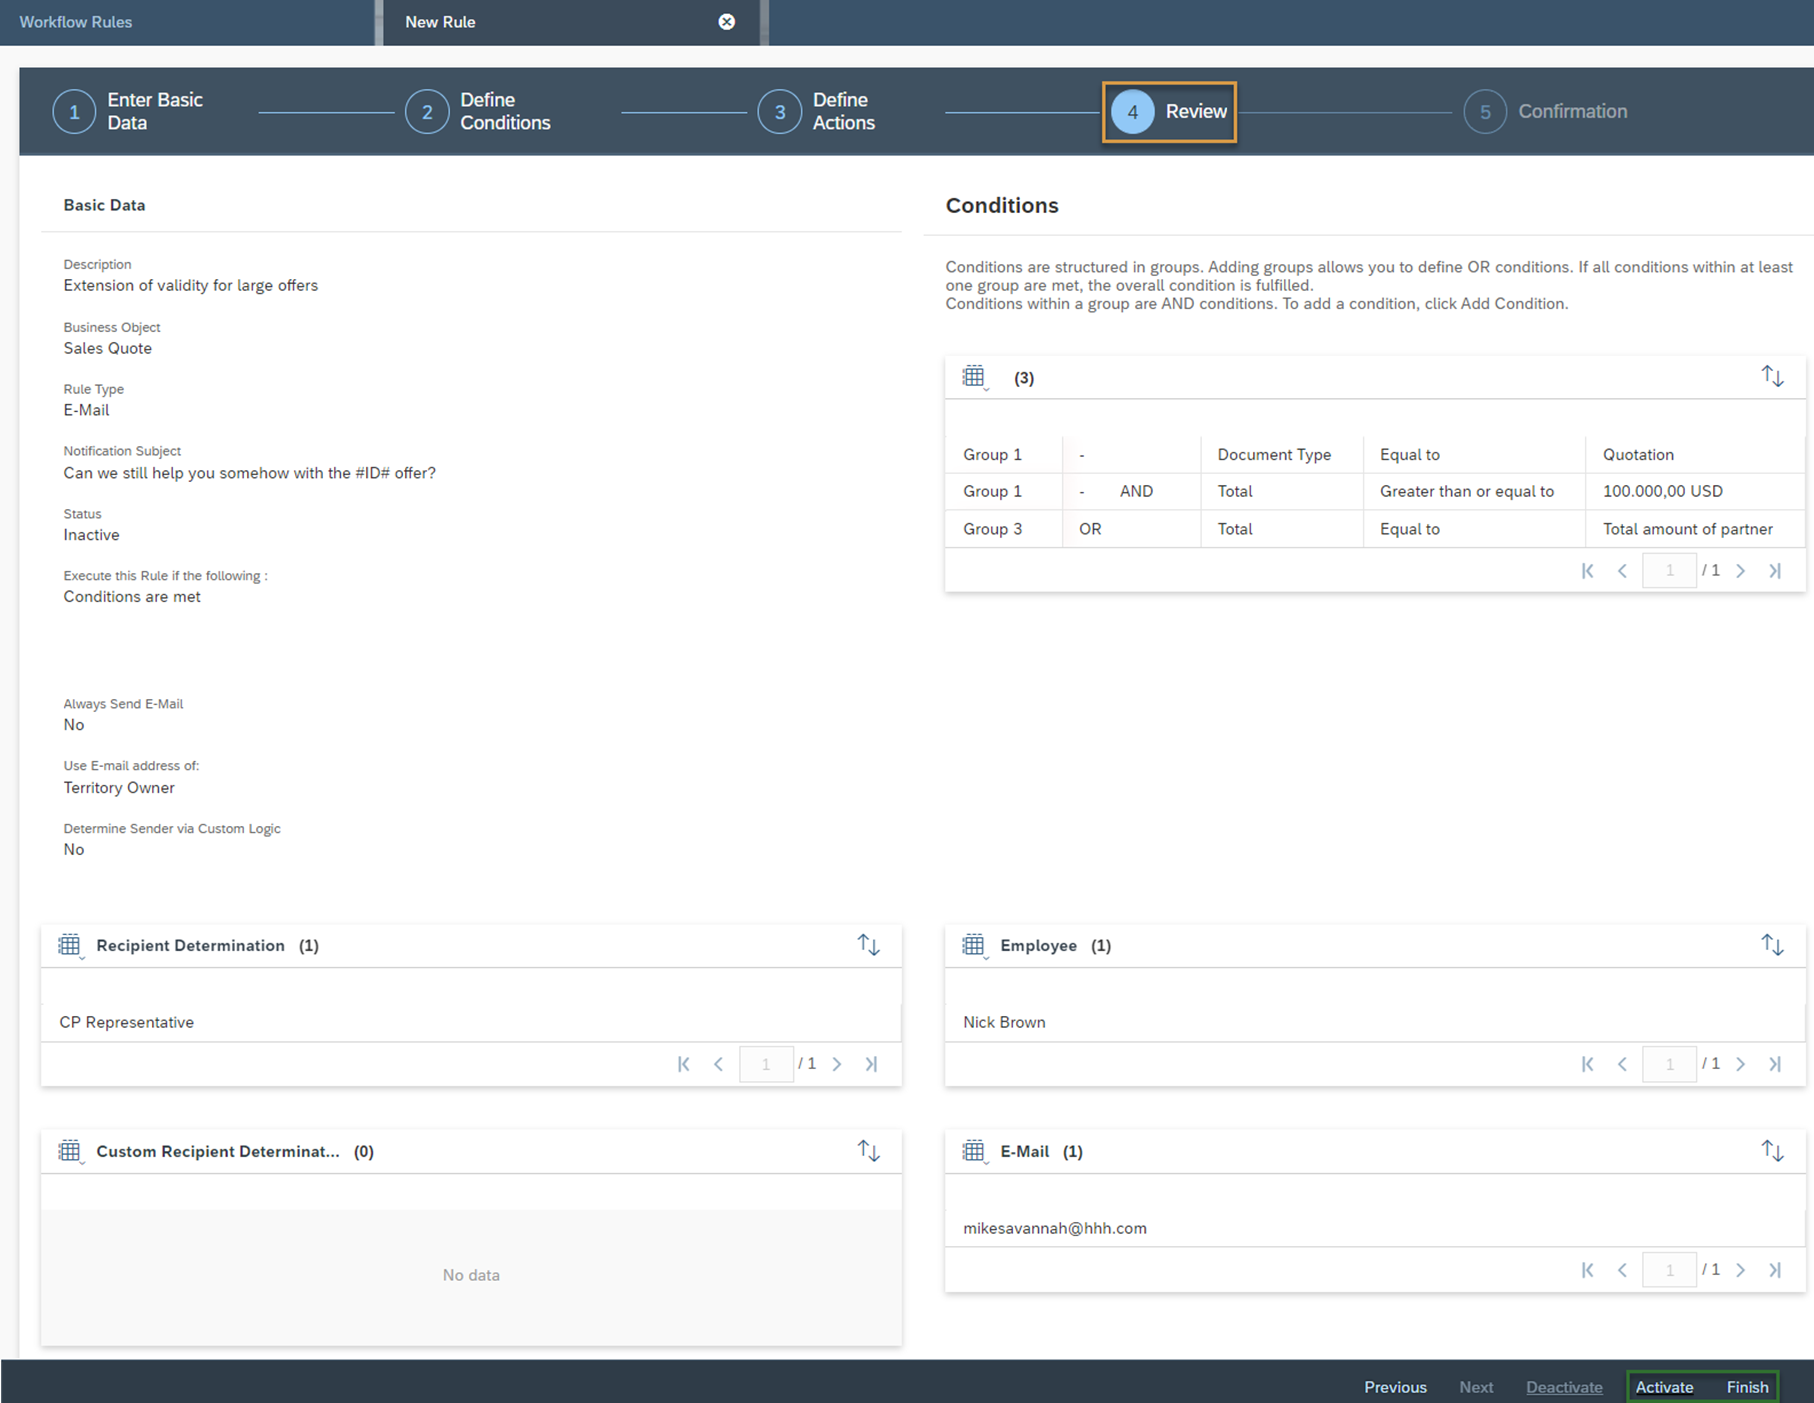
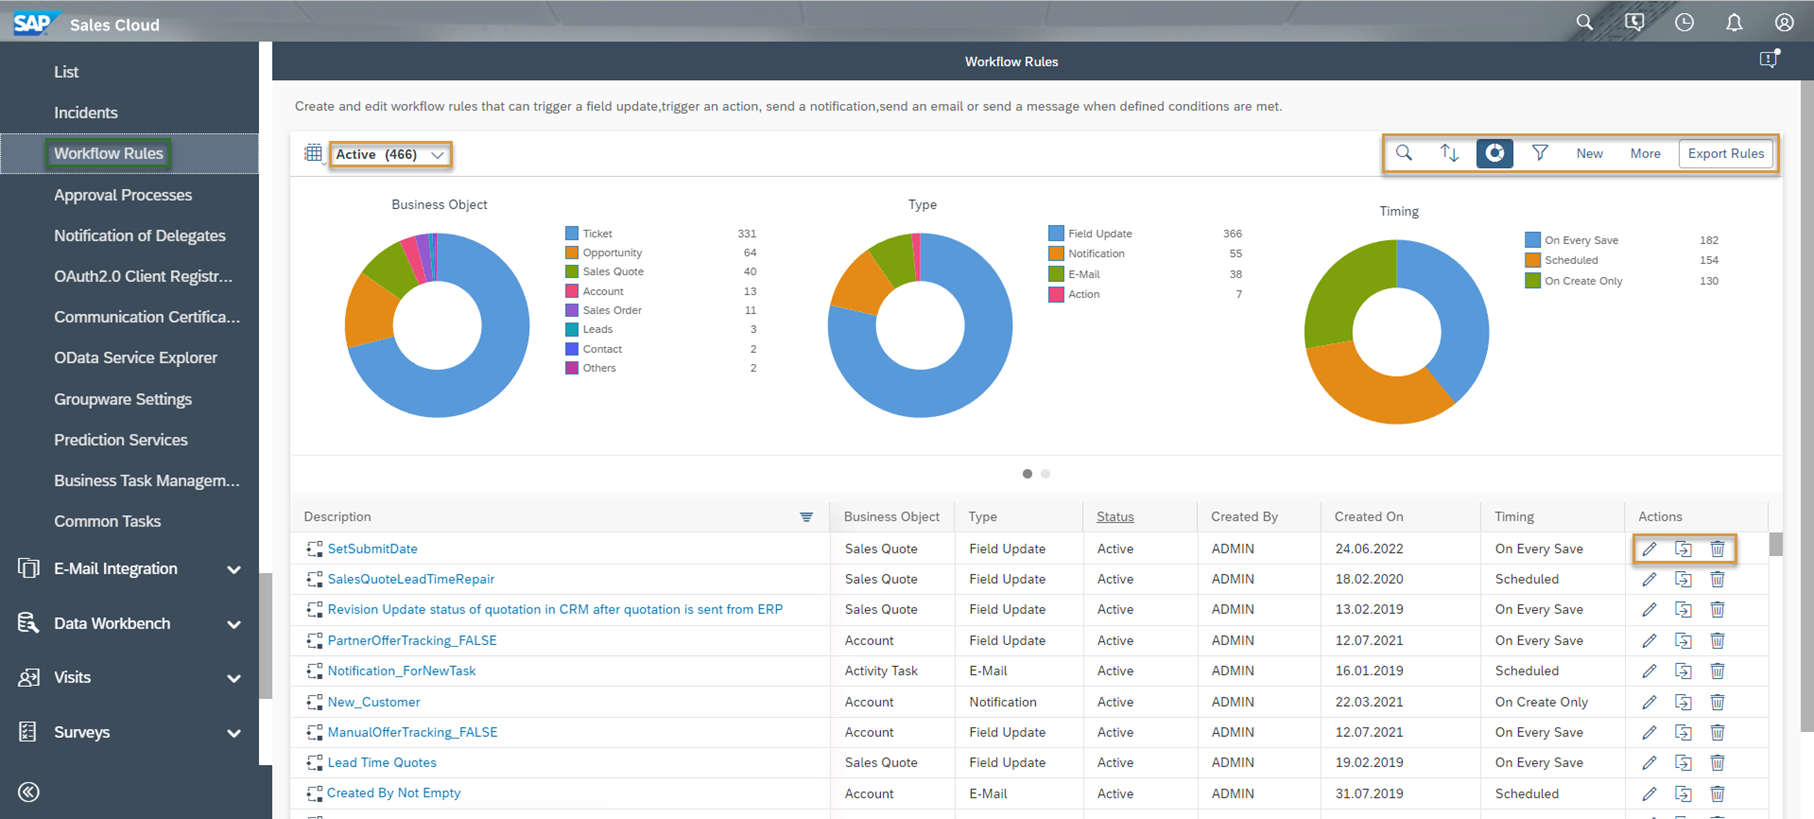
Status

There are two available statuses. Active and Inactive
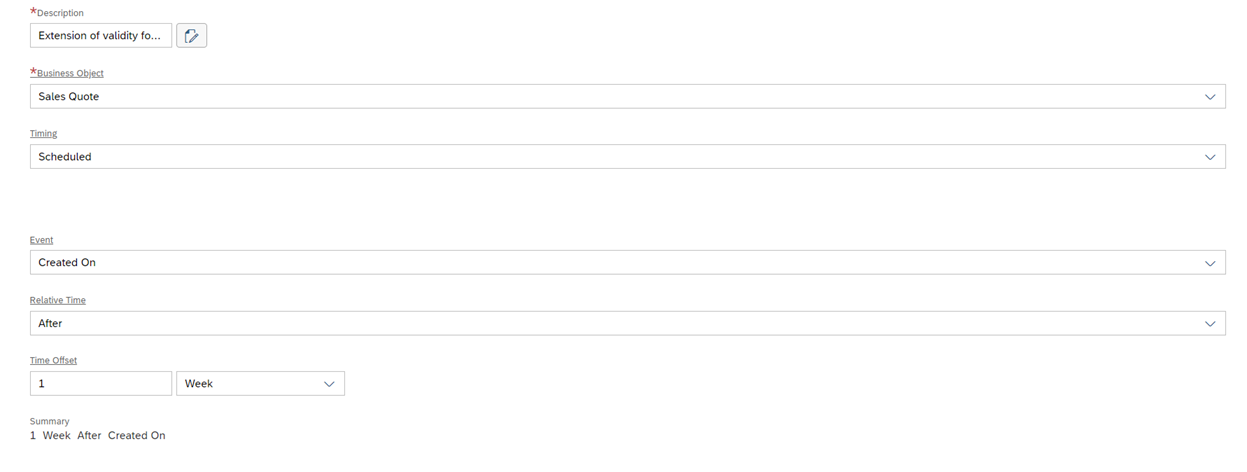
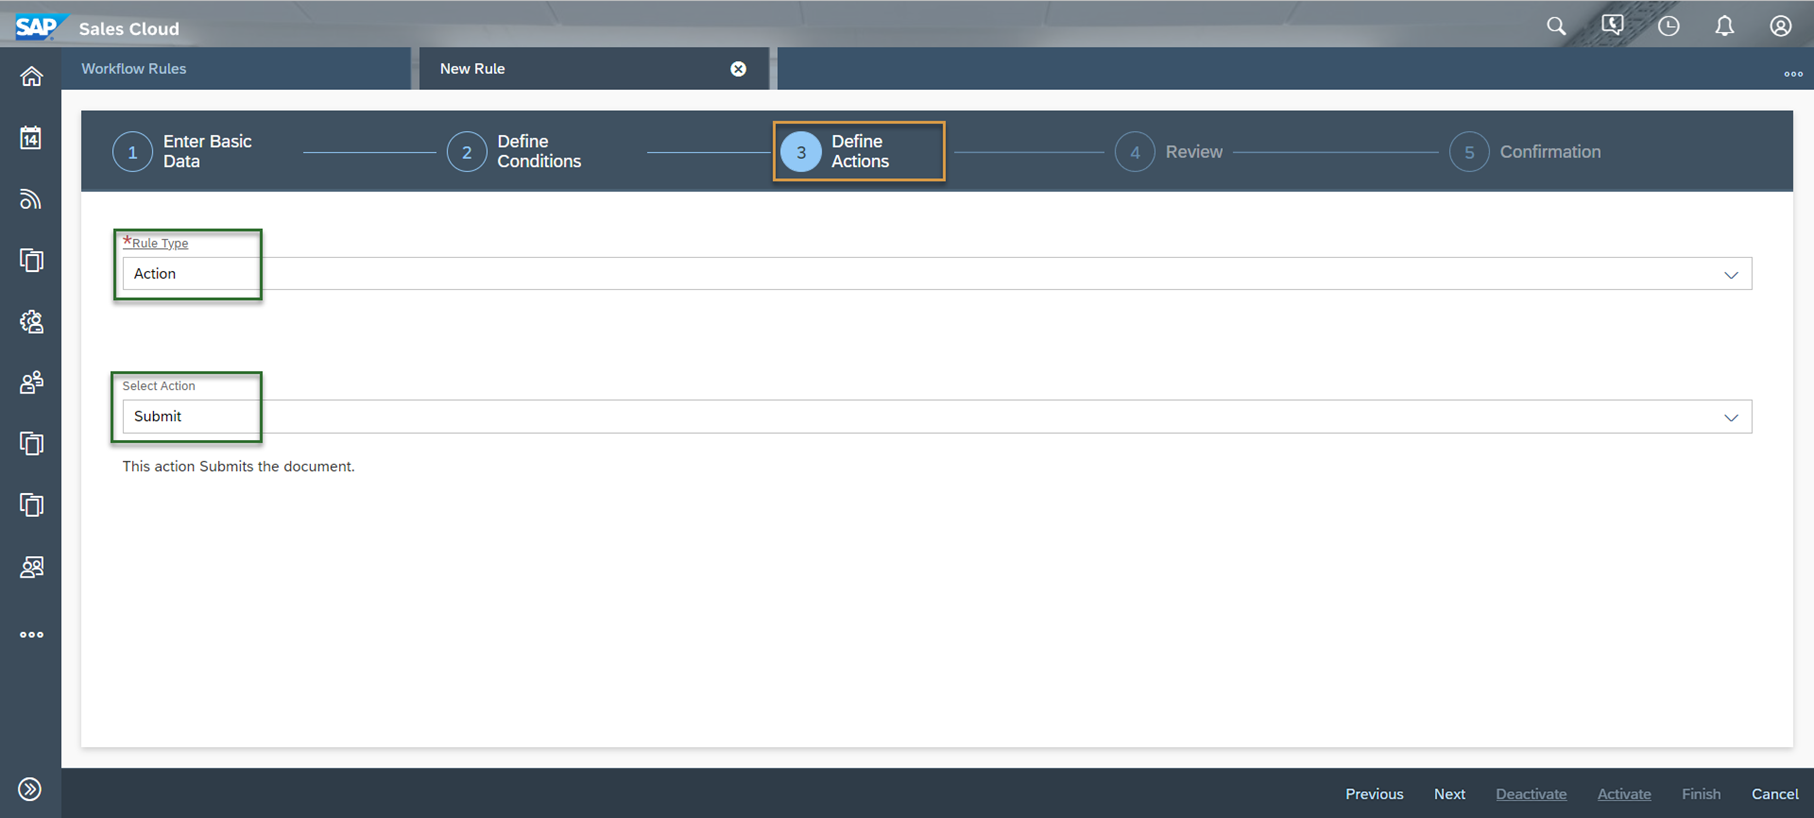
Timing

This property provides information about when the workflow should be executed. There are the following three possibilities: On Create Only, On Save (includes create) or Scheduled
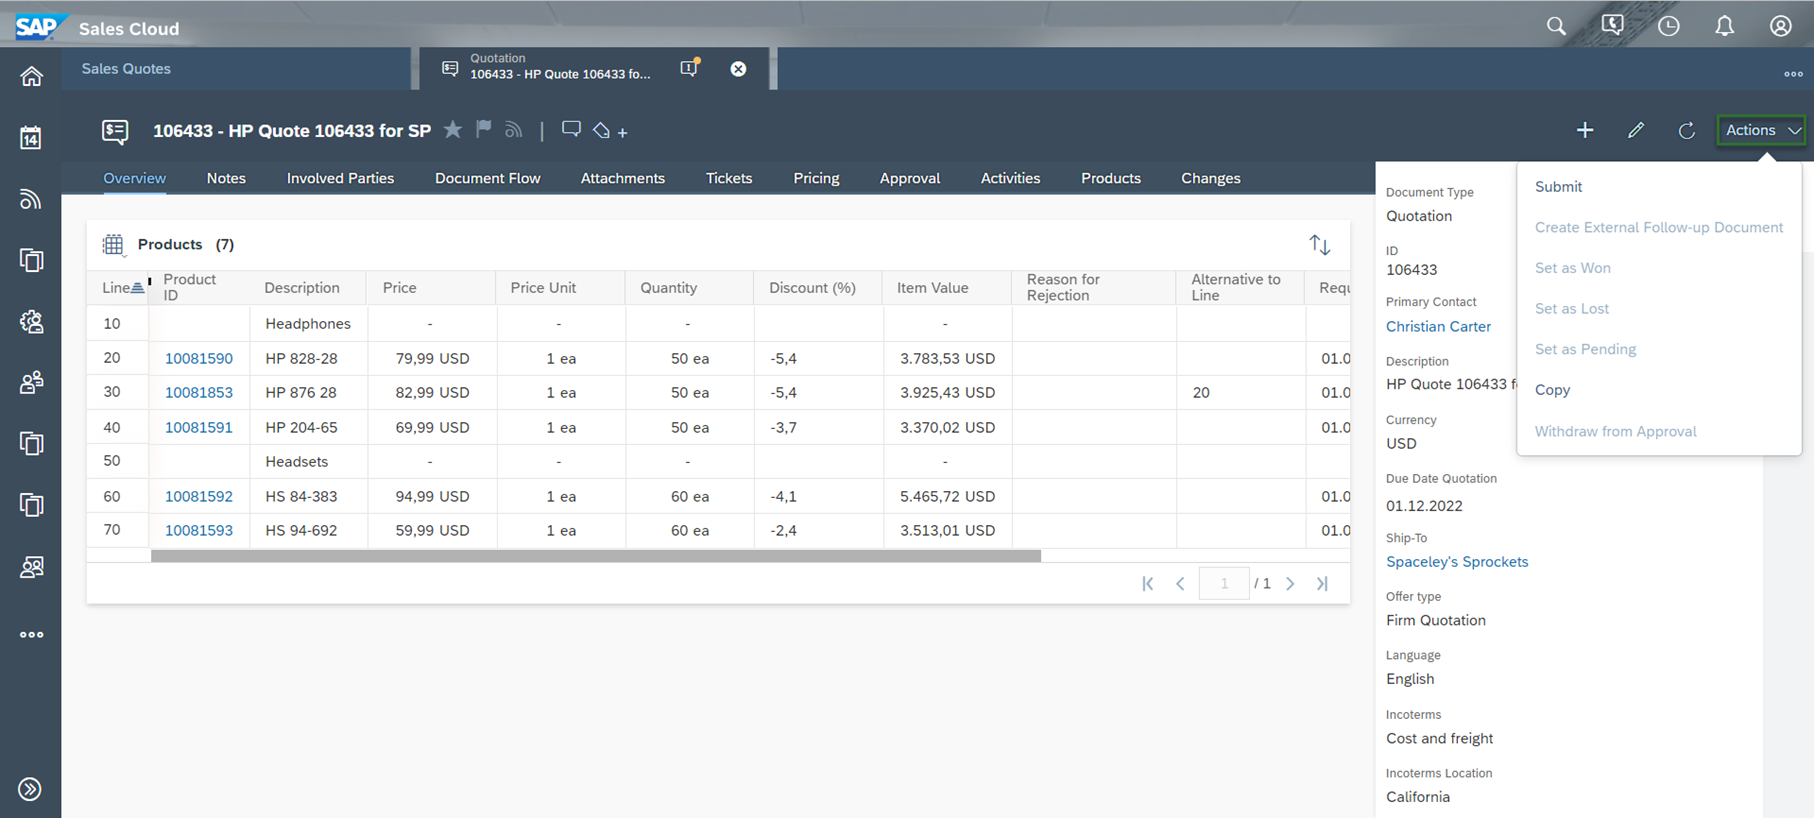
Actions

Three actions are available:

 Editing of a Workflow

Copies a workflow as a template for creating a new one

Deleting of a Workflow

To create a new workflow, click the New button in the OWL of the Work Center View Workflow Rules. As already described, you can also create a new workflow as a copy of an existing one. This often saves time if the basic structure of these workflows is similar. The creation of a workflow happens in the following five steps, which are explained in detail in the subchapters:

  • Enter Basic Data
  • Define Conditions
  • Define Actions
  • Review
  • Confirmation

Confirm each Step with clicking the Next Button in the right bottom corner.

1.1. Enter Basic Data

In the first step of creating a workflow, you specify a Description. You can define this in all system languages used. Then select the Business Object for which the workflow is to be used from the drop-down menu. The third setting is the Timing.

While both options On Create Only and On Every Save are self-explanatory, option Scheduled requires a more detailed explanation. If you select Scheduled, the following fields are available for this type of timing:

Event

In the Event dropdown, each date and time field of the respective Business Object is available. The workflow is then triggered based on this field and the following field settings

Relative Time

Choose whether the Workflow should be triggered with a Time Offset Before the selected Date Field, After or On. When you select On, then you cannot define a Time Offset

Time Offset

Set the Time Offset. You can work with the following units: Seconds, Minutes, Hours, Days, Weeks, Months or Years

Here are a few examples of how to use Scheduled Workflows:

  • Send an E-Mail one week before the validity to date to the contact person of the Sales Quote. This E-Mail contains a reminder
  • Send a notification on the creation date from the customer to the sales representative that a customer has been created in his territory
  • Send out a satisfaction survey two days after closing a ticket to the customer

1.2. Define Conditions

In the second step Define Conditions you will work with groups. Conditions within a group are linked with an AND condition. A group can also consist of only one condition. Groups themselves are linked with an OR condition. As soon as the conditions within one group are fulfilled, the workflow is executed.

To add the first condition to your workflow, click the Add Group button. The Edit Conditions popup opens automatically where you can make the settings as follow:

Field

Select the field that should be used to check your condition

Value Before Object Change

With this indicator you can set whether the value before the change or after the change should be considered. For example, the value of the offer before the change was less than 100,000 USD (see the middle image)

Compare Operator

The checking operator for your condition. The following ones are available:

List/Indicator

Equal To

Not Equal To

Date/Numeric

Equal To

Not Equal To

Greater Than

Greater Than Or Equal To

Less Than

Less Than Or Equal To

Object/String/Multi List

Equal To

No Equal To

Does Match Pattern

Does Not Match Pattern

With

Here you can select whether you want to compare the field against a fixed Value or against another data Field from the selected Business Object

Comparison parameters

In the last step, enter this fixed value (left image) for your condition or select the data field (right image). If you enter at With Field, then you can select here only fields of the same data type

It is checked whether the document type is equal to the value QT – Quotation

It is checked whether the Total value before Object Change is less than the value 100.000,00 USD

It is checked whether the value of the data Field Total equals to the value of the Data Field of Total amount of partner

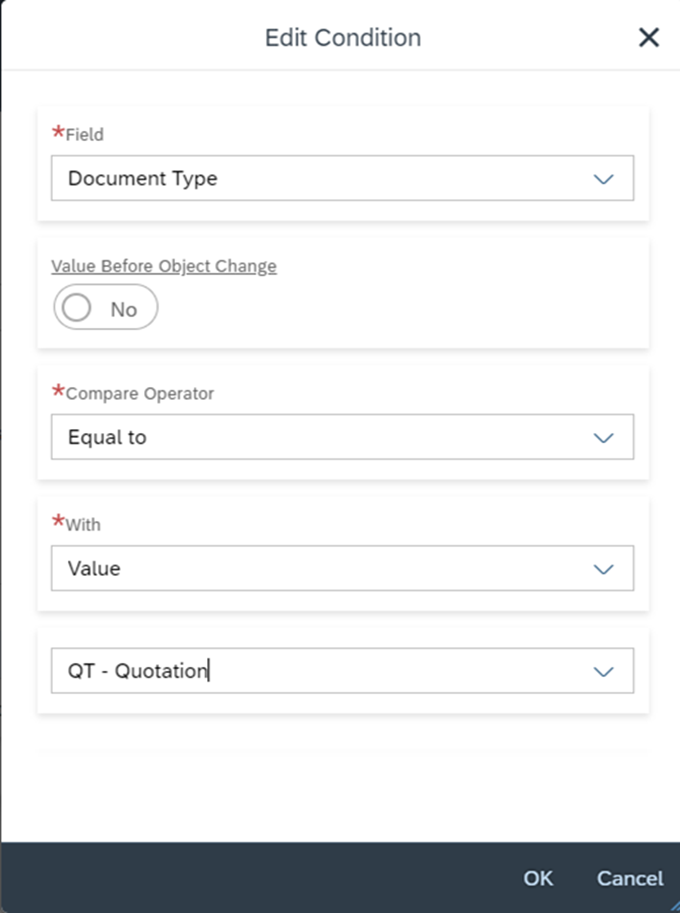
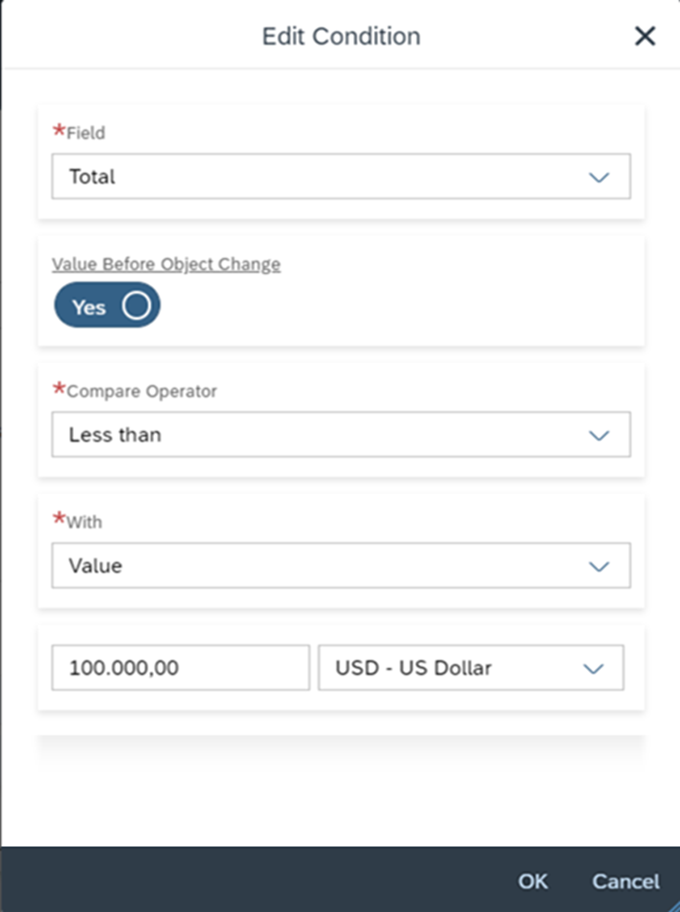
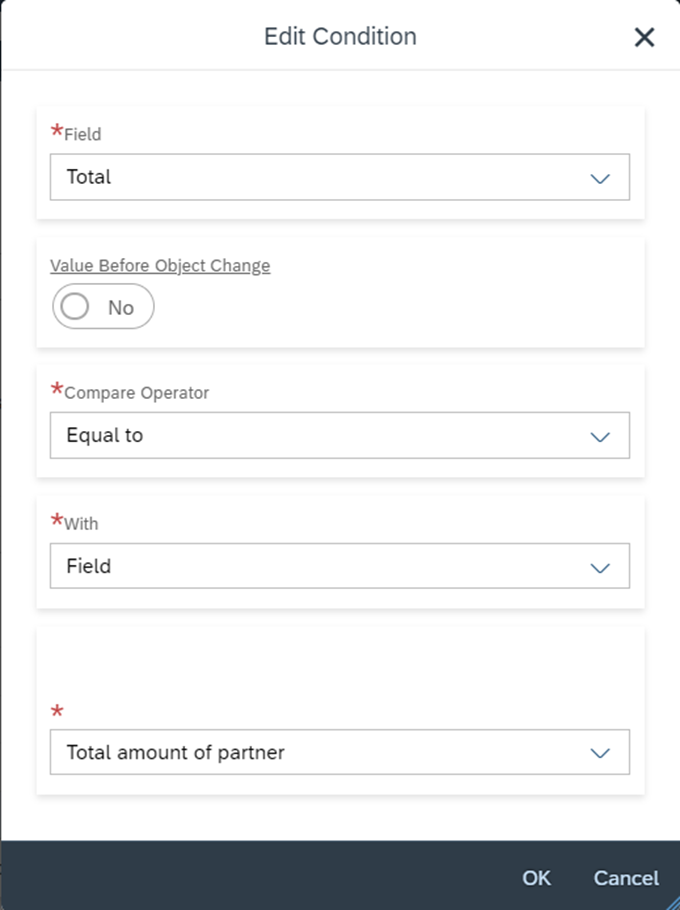
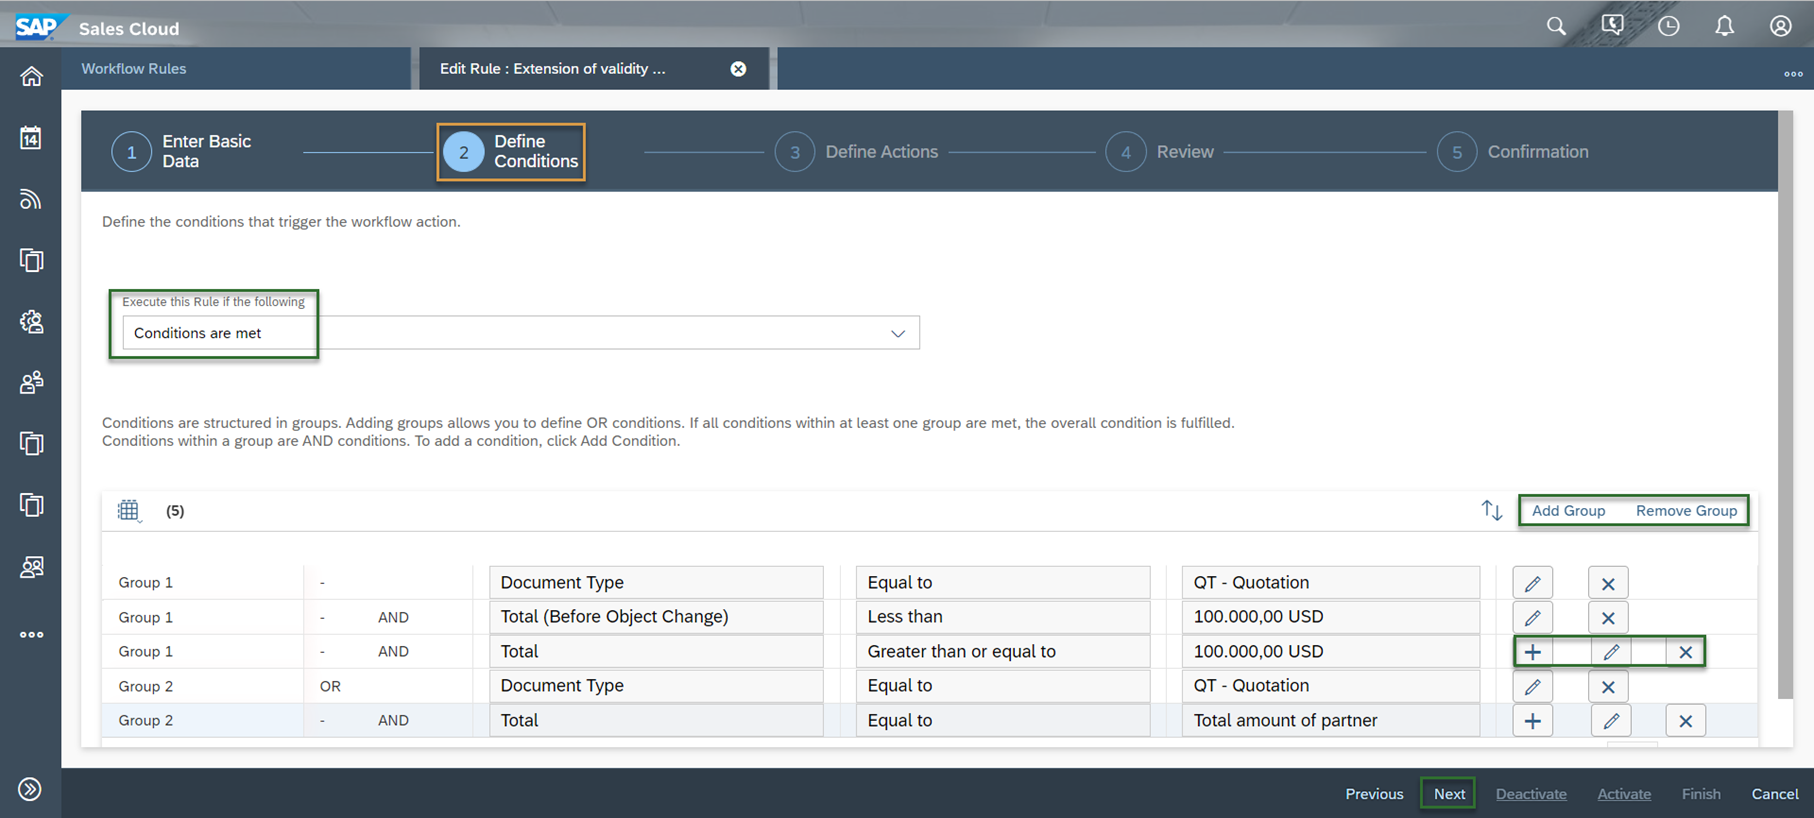
Once you have added the first condition, you can add more conditions in the same group or add more groups using the Add Group button. Of course, you can also remove groups using the Remove Group button. The following functions are available for each condition:

Adding a new condition within an already existing group. This icon is found only at the last created condition within an existing group

Editing of the condition

Deleting of the condition

The last important setting you can make within this second step Define Conditions can be found in the upper left corner of the figure below. The Execute this Rule if the following setting is per default set up with Conditions are met. This means that as soon as the conditions within a group are met, the workflow is executed. But there is also the entry Conditions are not met. Conversely, this means that the workflow will be executed as soon as the conditions within a group are not fulfilled.

1.3. Define Actions

In the third step Define Actions you specify what should happen when the conditions of a Workflow are met. There are various possibilities, which will be explained in detail.

Rule Type 1:           Action

The first rule type is Action. This refers to the functions of the respective Business Object. For example, if you navigate to a Sales Quote, you will find an Action Menu at the top right. Same of course with other Business Objects in SAP Sales Cloud. Below this menu you’ll find various functions such as Submit.

These are exactly the functions you will find in the workflow. However, you will find that there are often more options to choose from in the workflow than on the Business Object itself. One reason for this is that you can define even more actions via the workflow than the users at the front end and that a developer can make functions available to you via SDK development.

Rule Type 2:           Activity Task

The second rule type is that of the Activity Task. Here, parameterized tasks can be created automatically when the conditions in the workflow are met. The following setting options are available in detail:

Always Create Activity Task

Decide whether a task should be created by the system each time the condition is met, or only once. Note that the creation of a task always saves the referenced Business Object – in our example a Sales Quote. Avoid loops here

Subject

Define the subject of the task. You can also work with placeholders. The Subject can be stored in several languages. The logic is such that the language is derived based on the setting of the user – which is written into the task as the responsible employee.

Example: The User Mia Shoemaker sets up her Language to German. This means when a task for her is created from a workflow the German Subject will be derived.

Due

You can set the Due Date using the Due property. Specify a time interval in which the task should be completed. The Start Date is automatically the creation date of the task, and the Due Date is the Start Date + Due.  You can work with the units’ days, hours and minutes

Category

Select the Category of the Task

Priority

Select the Priority of the Task

Notes

Enter the note for the task. These can only be stored in one language. You can round up the notes with placeholders. If you want to work with several languages, it is recommended at this point to work with several workflows where you query the language of the referenced Business Object in the conditions

Placeholders

The placeholders are a great feature to parameterize and thus personalize the texts. Create new placeholders with the Add button. The variable of the placeholder always starts with a hash symbol and ends with it, e.g. #ID#, #NAME#, etc. In the second step select the data field with which value the variable of your placeholder will be filled

Recipient Determination

Derive dynamically via relationships for whom this task should be derived. In the example shown below, a task is derived for the Territory Owner. If you select multiple entries here or also via the Employee section, just as many tasks will be created

Employee

Select statically which employee will be responsible for the task


After the workflow has been executed, you can find the automatically created tasks in the Activities tab of the referenced Business Object under the Tasks section.

Rule Type 3:           E-Mail

The third rule type E-Mail is used to send E-Mails automatically from the C4C system. This can be used in the following scenarios: reminding the customer, informing employees from the organization about important changes in the Business Object, approval process, etc. In detail, the following properties are available for setting an E-Mail workflow:

Always Send  E-Mail

Decide whether an E-Mail should be sent by the system each time the condition is met, or only once (at the first time the condition is met)

Create E-Mail Activity

For each E-Mail sent, an activity of the E-Mail type is created at the same time and automatically linked to the referenced Business Object

Add Attachments

You can use this indicator to send the attachments of the referenced Business Object with the E-Mail via a PDI development.

Select a Sender E-Mail

You can derive the From E-Mail address based on a partner function of the referenced Business Object. For example, the E-Mail address of the responsible territory representative is used when a reminder of an outstanding quote is sent out. If you do not make a selection here, the E-Mail will be sent out with a donotreply E-Mail address.

Determine Sender via Custom Logic

Use this indicator to control complex logic for the sender E-Mail address via a PDI development.

Use E-Mail Address of

This field is visible only if you enable the Select a Sender E-Mail indicator. Select the partner function via which the E-Mail is to be sent.

Subject

Define the subject of the mail. You can work with placeholders. The Subject can be stored in several languages.

Template File

SAP Sales Cloud does not offer an E-Mail editor in the standard. You can only upload an HTML E-Mail template. You can work with placeholders in this template. Be sure to save the template somewhere locally, as you will not be able to download it again from the system afterwards

PDF

You can have a PDF generated via the C4C system and automatically sent as an attachment with the E-Mail. To do this, select the following fields: PDF Form Template, PDF Variant Language and PDF Variant Country/Region

Placeholder

Check Rule Type Activity Task

Recipient Determination

Check Rule Type Activity Task

Employee

Check Rule Type Activity Task

Custom Recipient Determination

Per PDI solution, you can determine additional recipients for your E-Mail workflow. If they are set in the development, you can select them here.

E-Mail Address

As a last option, you can also simply enter E-Mail addresses per position.

Rule Type 4:           Messaging

With this Rule Type you can select the channel of an SMS. Even today, information are shared a lot with customers or employees via SMS. In detail, the following properties are available for setting an SMS workflow:

Create Messaging Activity

Check Rule Type Activity Task

Sender

Select here the SMD MashUp ID – Check Chapter MashUps

Text

Check Rule Type Activity Task – Subject

Placeholder

Check Rule Type Activity Task

Recipient Determination

Check Rule Type Activity Task

Employee

Check Rule Type Activity Task

Rule Type 5:           Notification

The Rule Type Notification allows you to send alerts in SAP Sales Cloud and SAP Service Cloud. You probably know this function from social media platforms like LinkedIn or Facebook, when someone links you in a post. You have the following setting options for the notifications in detail:

Send Notification

Set when the notification should be delivered to the recipients. You have the options Before, On or After. Enter a time interval for before or after and select a date field to which the option should be directed. For On you can only select a date field.

Expires After

Set the time interval after which the notification should be cleared automatically. It does not matter whether the notification was read or not.

Cancellation of Task

You have the following options via this setting: Conditions Not Met – if the Business Object is changed again in the meantime, the notification can be removed again directly as soon as the conditions are no longer met. With Never – you leave the notification always, no matter what happens to the Business Object in the meantime.

Subject

Check Rule Type Activity Task

Send Push Notification

Specify whether the user should receive a visible push up notification. In the web application, users will see this via the red highlighted number on the global notification icon (see example image later). In the mobile app, users then receive a push notification via the mobile device.

Placeholder

Check Rule Type Activity Task. The only special thing here is that four placeholders are fixed by the notation &1, &2, &3 and &4. You cannot assign more than that.

Recipient Determination

Check Rule Type Activity Task

Employee

Check Rule Type Activity Task

The two figures below show how the push notifications have displayed to the user. In the first figure in the web application and in the second figure as a notification on the cell phone.

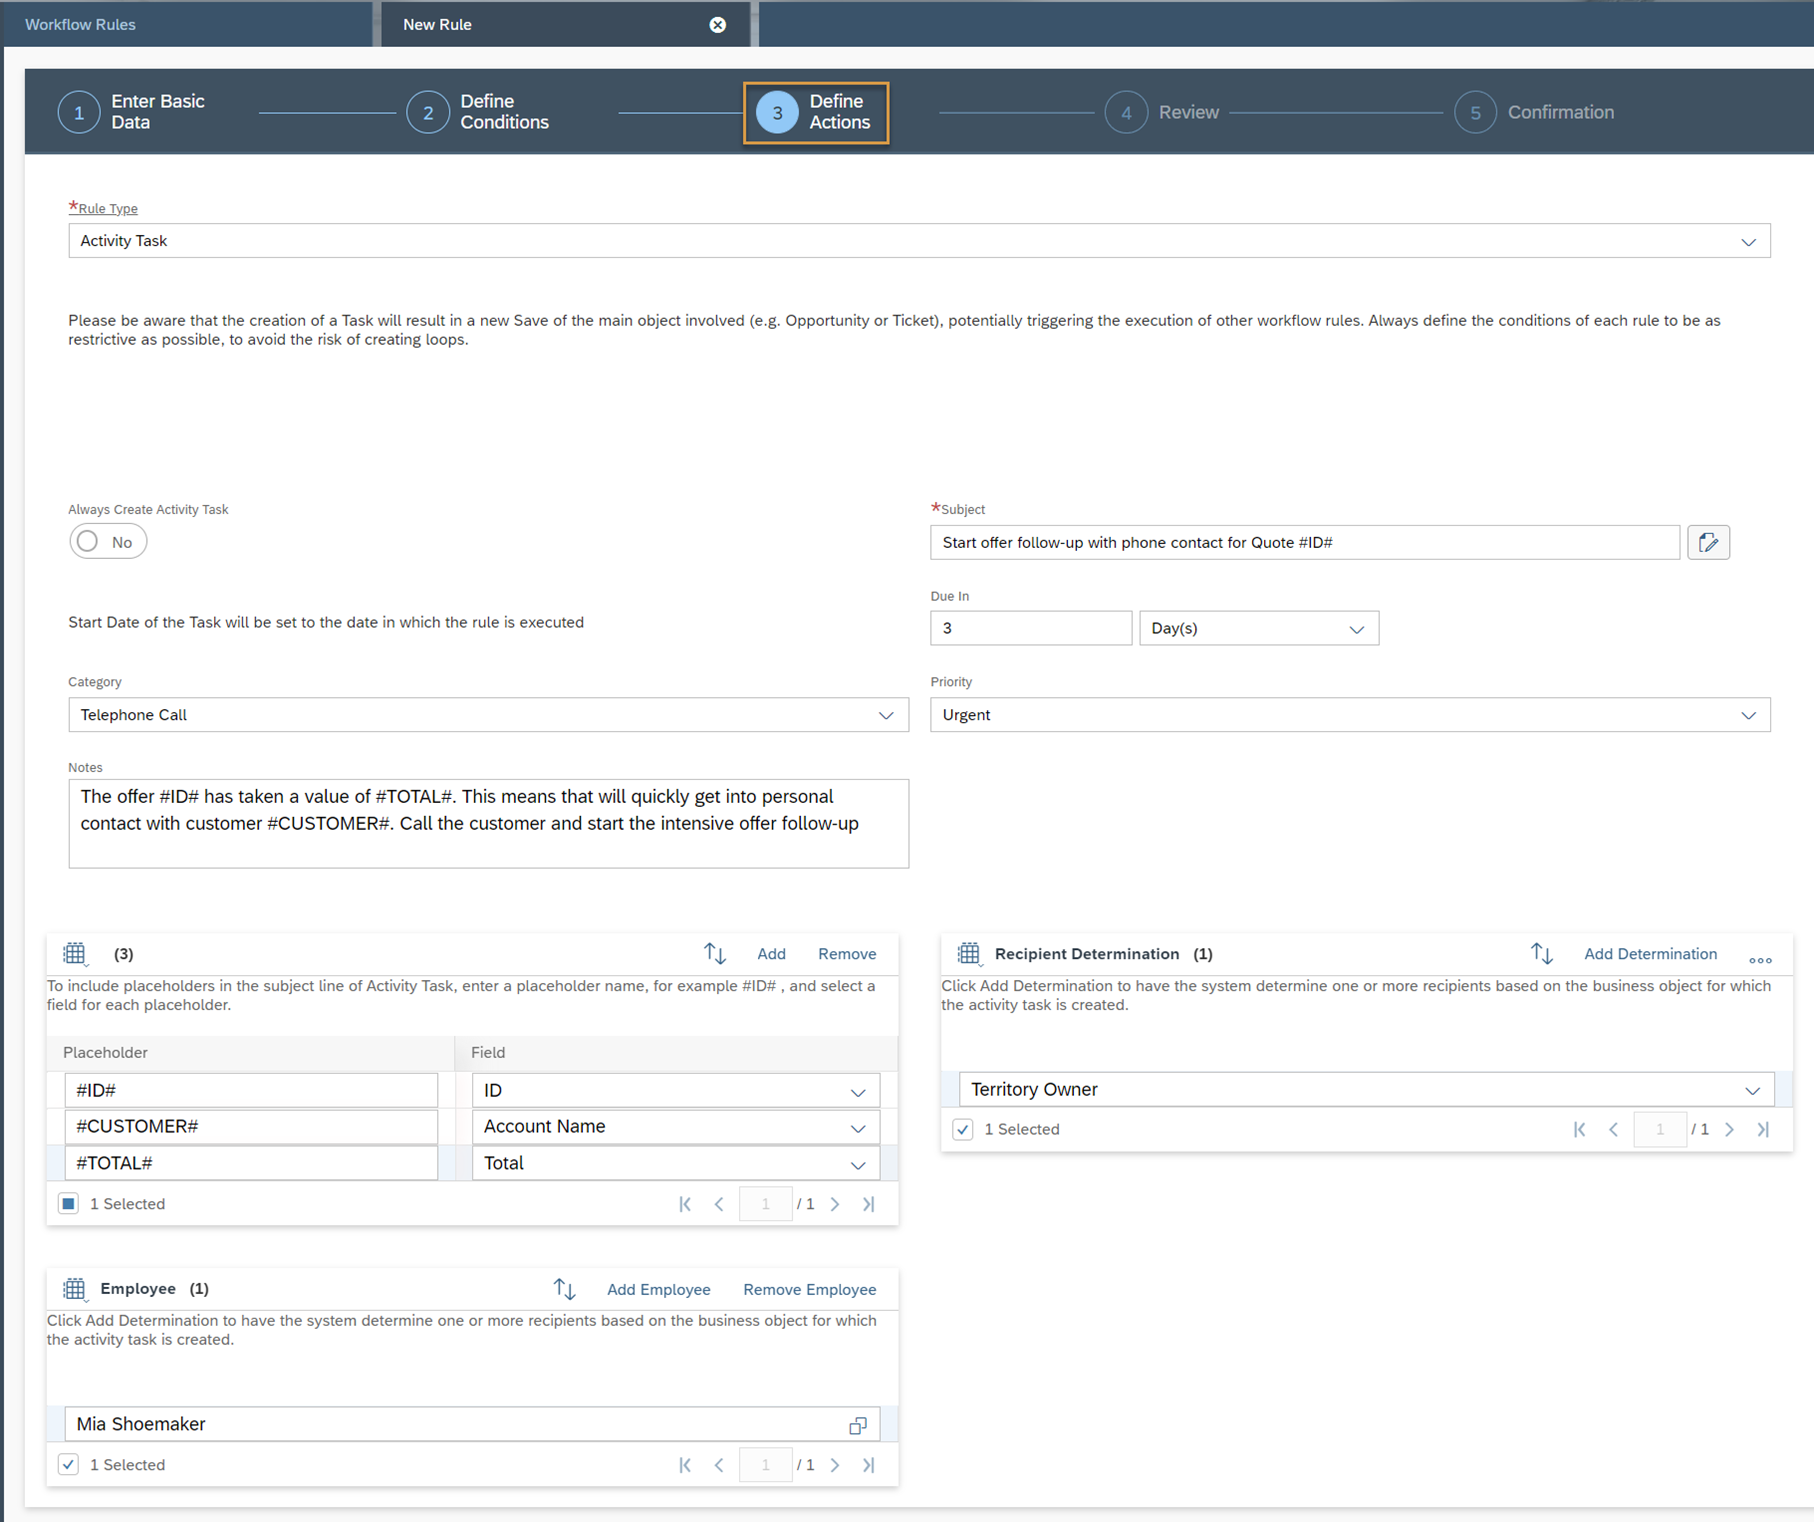
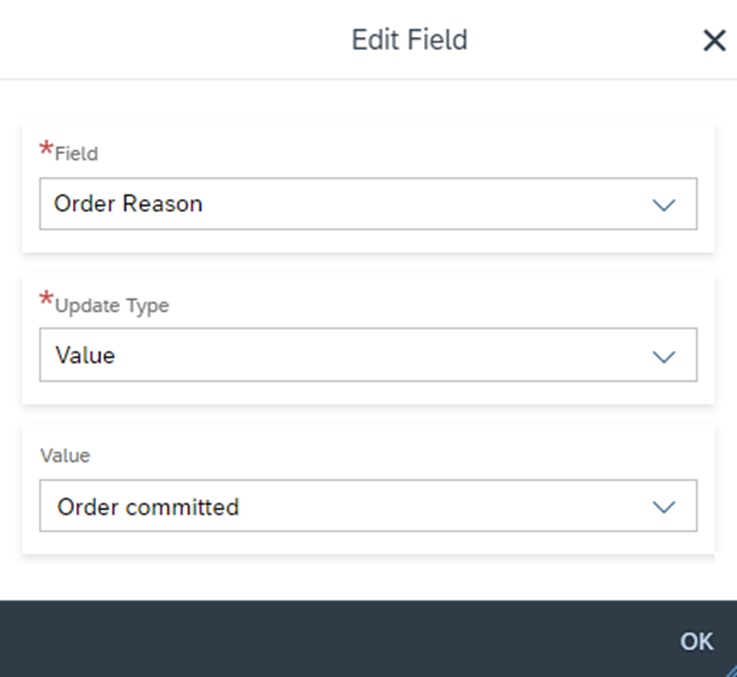
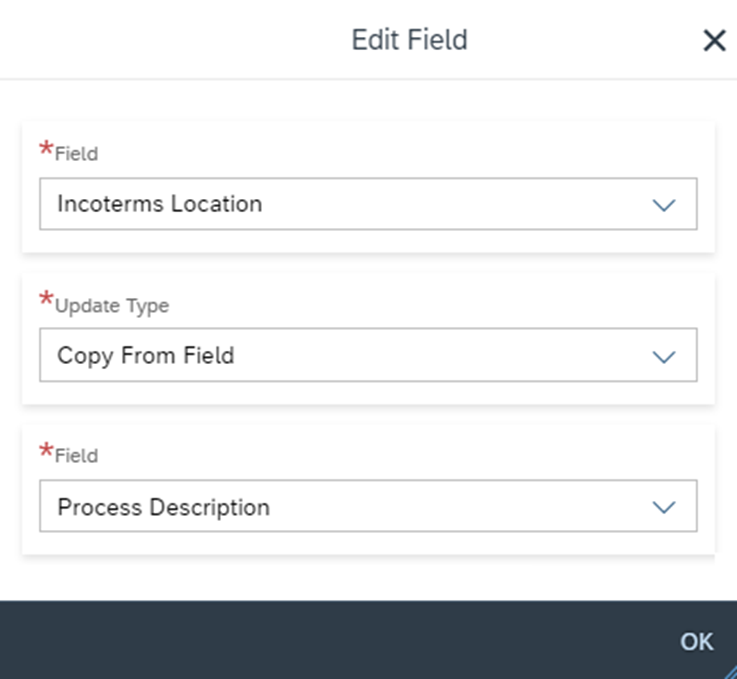
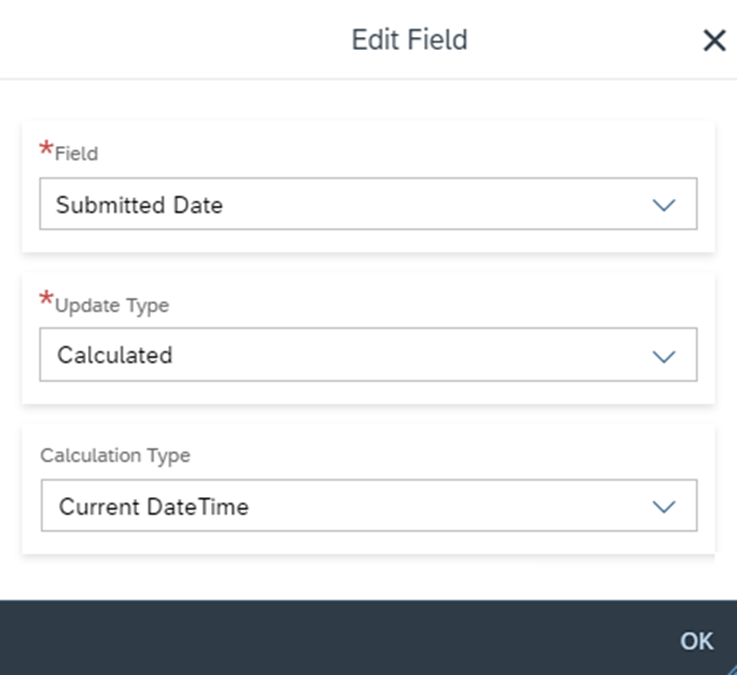
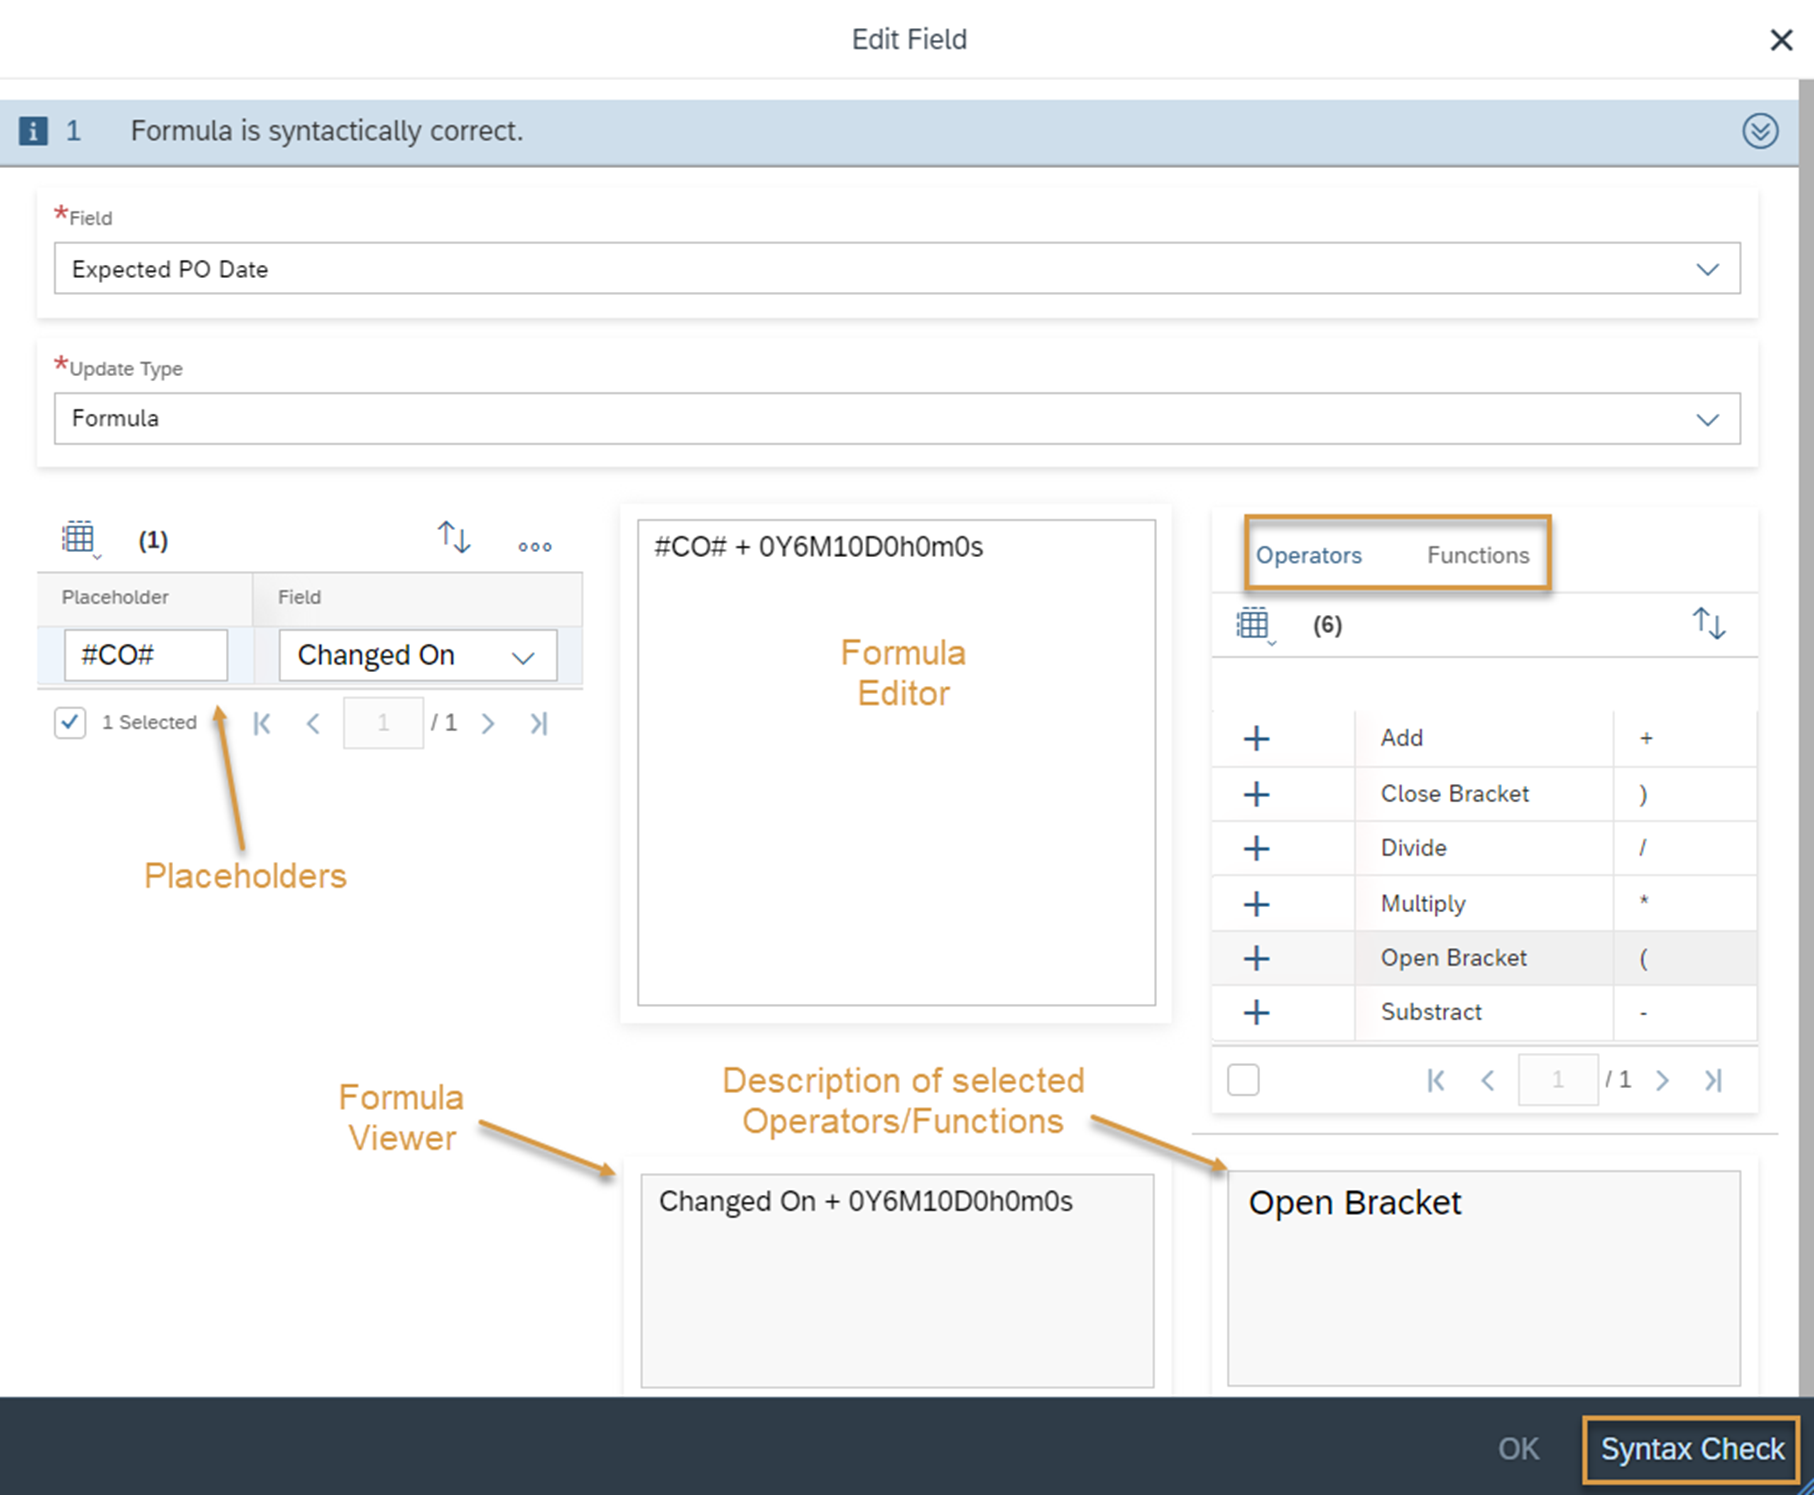
Rule Type 6:           Field Update

The sixth rule type Field Update lets you adjust fields of the respective Business Object via workflow. You can calculate the values of the fields, store them with fixed values or copy them from other fields. In the following, you will get a detailed overview of which data fields you can adjust via workflow and how:

Data Field Type

Available Update Types

Text

Formatted Text

Decimal Number

Amount

Quantity

Value

Formula

Copy from Field

Date

DateTime

Time

Calculated

Value

Formula

Copy from Field

List

Multivalued List

Value


The data fields of type Web Address and E-Mail Address are not supported in workflows. Means, you cannot use these field types as conditions, nor as fields to be updated.

Once you set the Rule Type to Field Update, you can add multiple items using the Add button. It is possible to update one field per position. Select as many fields as you want to change. You can also remove positions using the Remove button. Hover with your mouse over a position you want to change, the Edit Icon will be visible then, so you can access the edit mode.

Update Type:                    Value

This update type allows you to enter fixed values for specific data fields of your referenced Business Object. Always pay attention to the data type and above all whether you must control the field with a technical key or with a description text. Generally, if you leave the Value field blank, the field will be emptied via the workflow. For date fields, it works a little differently. Here you must enter the date 01.01.0001 or date/time 01.01.0001 00:00:00 UTC for a date field to be cleared.

Update Type:                    Copy From Field

With this update type you can copy values from another field to the field you want to control. Of course, only fields of the same type can be selected.

Update Type:                    Calculation Type

For date fields you can select the Update Type Calculation. This sounds a bit more powerful than it is, in truth you can insert the current date or time via a workflow.

Update Type Value

Update Type Copy From Field

Update Type Calculation Type

Update Type:                    Formula

With this update type you have the possibility to use complex formulas to determine the value for your data field. In detail, the following options are available:

Placeholder

Defined placeholders to use them as variables in your formulas. The following principle applies: First define your variable with beginning and ending hash symbols and then, in the second step, select the associated data field in the next column

Operators

Always make sure that there is a space between the operators. Otherwise, the following error message will result: Syntax Error in Formula. Here are some examples:

Do:

9 + 6 

( 3 + 6 ) * 9

Dont

9+6

(3+6)*9


Add

+

Adding two or more numbers to find their sum

Close Bracket

)

Write a closed Bracket in order to keep an overview in your formula

Divide

/

Division involves a number called the dividend being divided by another number called the divisor

Multiply

*

Multiply two numbers to find their product

Open Bracket

(

Write an open Bracket in order to keep an overview in your formula

Subtract

Subtracting one number from another number to find the difference between them

Functions

ABS()

ABS stands for Absolute Value. An Absolute Value basically just makes sure a number is positive

Example 1: ABS(9) = 9

Example 2: ABS(-6) = 6

CONCATENATE()

Use CONCATENATE() to join two or more text strings into one string

Example: CONCATENATE(‘Ha’, ‘llo’) = ‘Hallo’

DURATION()

Define a duration. You can then use this, for example, to add the duration to a date field. You can work with the units’ years, months, weeks, days, hours, minutes and seconds

Example: 4Y2M1D13h12m36s means: 4 Years, 2 Months, 1 Day, 13 Hours, 12 Minute and 36 Seconds

MOD()

The modulo operation returns the remainder or signed remainder of a division. Examples:

Example 1: 7 MOD 2 = 1

Example 2: 77 MOD 9 = 5

NOW()

Returns the current date with the current time

SUBSTRING( , , )

The substring method returns the part of the string between the start and end indexes.

Syntax:

SUBSTRING(‘STRING’,indexStart,length)

Example 1: SUBSTRING( ‘Mozilla’ , 1 , 3) = ‘ozi’

Example 2: SUBSTRING( ‘Mozilla’ , 2 , 4) = ‘zill’

TOLOWER()

Formats the input string to lowercase letters

Example: TOLOWER(‘Hallo’) = ‘hallo’

TOUPPER()

Formats the input string to uppercase letters

Example: TOUPPER(‘Hallo’) = ‘HALLO’

In the following figure you can see the screen for setting your formula. Before you can apply the formula via OK, you must always check first via the Syntax Check function whether your formula is correct. It is important that the result of your calculation always matches the data type you want to calculate. For example, the result for a date field cannot be an integer. This results in the error message Formula result and field to be updated are not of same type. Or given formula is not valid.

In the following you will find examples of successfully converted formulas, depending on the data type:

Data Field Type

Formula

Result of Formula

Text

SUBSTRING( ‘Mozilla’ , 2, 4)

‘zill’

Formatted Text

CONCATENATE(

CONCATENATE( ‘<span>The Quote was submitted on: <b>’ , #SO#)

, ‘</b>successfully</span>’)

‘The Quote was submitted on: 11.10.2022 successfully’

Decimal Number

#VA# * #VB#

Let Variable 1 (#VA#) be 9.46 and Variable 2(#VB#) 7.29 -> 68.9634

Amount

#AM# + #DE#

Let Amount (#AM#) be 3,0000.00 USD and Decimal (#DE#) 50.43 -> 3,050.43 USD

Explanation for Amount Formulas:

When calculating Amount Data Fields you can work with Amount fields and/or with Decimal fields. It is important that at least one variable contains the necessary currency. If there are two amount fields in your formula, it is important that the values contain the same currency. Otherwise there will be no error in the validation of the formula, but in the execution – which you can see in the workflow log.

Quantity

#QA# + #QB#

Let Quantity A (#QA#) be 13% and Quantity B (#QB#) 17% -> 30%

Explanation for Quantity Formulas:

When calculating Quantity Data Fields you can work with Quantity fields and/or with Decimal fields. It is important that at least one variable contains the necessary unit. If there are two quantity fields in your formula, it is important that the values contain the same units. Otherwise there will be no error in the validation of the formula, but in the execution – which you can see in the workflow log.

Date

#SO# + 0Y3M0D0h0m0s

Let Submitted on (#SO) be 01-10-2022 -> 01-01-2023


Valid Operations for Date only fields:

#DATE# + Duration

Duration + #DATE#

#DATE# – Duration*

Invalid Operations for Date only fields:

#DATE# + #DATE#

Duration + Duration*

DateTime

#ER# + 0Y1M15D12h30m0s

Let Enquiry received date (#ER#) be date only field with value be 13-10-2022 -> 28-11-2022 13:30 WDFT

Valid Operations for Date/Time fields:

#DATE# + Duration

Duration + #DATE#

#DATE# – Duration*

Invalid Operations for Date/Time fields:

#DATE# + #DATE#

Duration + Duration*

Mixing Date and DateTime fields in formula calculation:

In Date/Time Fields the time zone is already specified and there you will notice that the duration of the units’ hours, minutes and seconds is added absolutely. When calculating a duration based on Date only fields, it is different. The calculation always starts from UTC 0, i.e. from Greenwich Mean Time. If the Date/Time field is now defined in another time zone, then the delta of the time zone is added in addition to this calculation (in the example shown with WDFT – corresponds to UTC 1 – i.e. +1 hour)

When you use date field to update datetime then by default, time 00:00:00 will get appended to date field.

When you use datetime field to update date field then time section will get truncated from datetime field

Time

#ST# + 3h0m0s

Let Submitted Time (#ST#) be 18:30 -> 21:30

Valid Operations for Time fields:

#TIME# + Duration

Duration + #DATE#

#TIME# – Duration**

Invalid Operations for Time fields:

#TIME# + #TIME#

Duration + Duration**

*#DATE# can by any Date or Date/Time field or also the NOW() function

**#TIME# can by any Time field or also the NOW() function

1.4. Review and Confirmation

Under the fourth step Review you will see a summary of your settings for the new workflow. Take a critical look at the settings you have made, as they can have a strong influence on your productive system. It is always recommended to first create a workflow in the test system, test it extensively and then transport it to the productive client – Check SAP Sales Cloud – C4C Is Easy – Transport Management for Workflows. However, in this part you can Activate the Workflow or Finish it. When you click on Finish then workflow will be created as Deactivated, while the Activate Button will create it as Activated.

In the fifth step, Confirmation, you will either receive a message that the workflow has been saved, or you will receive a palette of error messages because the settings you made contain errors. Then go back to the respective step and fix the errors so that you then receive a successful save message.

Do you need consulting from our experts?

The Customer Experience team at Camelot ITLab deals with exciting and challenging CRM related topics every day and serves a large portfolio of different customers from a wide range of industries. Trust in this collaboration and feel free to contact us at tlil@camelot-itlab.com.

Was this article helpful?

If you like our content we would highly appreciate your review on Trustpilot


#SAP C4C #SAP Cloud 4 Customer #Cloud 4 Customer #Cloud for Customer #SAP Sales Cloud #Sales Cloud #Workflow #Workflow Rules #Condition #Action #Review #Confirmation #Formula #Field Update

Receive the latest news

Subscribe To our SAP Sales & Service Cloud Newsletter

Get notified about new articles