Users and Organization Structures Business Roles
The Business Roles functionality is used to control authorization in SAP Sales Cloud. Basically, all modules that have been set via the Business Configuration can be provided with authorization here.
Navigation for Users and Organization Structures
1. Organization Structures 1.1. Creation of an Org. Unit 1.2. Adjusting of an Org. Unit 1.3. Plant 2. Job Definition 3. Employees 3.1. Creation and Editing of an Employee 3.2. People Workcenter 4. Business Users 5. Business Roles 5.1. Creation of a new Business Role 5.2. Copy a Business Role 5.3. Assignment and Controlling of Business Roles 5.4. Rules and Validations for Business Roles 6. Local and Global Administrator 7. Login as another User 7.1. Pre-settings 7.2. Main-settings 7.3. Login as another User 8. Check User's Authorization 9. Support and Technical Users
In practice, two different approaches have become established. The first approach would be to create a separate business role for each role that should have access to the system. For example, a technical consultant in inside sales gets a role, the customer service representative gets his own one, as well as the field service employee. The second approach would be to create a Business Role for each module or module set. An example would be that the module Products is generally only to be provided with read permission, which is then assigned to each business user, the module Service is for all users visible and editable, etc.. This way, all permissions are superposed at the end for all business users. However, you will quickly notice that you will drive both approaches in order to also provide special users – such as key users who also work in the organization – with special authorization.
To use the Business Roles features, navigate to the General Settings view under the Workcenter Administrator. In the Users tile, click Business Roles.

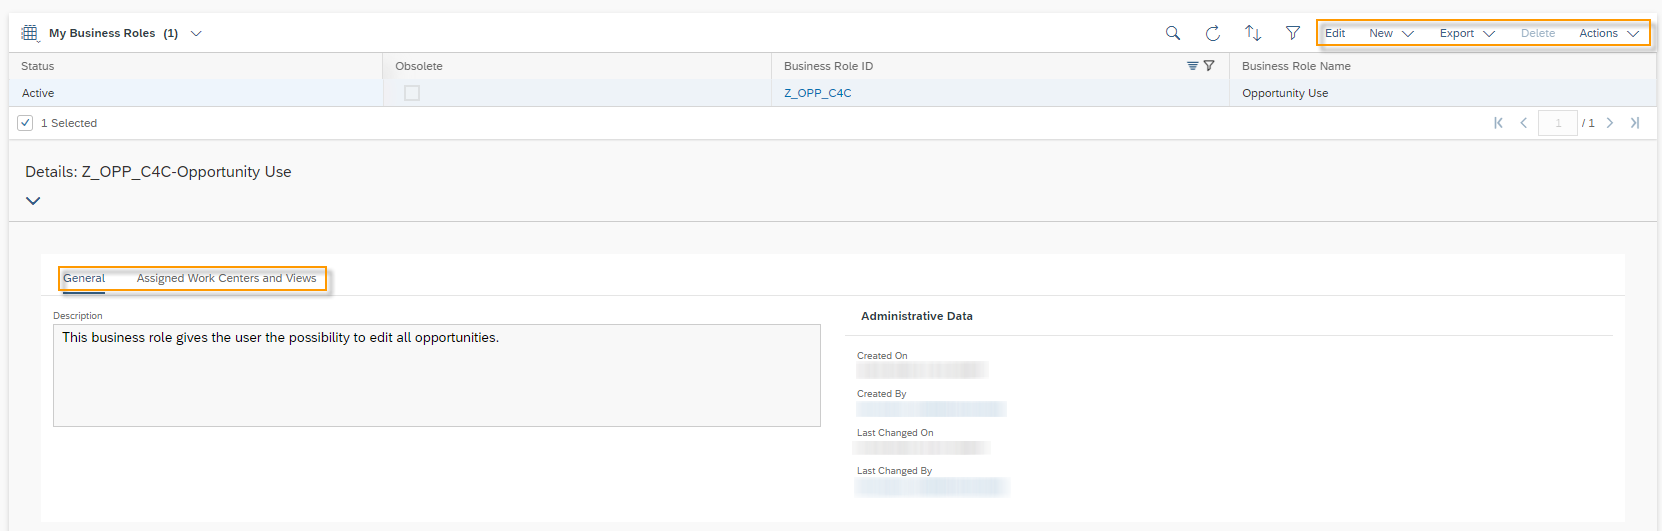
Here you have five functionalities to choose from. First, you can edit an existing Business Role under Edit. Furthermore, you can also create a New business role, which will be discussed in more detail later. You can delete a Business Role – but only if you – and this is also the fourth function – have previously set this role to Obsolete via Actions. As a last function you can set a deactivated role to active again – just by clicking on Undo Obsolete under Actions. At the bottom left of the screen you can see more information about the selected Business Role in the table. Here you can switch back and forth between the Description and the Assigned Workcenter and Views without switching to the edit mode.
5.1. Creation of a new Business Role
To create a new Business Role click in the view of Business Roles on the top right hand side on New and then on Business Role.
The area is designed in such a way that you actually only need to go through the tabs from left to right to fully implement the Business Role. The best way to explain the Business Role is to use an example. A field service role for Headphones & Headset Holding has to be created.
In the first tab General the administrator can make the basic settings for this business role. The ID and a Description, which can be stored in several languages, is the beginning. The description and the name can be maintained under the button Maintain Name and Description. As a tip from practice, it has been proven that the name of the responsible employee from the organization should also be written in the description – who should be asked for permission if a user requires this role. In the scope area, you can separate whether this role may only be assigned by global administrators or also by local administrators. To do this, click on the Select Scope Manually toggle field and then select Global or Local from the Scope dropdown. If you leave the toggle disabled, it is possible for all administrators to assign this role to a business user. The last step is to specify which administrator is responsible (Users Responsible) for this role.

In the second tab Workcenter and View Assignments the administrator can assign either a whole Workcenter – as shown in the Sales example – or dedicated views of a Workcenter – as shown in the Products example – to the business role. The last column would display possible errors or warnings if there were any conflicts in the assignment.

In the third tab Access Restrictions you will now find each individual Workcenter view as an entry in the table. For the Read Access you can select the property Unrestricted or Restricted. For Write Access you can choose between Unrestricted, Restricted and No Access. Since the meaning of Unrestricted and No Access should be clear to everyone, let’s do concentrate on Restricted. In each tabular entry you can see the matching Access Context for each Workcenter View. This tells you which predefined Restriction Rules exist for this view. For each view there is also the possibility to select Restriction Rule 99 – Define Specific Restrictions, which we will come to later.
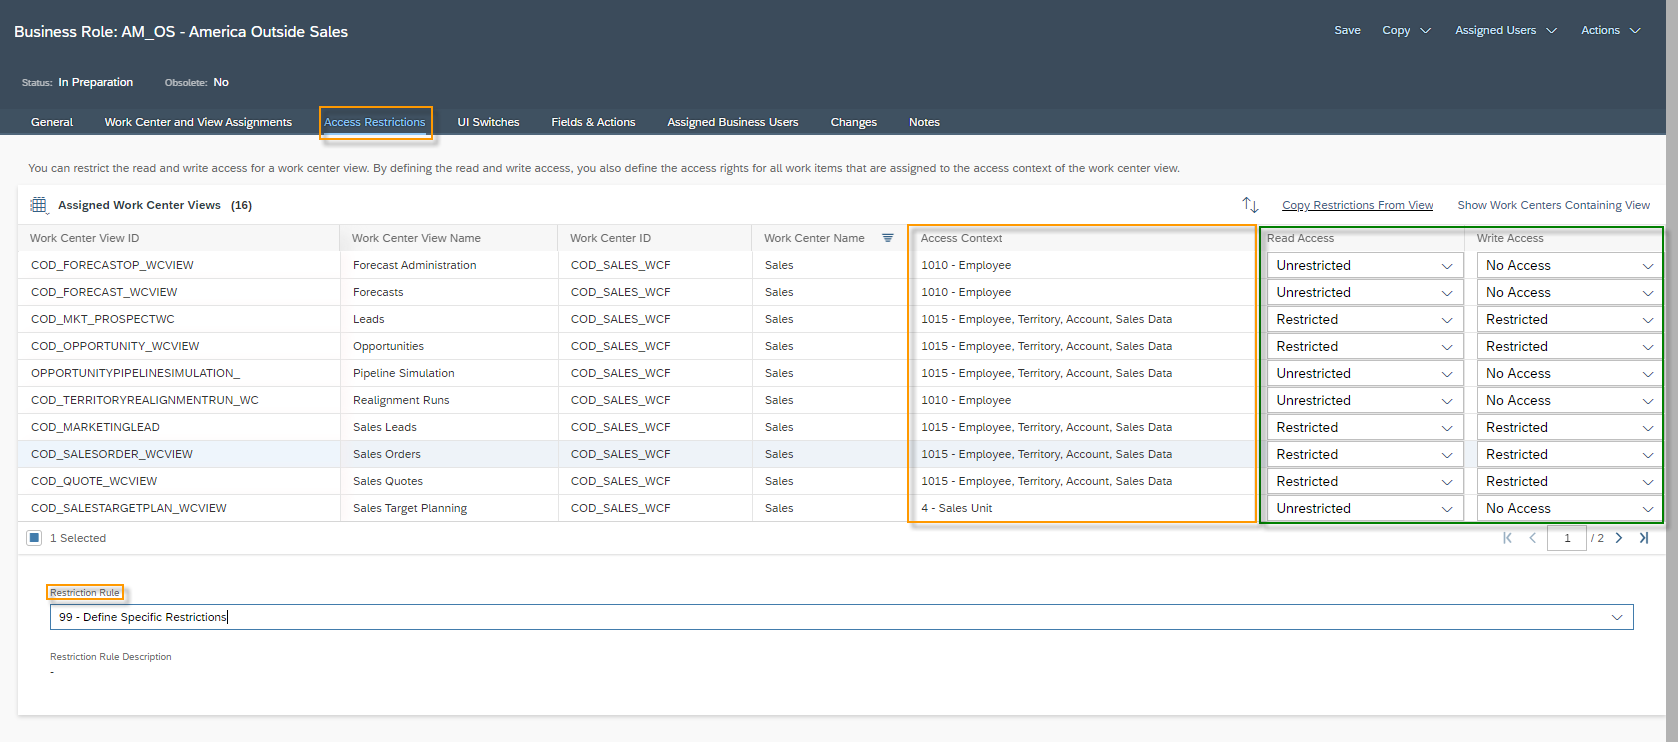
If you do find None in the Access Context, that means that you can select for this Workcenter View only Unrestricted or No Access. Otherwise the Access Context tells you what kind of logic you can apply for this specific Workcenter View. The Access Context 1016 – Employee, Territory, Account, Sales Data means that you can select between Employee or Territory or Account or Sales Data. The Access Context 2001 – Sales Organization, Distrib. Channel as a second example means that you can select between Sales Organization and Distribution Channel. The most used Restriction Rules are explained below:
Employees
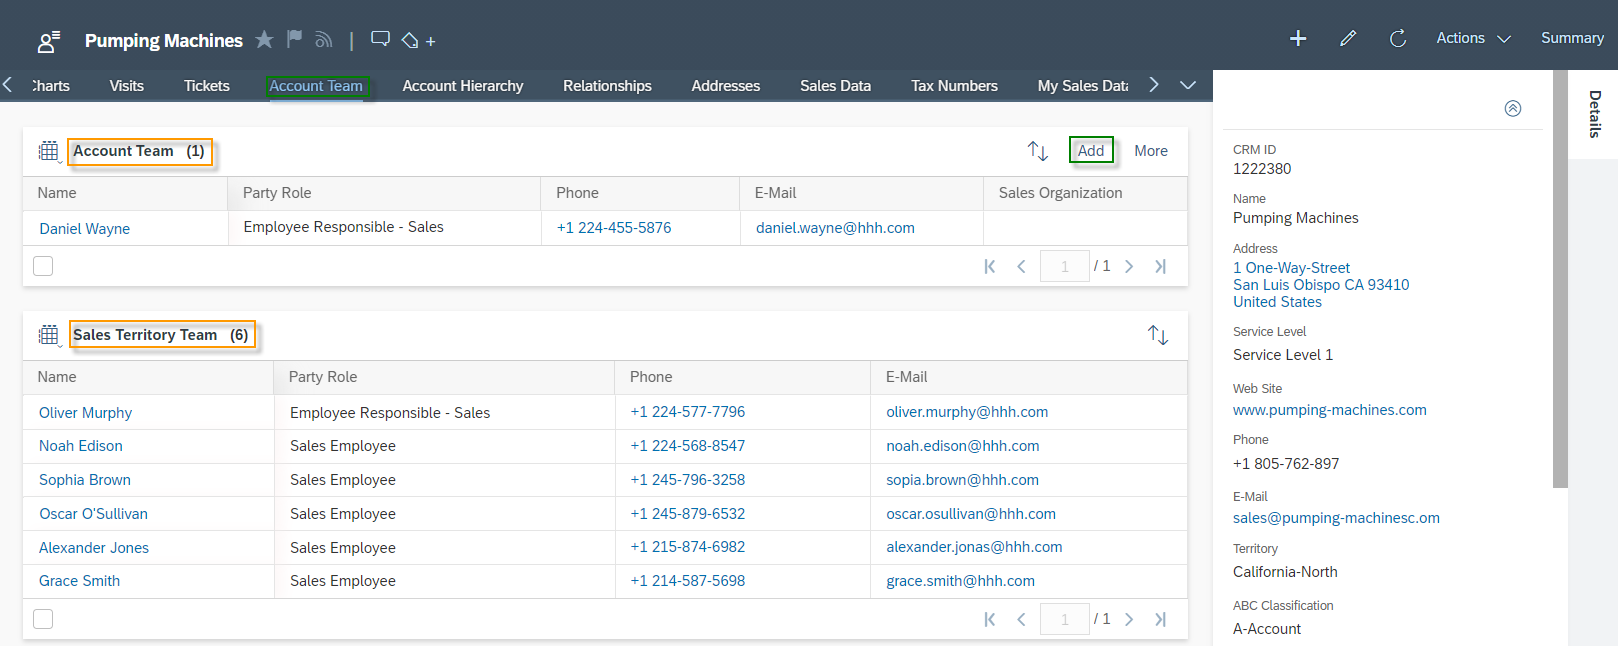
This Restriction Rule applies when a Business User is assigned as an Account Team Member. This can be done manually by clicking on the Accounts Tab Account Team and then click on Add Button. As soon as the Business User is assigned in the Account Team, this User will then have access to all objects – e.g. Tasks, Quotes, Phone Call, etc. – according to this specific Account.
Territories
This Restriction Rule applies when a Business User is assigned as a Sales Territory Team Member. To learn how this mechanism works. This Rule gives the Business User access to all objects of all Accounts which are assigned in this specific Sales Territory.
Sales Data
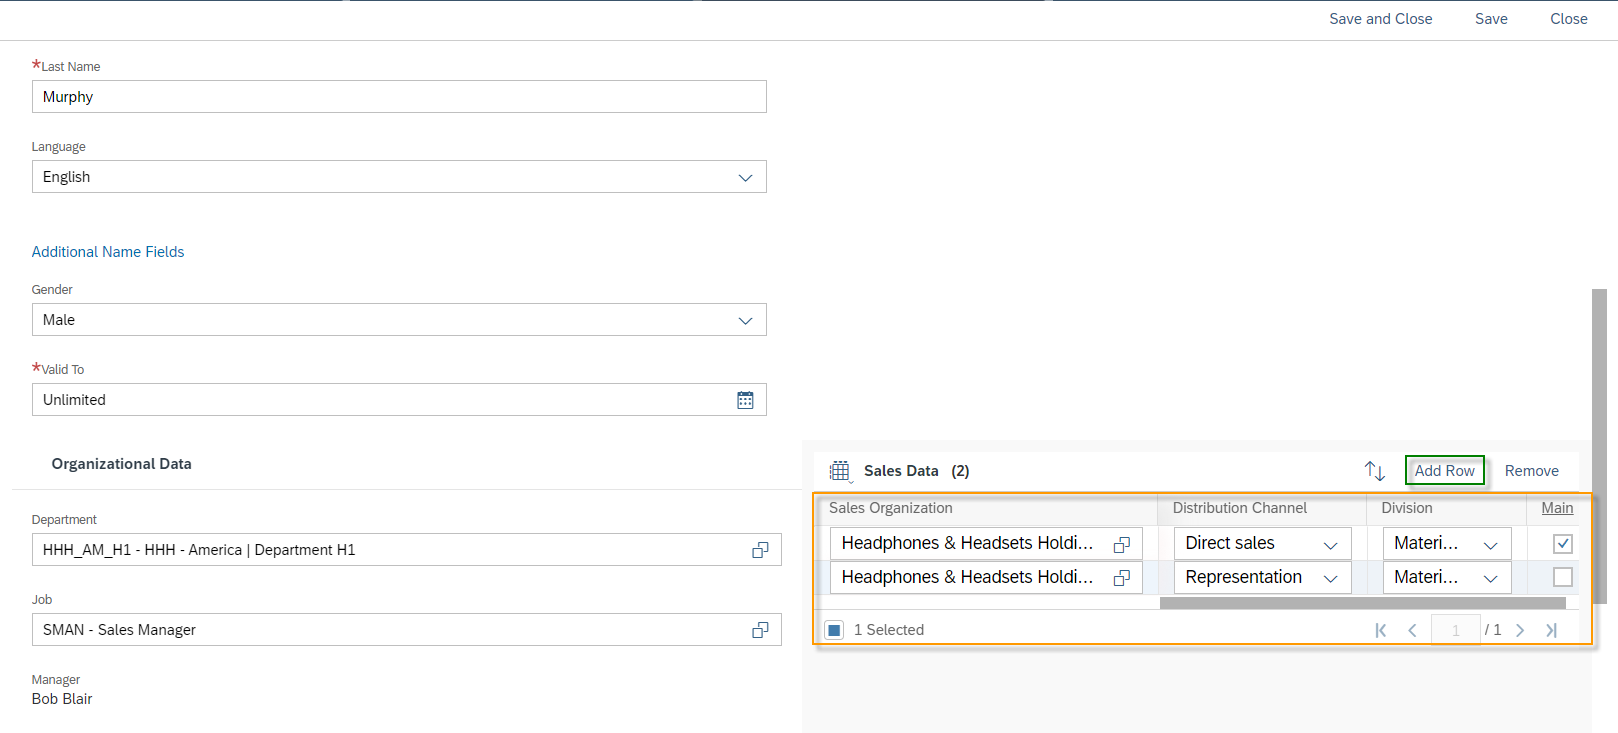
This Restriction Rule applies when the Employee’s Sales Data Assignment matches with the Sales Data Assignment of an Account. This Rule gives the Business User access to all objects of all Accounts which are assigned with this specific Sales Data. To assign the Sales Data of an Account click on the Tab Sales Data. Here you can click on New and assign the Sales Data to this specific Account according to the Organization Structure and sales strategy of your company.
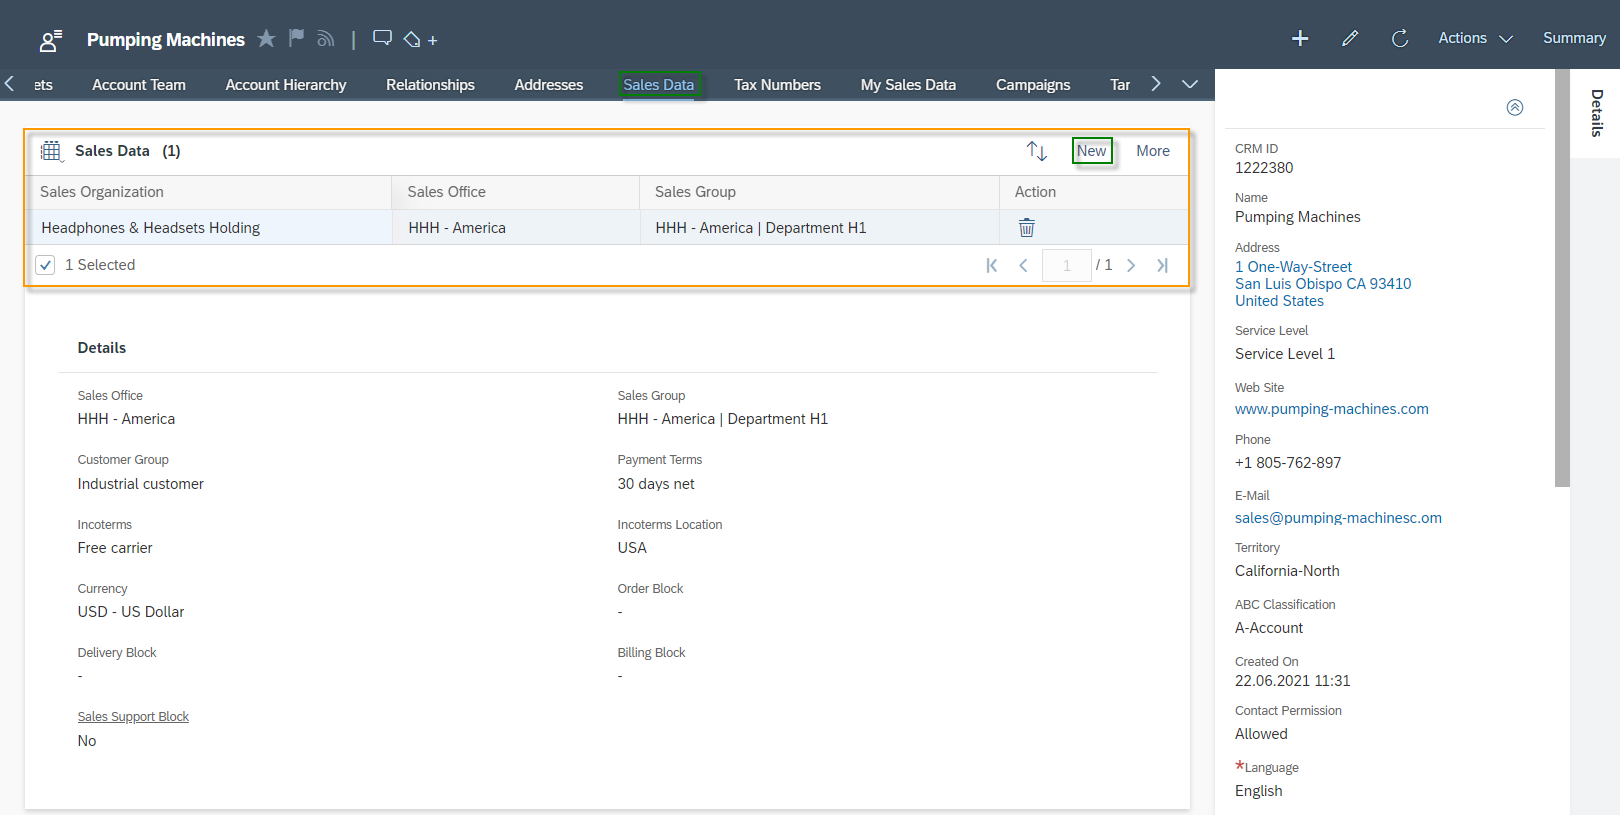
To assign the Sales Data to an Employee follow the instruction of Chapter Creation and Editing of an Employee. Click on Add Row and fill out the information of Sales Data. You can assign multiple entries and mark one entry as Main.
For all Workcenter Views you are also able to select the Restriction Rule 99 – Define Specific Restrictions. Here you are able to select multiple Sales or Service Organizations, Employees and Sales Territories. The authorization structure is thus derived from all these settings then.
In the fourth tab UI Switches you are able to assign to this Business Role multiple UI Layouts.
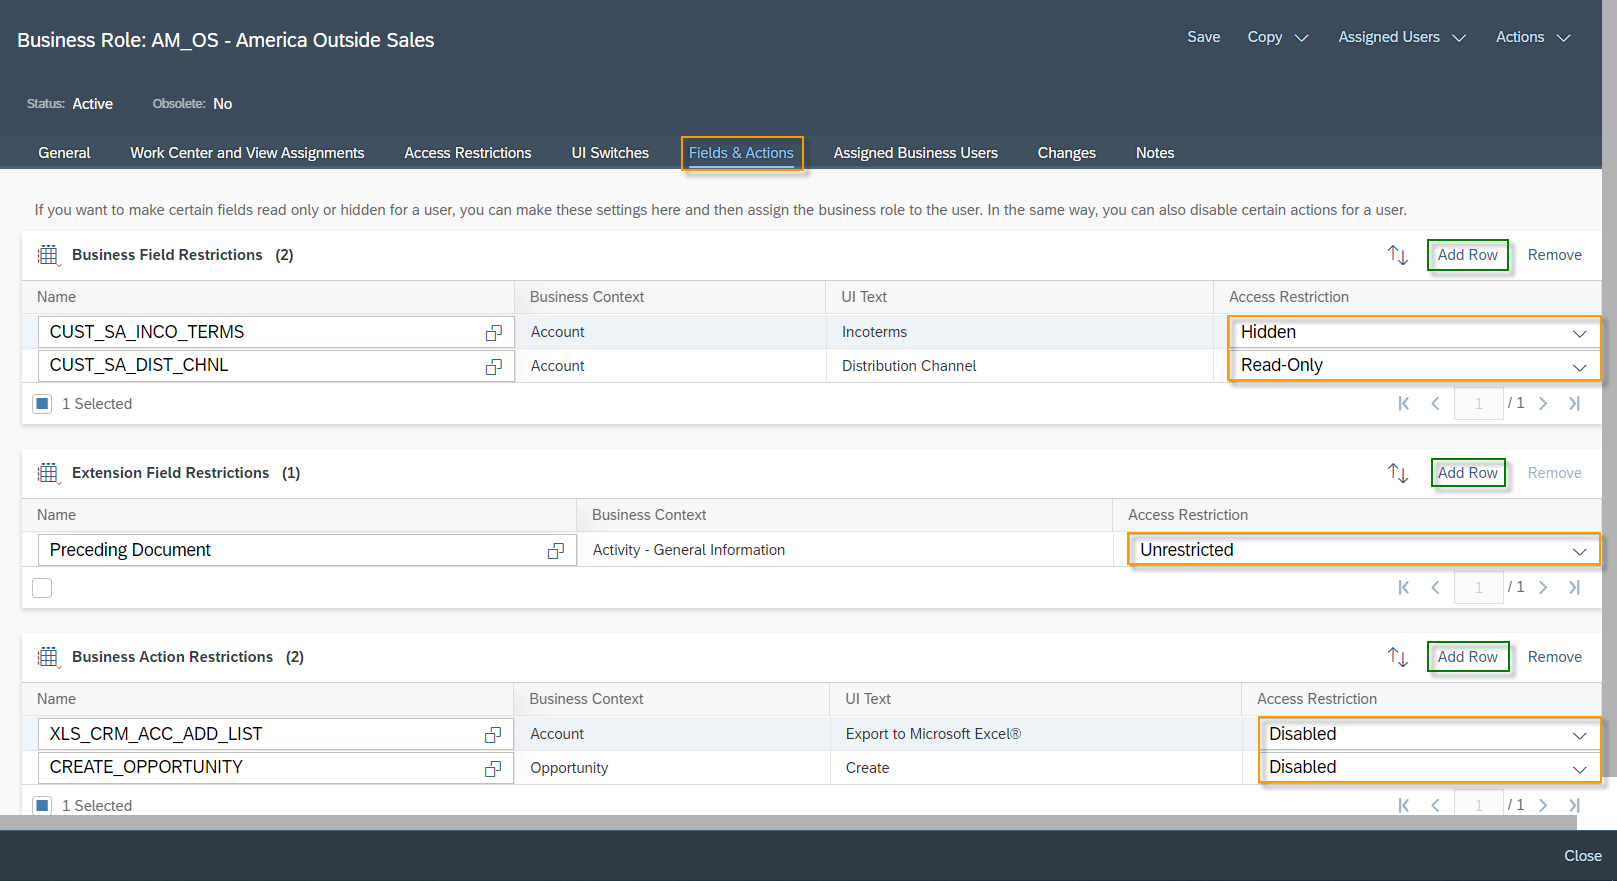
The fifth tab Fields & Actions is again more about permission settings. It is possible to set restrictions for fields separated by Business Fields or for Extension Fields. Business Fields are all standard fields, which are set up by SAP. Extension Fields are fields which are customized by the customer using this specific system. You can restrict access for both field types to Hidden, Read-Only or Unrestricted. By clicking on Add Row you can add another field, you would like to restrict. As a third setting in this tab it is possible to disable Business Actions.
The following list shows most common Business Actions you can restrict:
- Restrict: Export to Microsoft Excel® for Account
- Restrict: Export to Microsoft Excel® for Activity
- Restrict: Export to Microsoft Excel® for Contact
- Restrict: Export to Microsoft Excel® for Contract
- Restrict: Export to Microsoft Excel® for Lead
- Restrict: Export to Microsoft Excel® for Opportunity
- Restrict: Export to Microsoft Excel® for Sales Lead
- Restrict: Export to Microsoft Excel® for Sales Order
- Restrict: Export to Microsoft Excel® for Sales Quote
- Restrict: Export to Microsoft Excel® for Ticket
- Restrict: Delete a Contract
- Restrict: Delete a Lead
- Restrict: Delete an Opportunity
- Restrict: Delete a Sales Document
- Restrict: Delete a Visit
- Restrict: Create an Account
- Restrict: Create an Individual Customer’ a Lead
- Restrict: Create a Lead
- Restrict: Create an Opportunity
- Restrict: Create a Sales Document
- Restrict: Create a Ticket
The tab Assigned Business Users is just a view which Business Users are assigned to this specific Business Role. It is not possible to add Business Users in this tab. The Changes tab shows all changes made in this Business Role. In the last tab Notes you can add specific Information about this Business Role. It is very common that most customers write here information about: Who is the owner of this Business Role, from whom must approval be sought when a user requests this role in the IT department, and further information.
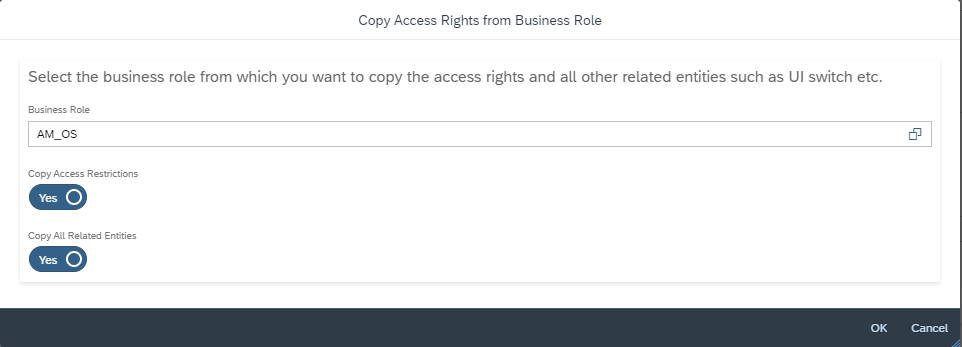
5.2. Copy a Business Role
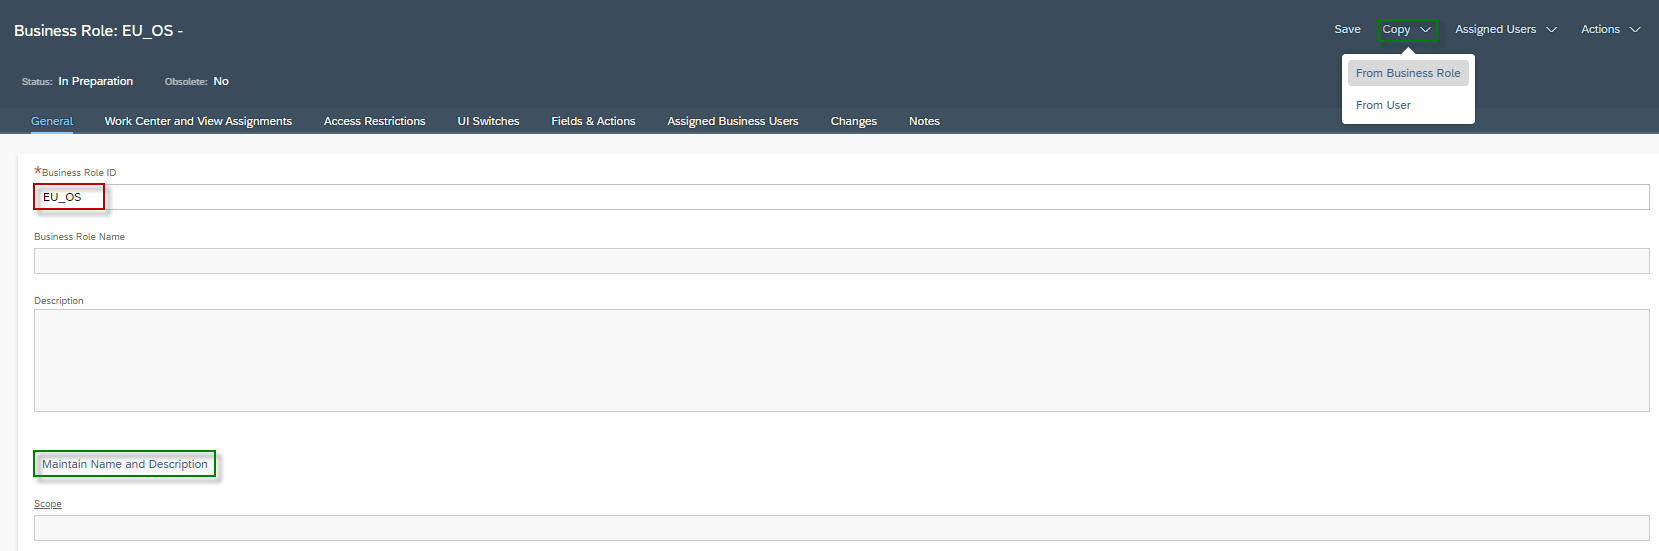
You will quickly realize that there are some Business Roles that will be similar. For these, it makes sense that there is a copy function that takes the properties of an existing Business Role into a new one. This is very easy to do in SAP Sales Cloud. First, create a new Business Role. To create a new Business Role click in the view of Business Roles on the top right hand side on New and then on Business Role. The first thing you need to do is enter a Business Role ID and then Maintain Name and Description. Afterwards click on the Button Copy. Here you can select between From Business Role or From User. To use the function From User makes sense when a User is assigned to multiple Business Roles and you would like to put this mix into one Business Role, which you can then assign to certain Business User. Since both functions From Business Role and From User work the same way – but obviously with different data sources – the focus is now on the function From Business Role.
The following three attributes can now be set.
Business Role: Select the Business Role you would like to copy the settings from
Copy Access Restrictions: Activate this indicator if you would like to copy the access restrictions from the selected Business Role. In other words this means the settings from the tabs Work Center and View Assignments and Access Restrictions will be copied
Copy All Related Entities: Activate this indicator if you would like to copy also the settings from the tabs UI Switches and Fields & Actions
5.3. Assignment and Controlling of Business Roles
In the view Business Users under Workcenter Administrator you have full control over Assignment of Business Roles. Under the Button Edit you can click on Access Rights. Here you can assign all Business Roles to a select user. Furthermore you can click on the …-Button where you can do one of the following commands
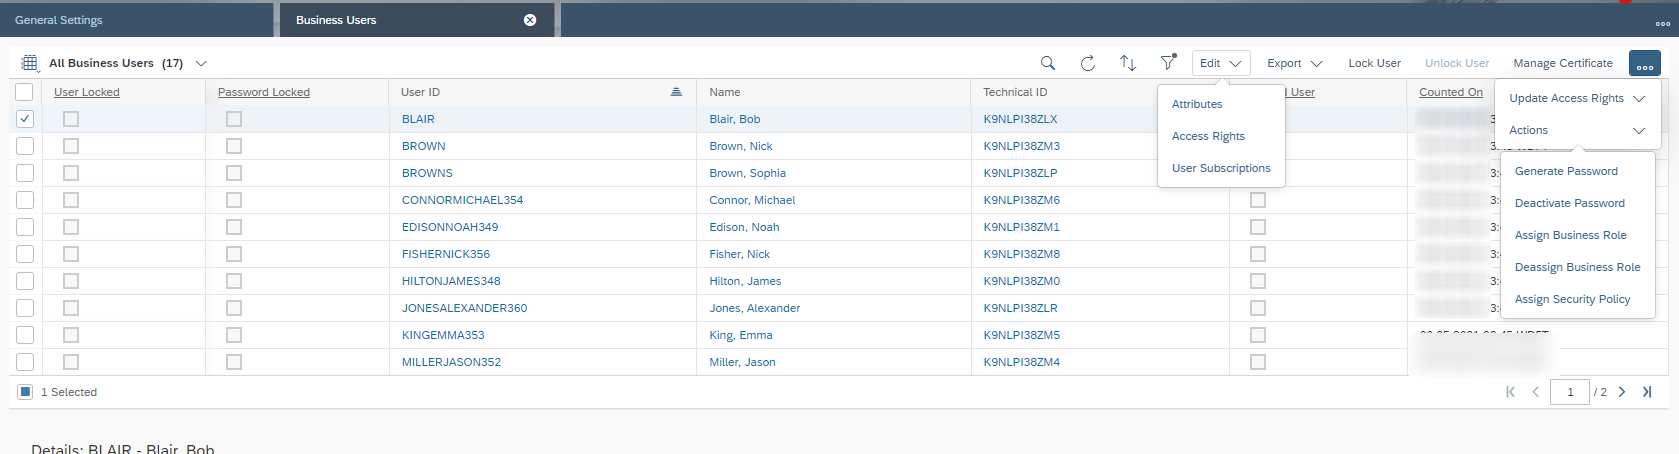
Update Access Rights
Simulate Update of Selected User(s)
Simulates all selected business users, checking for possible inconsistency
Simulate Update of All Users
Simulates all business users, checking for possible inconsistency
Update Selected User(s)
After assignment of Business Roles it is necessary to update the Business Users with this function. After updating the selected users, the new assigned business roles are applying
Update All Users
Same as above, but for all users – not only the selected ones
Show Background Runs of All User
Whenever you update or simulate multiple users, a background job will created, which can be seen here. For detailed information about a background job you can click on Display Log. This is needed when warning or errors occurred.

Actions
Assign Business Roles
For the selected user you can assign one Business Role. This function should only be used, if just one Assignment is necessary, because for multiple assignments Access Rights button under Edit is way handier.

Deassign Business Roles
The opposite of Assign Business Roles. Again, this function should only be used, if just one Deassignment is necessary, because for multiple deassignments Access Rights button under Edit is also here way handier.
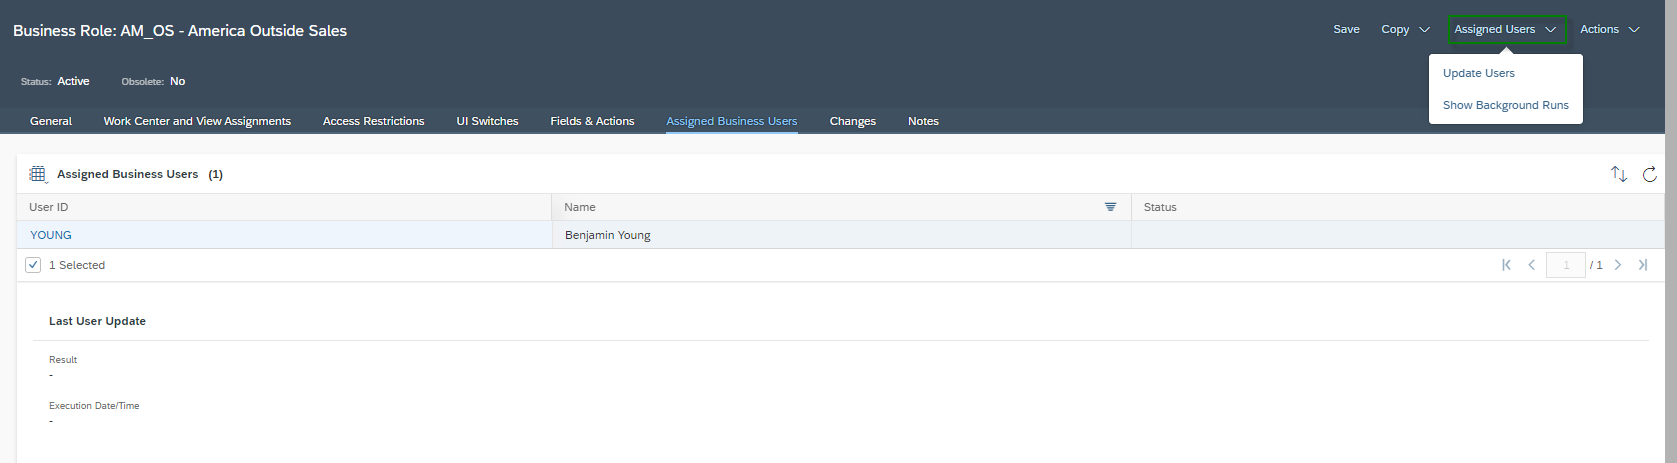
It also possible to Update Users or Show Background Runs with respect to the Business Role and not the Business User. Select one Business Role and click the on Edit. Under the Button Assigned Users you can update all Users, which have this business role assigned and also see the Background Runs for that.
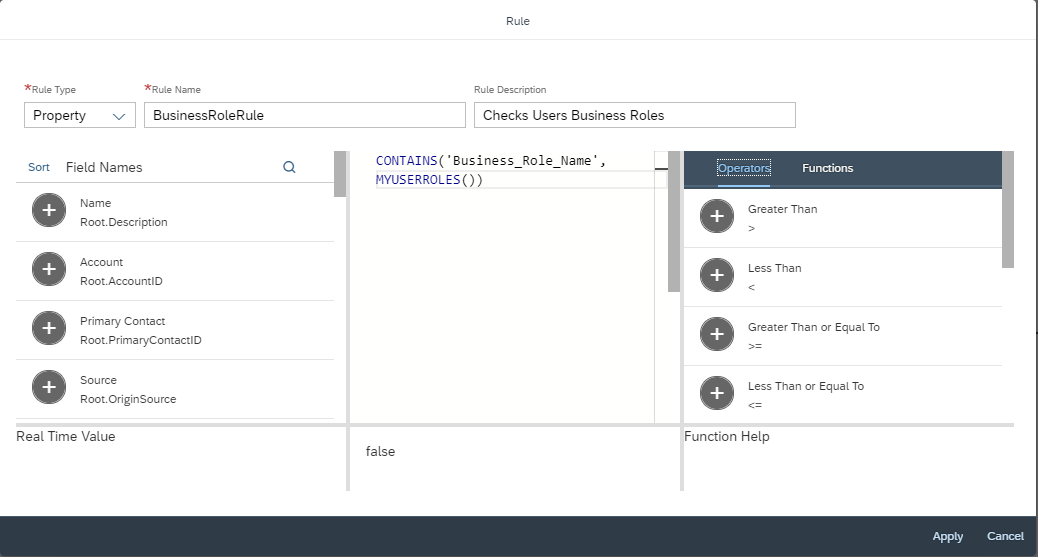
5.4. Rules and Validations for Business Roles
Using the Adaption Mode, Rules and Validations can be created. In those Rules and Validations the function MYUSERROLES() returns an array of all business roles to which the business user is assigned. Therefore you can query a very explicit business role with the following command line:
CONTAINS(‘Business_Role_Name’, MYUSERROLES())
As a result you will get TRUE or FALSE. A use case would be if a data field should only be editable for certain users.
Do you need consulting from our experts?
The Customer Experience team at Camelot ITLab deals with exciting and challenging CRM related topics every day and serves a large portfolio of different customers from a wide range of industries. Trust in this collaboration and feel free to contact us at tlil@camelot-itlab.com.
Was this article helpful?
If you like our content we would highly appreciate your review on Trustpilot
#SAP C4C #SAP Cloud 4 Customer #Cloud 4 Customer #Cloud for Customer #SAP Sales Cloud #Sales Cloud #BusinessRoles #Roles #Access #Access Restrictions #Restrictions #Context #AccessContext #RestrictionRules #UISwitches