Search
Close this search box.

Visit Preparation – Execution and Follow-up

visit preparation, execution and follow-up

The actual visit consists of the three parts: Visit planning and preparation, execution, and follow-up. While the first part may still be conducted on the computer by the sales representative, the second and third part require flexible tools

With SAP Sales Cloud, you can carry out your visits very flexibly, using various tools such as Microsoft Outlook and the mobile APP on different mobile end devices – such as Phone and Tablet. In this chapter, all these steps and the associated tools will be explained in detail.

2.1. Visit Planning and Preperation

You can create a visit as a follow-up to a campaign, after telephone consultation, as a part of a tour or a route or various other motivations. No matter how you plan your visits, at the end, you will always reach the creation screen, which always looks the same:

Subject

Enter the subject for your visit

Visit Type

Select the visit type, which is basically a way of categorizing your Visits. Examples may include Quote Tracking, Product Training, Payment Collection, etc.

Account

Select the customer to be visited

Primary Contact

Select the primary contact who will organize the visit from the customer’s perspective

Organizer

The Organizer is the counterpart of the primary contact and organizes the visit for your company. By default, the business user who creates the visit is entered

Owner

The owner is the person responsible for the visit. By default, the business user who creates the visit is entered. The difference between Organizer and Owner can be given if, for example, a manager (=Organizer) organizes the visit for one of his sales representatives

Start Date/Time

Select the start date/time

End Date/Time

Select the end date/time

All-Day Event

With this indicator you can mark the visit as an All-Day Event, which means that you cannot do any other activities, visits, etc. on this business day

Note

Enter your notes here

Confirm your entries with Save and Open to create the visit and to be able to make additional entries in the visit itself. In the visit, you can further prepare your Notes. It is recommended to separate the notes into the three areas Preparation, Execution and Follow Up. This way you can note down everything important into these three areas. In the Attendees section you can add all participants of the visit with the Add button. Add all employees as well as the contact persons of the customer who will participate in the visit. In the Overview tab you will also find the Last Visited Date and Notes from Last Visit sections. Here you will see the information about when the last completed visit took place and the corresponding conversation notes.

You add and manage documents in the Attachments tab. At the same time, you also have the possibility to manage the notes and the attachments via the Notes/Attachments panel.

When scheduling a visit, you may accidentally want to schedule an appointment that is already occupied by another visit or activity. In this case, you will receive the following warning message when you create the visit: A parallel activity exists.

2.2. Visit Excecution

While you are holding the visit with the customer’s contact person and your colleagues, you should of course listen carefully and take notes on the conversation. You can use various handheld devices for this purpose, with the help of which you can directly write the notes digitally. For example, with a tablet. In the Notes/Attachments panel, you can perform your Notes and share important Attachments with your Customer. Use the tab of Visit Execution, which helps you to perform your Tasks and Surveys, you may need these during the Visit. In the figure shown below you can see that there are two Objectives that you need to check during the visit. In the All query you can see all surveys as well as tasks. At the same time, you have a predefined filter for the Surveys and the Tasks itself. Finally, there is a filter where you can select all Mandatory surveys and tasks. For more information on surveys and tasks in visits, see Activity Planner. In the Visit Execution tab, you can also Create Follow-Up objects such as Sales Quotes, Sales Orders, Tasks, Appointments, Phone Calls, Visits, Leads, Opportunities and Tickets.

Another useful feature during the visit execution is the Timeline panel. Here you can quickly look at all business objects – descending by creation date – that are linked to this customer. This way you can quickly get information about these objects when the customer asks you about them.

2.3. Visit Follow-Up

As the third part of the actual visit, you should follow it up. This part includes finalizing your Notes, informing your colleagues about Follow-Up Items, Generate a Summary, and sending it to colleagues or managers if necessary, and managing the Status of the visit.

Notes

Make sure that the note is complete and structured on the visit. This has the advantage that you can provide information quickly – in case the customer should ask for it – and that other colleagues can get information about it.

Follow-Up Items

In the Follow-Up Items tab, you can create all follow-up actions. To do this, click New in the Follow-Up Items section. Here you have the option of creating Sales Quotes, Sales Orders, Tasks, Appointments, Phone Calls, Visits, Leads, Opportunities and Tickets. In the Related Items section, you can use the Add button to link existing business objects in your system to this visit. Note that the Related Items can only be linked, if the same Account is used, which you visited.

Generate Summary

After you have completed the visit, you can generate a summary in the form of a PDF. To do this, click on Actions and then Generate Summary. A PDF will be created automatically and attached to the business object visit. You can use this PDF to send this to the customers or also to email it to managers as an attachment in the form of a visit report.

Status

Four status values allow you to track the progress of the visit. The first initial one after the creation of the visit is Open. This symbolizes that the visit is planned and will take place in the future. The Completed status indicates that the visit has been carried out, but it may still be necessary for the sales representative to fill his or her notes here. If there is a necessity to work on it longer, use the In Progress status. Since it unfortunately happens in any business that visits are canceled for various reasons, you can use the Cancelled status here. This status has the advantage over deleting the element that you can also track when visits would have taken place. Also, an important information. It is only possible to delete Visits which are in the Status of Open. If the Check In and Check Out functionality is disabled in your application, you can trigger the statuses using the Action button.

2.4. Visits & Microsoft Outlook

Microsoft Outlook® has established itself as the program for email and calendar management. This is also the reason why many of your employees are already well organized via Outlook and manage many of their emails, activities and visits via this application. You also have the possibility to organize and manage your visits with a Microsoft Outlook® Add-In and synchronize all information to SAP Sales Cloud. In general, all sales employees can keep Outlook in sync with their C4C calendar.

To create a visit from Outlook, use the client-side add-in for Microsoft Outlook®. Select the free slot in Outlook and right-click on this area and then click on New Appointment.

In the SAP Sales Cloud Ribbon, mark your just created Appointment as a Visit. Next, enter all the important information as already described in Chapter – Visit Creation and Preparation. Each information will be synchronized to the SAP Sales Cloud. The notes, start and end time, all-day event, subject and attendees. If you invite contacts or colleagues as optional, they will not be synchronized to SAP Sales Cloud application.

In the next step, a popup window will open in your Outlook where you can enter a reference. In this process, the visit is simply referred to a customer. To do this, click on Add Reference and then on Account.

In the next step, you can search by customer name or customer number in the Find field and press Go to start the search. Select the customer in the displayed search results and then click Add Reference.

You will be redirected to the first popup, where you will find the found customer in the Referenced Account column. Now confirm your entries with Submit. If the synchronization is successful, you will now receive a message from Outlook that this visit can now be found in the SAP Sales Cloud system.

Besides the Add Appointment button of the SAP Sales Cloud Ribbon – which was explained in the first step – you can also select the Save, Send, and Sync Appointment button in the first step. This button simplifies the process steps for you by automatically saving the appointment, sending it to the invited contact partners and then synchronizing it by selecting the customer in the SAP Sales Cloud.

Now, in business life, it is also common that visits must be canceled again. You can easily cancel visits via Microsoft Outlook. To do this, right-click on the visit you have organized in your Outlook calendar and click Cancel Meeting. In the next step, send the cancellation from Outlook to all participants. This change is now automatically synchronized in the SAP Sales Cloud and while the entry is removed from your Outlook calendar, the Status in the cloud is simultaneously set to Cancelled.

2.5. Use the mobile APP for your Visits

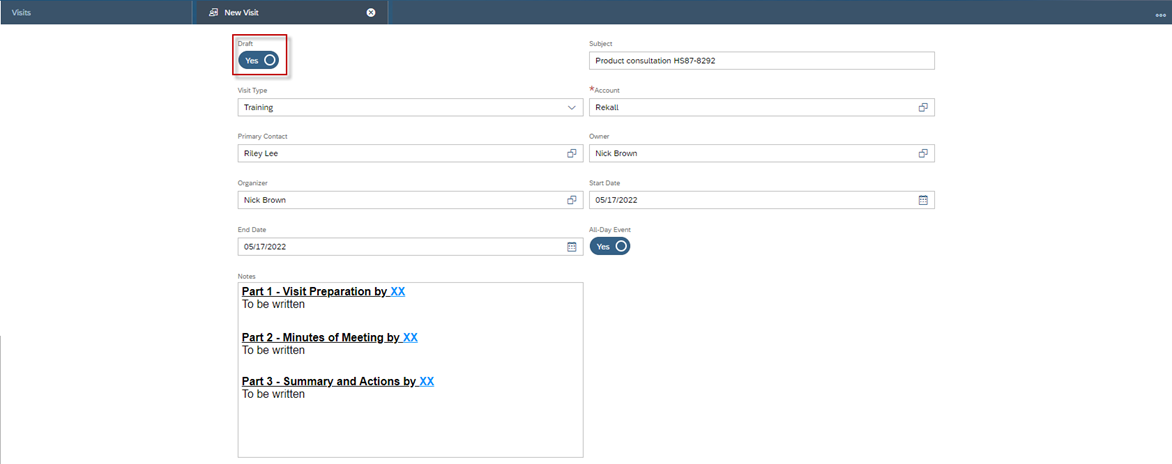
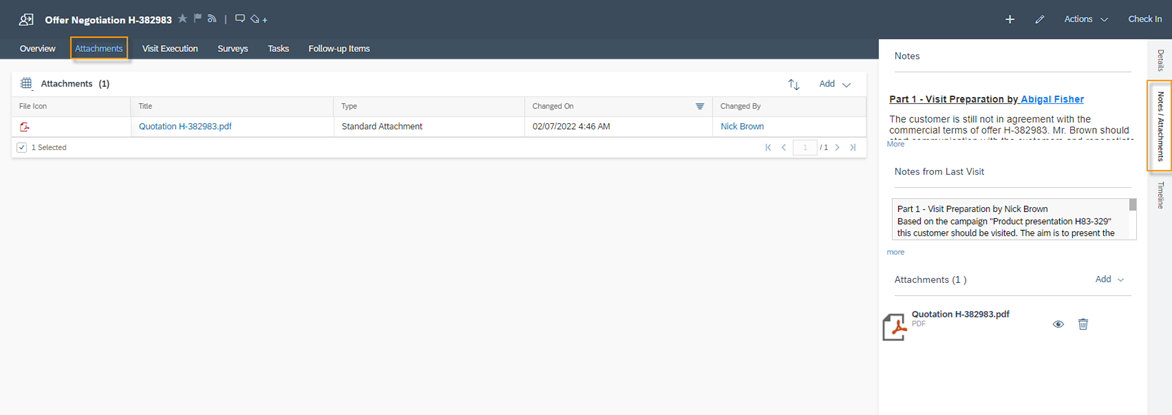
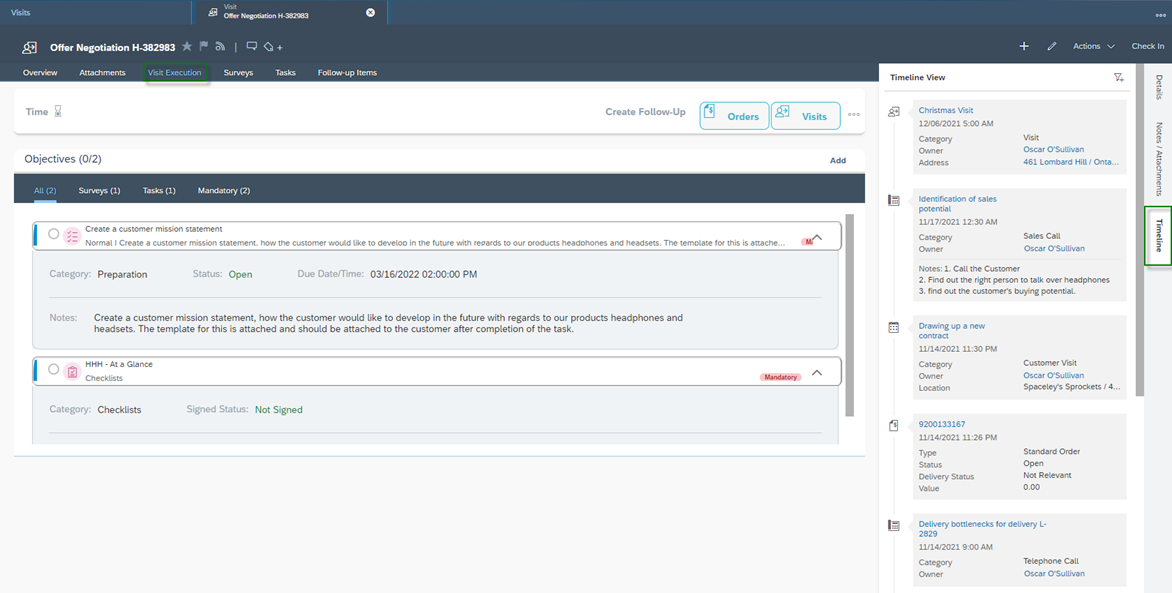
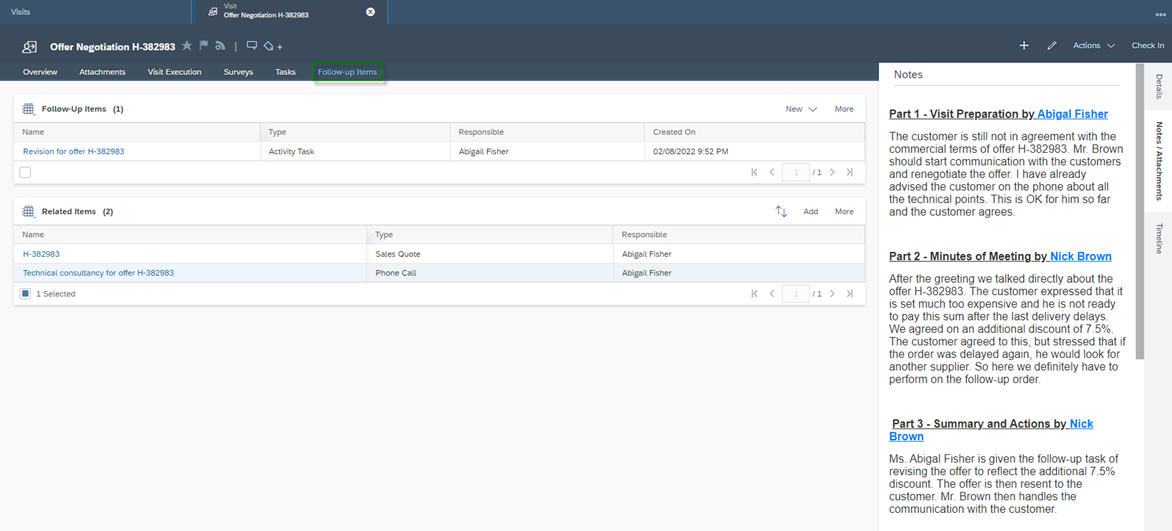
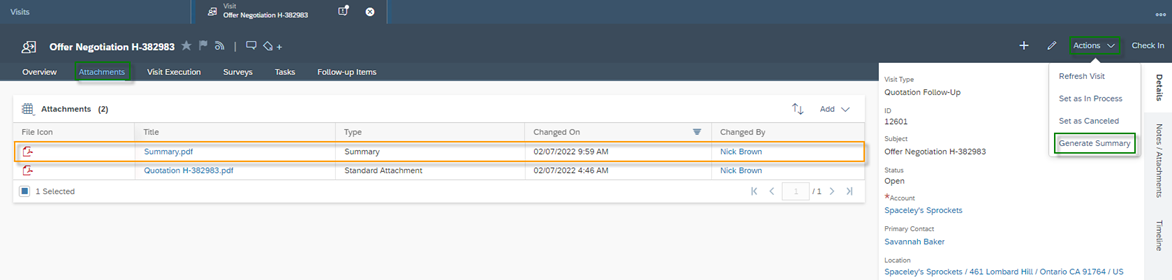
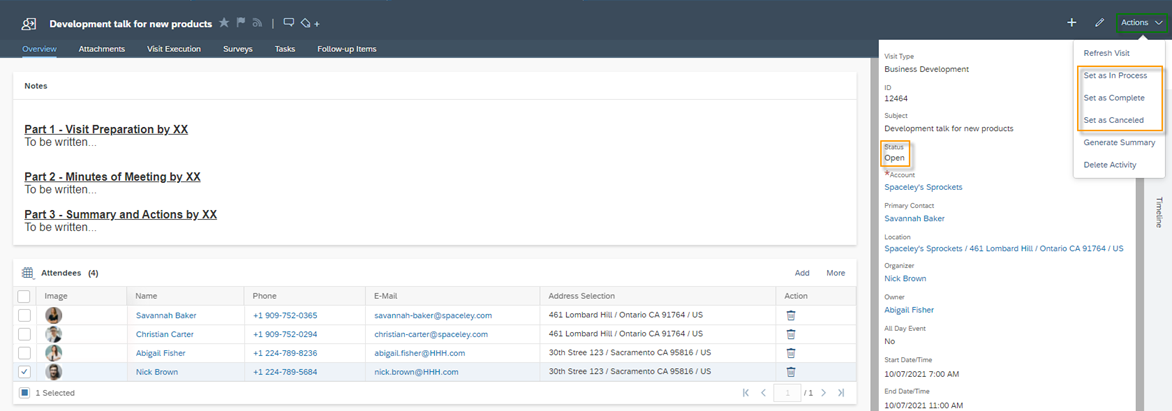
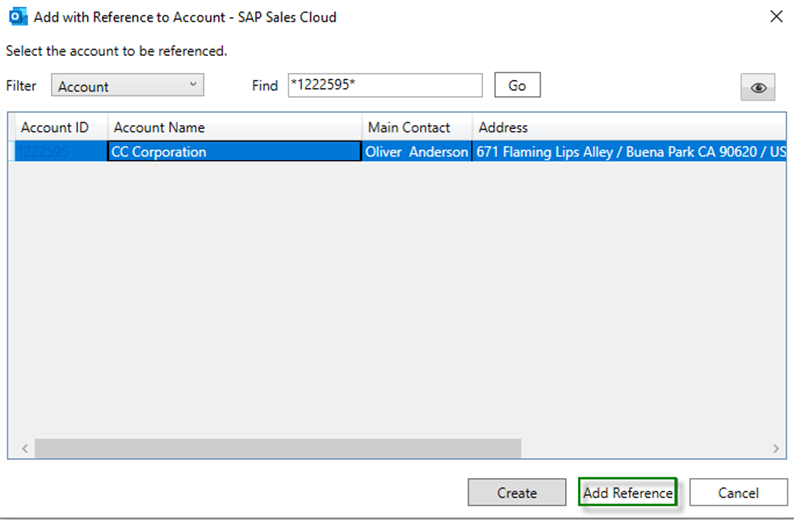
A big advantage of the SAP Sales Cloud application is the ability to access it at any time from any mobile device. This can come in handy for the outside sales team, which daily routine is characterized by travelling and customer visits. By using the mobile application they can store important information directly in the cloud.

You will find a particularly useful function on every mobile device for every brand. Speech-to-Text helps you – especially when you are on the road – to quickly record notes and thoughts even when you are on the move. You will find this function on all Android as well as IOS systems with a Microphone Icon on your keyboard. With this function, you can dictate into the microphone and the device will automatically take notes for you. Thereby the recognition is extremely high today. You can also use commands such as question mark, comma or, for example, new paragraphs. In this way your notes and thoughts will be already structured while you record them. Read the user manual of your mobile device carefully for this function.

2.6. Create Visits in Draft Mode

When planning your visits, it will happen more often that you already want to block the visit in your calendar, but the visit has not yet been finally confirmed by all participants. In addition, it can also happen that the time window shifts a little forward or backward. In the planning phase it makes sense to create the visit anyway – even if it is not finalized – and thus block this time slot. With that you avoid that you plan visits in parallel. To do this, you can mark your visit as a Draft when you create it. By default, this indicator is set to disabled. With the draft indicator you prevent the visit from being synchronized to your Microsoft Outlook calendar. Thus, you can include it in the visit planning, but the object does not appear directly as a binding appointment in the calendar. Once the visit is finalized, you can disable the draft indicator in the visit, send the visit and synchronize it with your calendar.

Do you need consulting from our experts?

The Customer Experience team at Camelot ITLab deals with exciting and challenging CRM related topics every day and serves a large portfolio of different customers from a wide range of industries. Trust in this collaboration and feel free to contact us at tlil@camelot-itlab.com.

Was this article helpful?

If you like our content we would highly appreciate your review on Trustpilot


#SAP C4C #SAP Cloud 4 Customer #Cloud 4 Customer #Cloud for Customer #SAP Sales Cloud #Sales Cloud #Visit #Visits #Visit Planning #Visit Preperation #Visit Excecution #Timeline #Summary

Receive the latest news

Subscribe To our SAP Sales & Service Cloud Newsletter

Get notified about new articles