Search
Close this search box.

Assign Tasks and Surveys with the Activity Planner

Assign Tasks and Surveys with the Activity Planner

With the Activity Planner you have the possibility to plan and control sales activities as well as surveys in a defined validation period. The difference to a sales campaign with activities is, that you want to address in a campaign a defined target group in the campaign - for example, customers based on an attribute, contact persons or leads. Whereas the Activity Planner is meant to be a support or supplement to the already planned sales activities. The advantage is quite obvious. With an Activity Planner, you can support your sales or service team, quickly gather information, or fulfill activities that are necessary within this validation period.

Navigation for User - Activity Planner

This chapter is explained based on an example, which will give you a much better understanding of the features and content. At HHH – Headphones & Headsets Holding it is known that in the summertime many customers and their contact persons have less on their desks, than during the peak times in winter, spring, and fall. This relaxation of customers should be exploited to visit customers and contacts to strengthen customer relationship. Customers are always happy to receive such visits in the summer. You give your sales staff maximum freedom to choose which customers to visit in the US or Germany – which at the same time is an argument against a campaign. The only requirement is, that you must categorize the visit as a courtesy. However, you don’t want them to simply drink coffee and make small talk about gardening and their children. You also want an informal outcome from the visit. So, you plan to have the sales rep to interview the customer based on two surveys and have them to complete two tasks as a follow-up.

Activity 1:

Subject:         Create a customer mission statement

Goal:              The sales representative should find out in discussions how the customer would like to develop in the future. The employee should write this down in a Word template and attach it to the customer. This task is supposed to be mandatory

Activity 2:

Subject:         Inform colleagues about possible planned structural changes of the customer

Goal:              If you should find out in the discussions with the customers that the customer is reformatting or restructuring you should inform other colleagues – such as the inside sales colleague or your sales manager – in a meeting. This task is optional

Survey 1:

Introduce customers to the HHH – At a Glance survey so you can sharpen the customer relationship. This survey is to be conducted mandatorily

Survey 2:

Go through the Competitor Risks survey with customers to learn what competitors this customer is in contact with. This is optional if the customer is not allowed or does not want to talk about it

The Work Center Activity Planner therefore consists of two Work Center Views. The Plans, where you can add and define tasks and surveys. And the Routing Rules, where you can define to which business objects and under which conditions the plans should be attached.

1. Plans

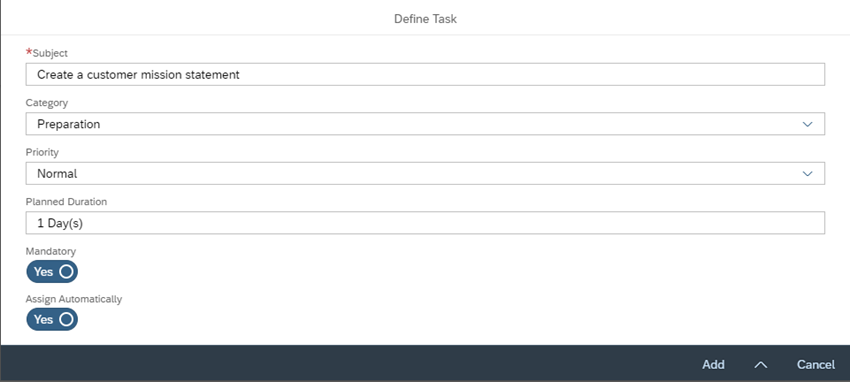
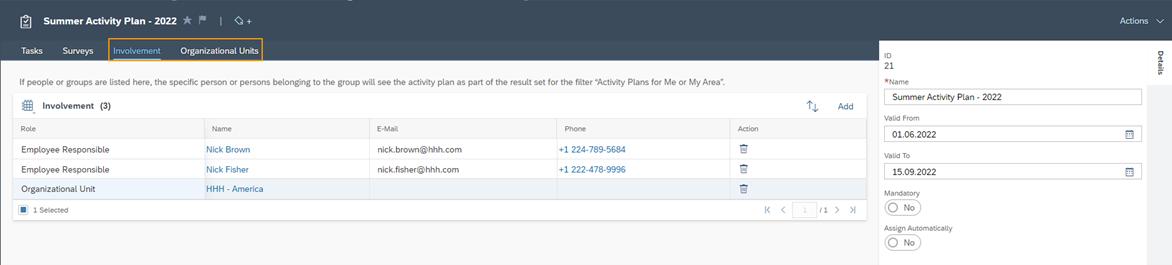
To create an Activity Plan, go to the Work Center View Plans and click on the Create Icon . In the creation screen, define a Name for your plan and the Validation period. In this period this plan will have its validity and will be attached to every business object you can later define with the routing rules. In the last step you can define whether this plan should be Mandatory or not. Basically, you define with this setting that the tasks and surveys – which you add to this plan – will be suggested as mandatory by default. You will learn more about this later.

Tasks

In the Tasks tab you can now add and modify the tasks you want to add to this Activity Plan. To do that, click the New button. In the popup shown you define a Subject for the task, the Category, the Priority and the Planned Duration to complete this task. The Duration must be in the following syntax: Enter the value in units of Year(s); Month(s); Day(s); Hour(s); Minute(s); Second(s); with number and time unit, for example, “4 Day(s) 4 Hour(s) 4 Minute(s) 4 Second(s)”. All time units may be abbreviated to the first unique letters; empty characters are not necessary. In the last step you decide whether the task should be Mandatory – it is mandatory by default if you have marked the plan as mandatory – and whether the task should be assigned automatically to the business object. So, if you have set Assign Automatically to disabled, the business users can add this task manually to the business object. You can read more about this in the following chapter – Usage of Activity Plans. Confirm your adjustments with clicking on the Add Button.

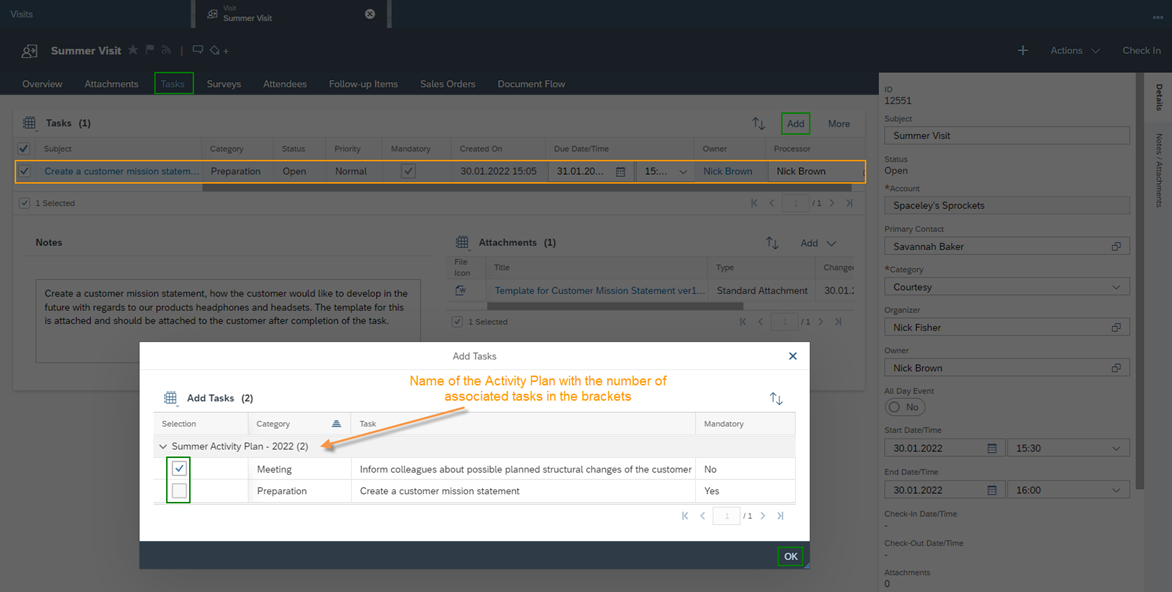
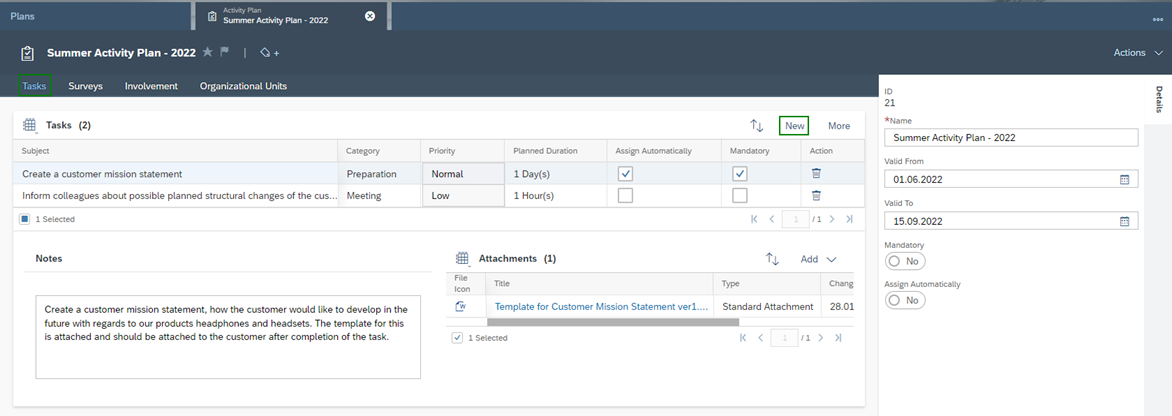
After you have created the task, you can add Notes and Attachments to the task. With the Trash Icon  you can remove Tasks later if you don’t need them anymore.

Surveys

In the Surveys tab you can add created surveys to this Activity Plan using the Add button. Make sure that the validation period of your survey matches the validation period of your plan – otherwise you will not find your Survey to add into your plan. After you have added the survey, you can determine here whether the survey should be Mandatory and whether this survey should be Assign Automatically to the business object.

Involvement and Organizational Units

In the last step, you can determine the responsible employees for this Activity Plan and assign this plan organizationally. This is important for your overview, as well as for assigning authorizations. All the necessary settings for this can be found in the Involvement and Organizational Units tabs.

Copy

Under the menu Actions you will find a Copy function with which you can copy an existing activity plan. This is of course helpful if your new plan is to be structured very similarly to an existing one.

At this point it should be emphasized once again that you can modify the Activity Plan at any time, even if you are in the middle of the Validation Period. Activation is not necessary; the plan is active as soon as you have created it. Another important aspect is that it is recommended to always enable the Assign Automatically properties for mandatory tasks or surveys. The property mandatory only takes effect in the business objects if the task or survey is also attached to this object. If not, the Business User can easily complete the Business Object, without fulfilling the mandatory Activity or Survey. You will also learn this later in detail in the following Chapter – Usage of Activity Plans.

2. Routing Rules

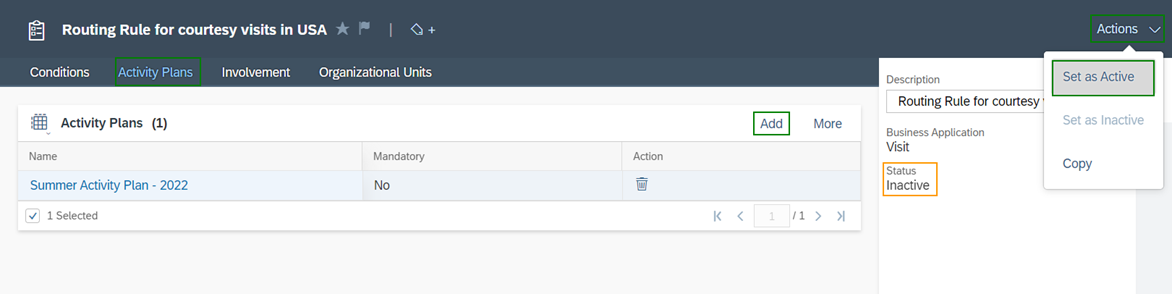
Now that the plan has been created and provided with tasks and surveys, this chapter explains how exactly this plan is attached to the business object you want to use, considering defined conditions.

To create a Routing Rule, go to the Work Center View Routing Rules and click on the Create Icon . In the creation form you can then enter the Description for the routing rule and select the Business Application. The following business objects are available under Business Application:

  • Leads
  • Opportunity
  • Sales Quote
  • Phone Call
  • Visit
  • Ticket

Confirm your adjustments with Save and Open.

Conditions

Now that you have created the routing rule, you are automatically taken to the Conditions tab. You must define at least one condition, otherwise you will receive the following error message Maintain at least one condition.

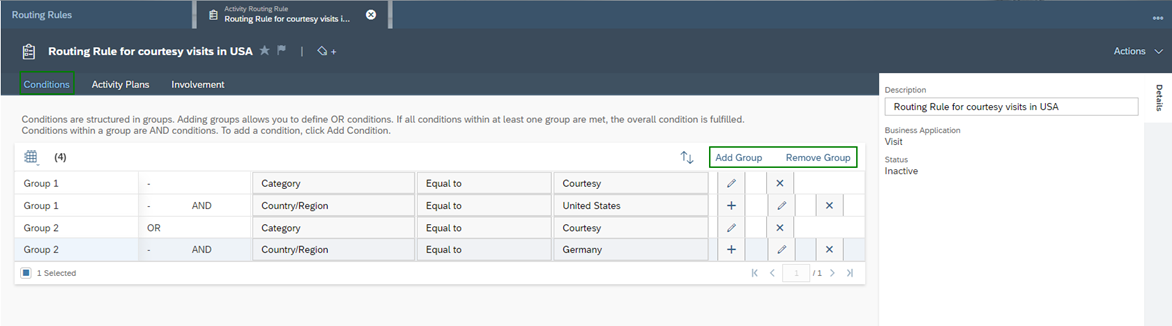
The conditions can be grouped. Within a group, the individual conditions are linked with the logical operator AND. The groups to each other are linked with the logical operator OR. To add a group, click the Add Group Button. With the Remove Group button, you can remove a group later, if this is not needed anymore. The last sub condition of a group always has the Add Button , with which you can add more members to this group. Each sub condition can be edited with the Pencil Button  and thus adjusted later and also removed with the Remove Button . The example shown below can therefore be understood as follows:

If the Category of a visit equals to the value Courtesy and the Country/Region value equals to the United States OR Germany with also the same category, then all conditions are met.
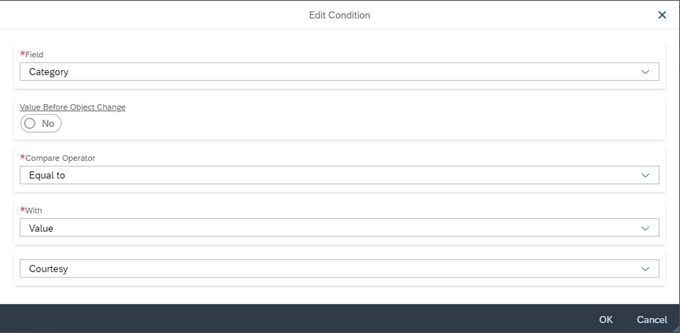
So, when you click on the Add Button  the following popup appears, where you can define the condition with the following parameters:

Field

Select the data field you want to check as a condition

Value Before Object Change

With this indicator you can choose whether you want to check the value before (indicator enabled) or after (indicator disabled) the data field changes. Example: If the value of the data field Category will be changed by a Business User from Courtesy to Business Development, then you can check with this indicator which value you would like to consider to your condition

Compare Operator

Decide which operator you need to compare the value of the field with a defined value. Here you will find all typical operators like equal to or not equal to for text fields, but also for example greater or less than for numeric fields

With

Here you can select whether you want to compare the field with a defined Value or with the value of another Field

Value

Enter the value to be compared or select the field you want to compare with the field defined above

Note: If you are interested to understand more about Conditions and you would like to go through more examples, then check Chapter Workflows.

Make sure you have made all the necessary settings in the Involvement and Organizational Units tabs to assign responsibility. In the last step, you can then add the Activity Plans, that you want to run, under this Routing Rule in the Activity Plans tab. Note: If you have defined an Activity Plan in the Validation Period for the future, you will not find it here. You can only add plans that are in the Validation Period in the period where you create the Routing Rules. With the Add button you can add as many plans as you want to these rules. When all settings are done for your Routing Rule, you should activate the rules before you save them, because the Status is set to Inactive by default. To do this, click on Actions and then on Set as Active. Now you can Save, and the rules will be active from now on.

3. Usage of Activity Plans

As already described, you can use Activity Planner for objects Leads, Opportunity, Sales Quote, Phone Call, Visit and Ticket. In this example we show all the functions in the Business Object of a Visit.

As soon as you create or edit a business object so that the conditions of a routing rule have been met, you will receive the following messages, if a task or survey has been marked as Assign Automatically:

  • Activity Plan Items will be created asynchronously.
  • Activity Planner Routing Rules were re-executed.

These messages mean that it takes a little time – one or two seconds – for the attached objects to become visible. They are immediately visible as soon as you refresh the business object. In the Tasks tab, you can see in the figure below that the task Create a customer mission statement is Assigned Automatically to this visit. You can also see in the Mandatory information column whether you need to perform the task before you can complete the visit. You can edit attributes of the tasks here – like Due Date/Time or Processor. To manually add more tasks – which have not been marked as Assign Automatically – click the Add button. In the following Pop-up all tasks – grouped by Activity Plan – are displayed. Select all the tasks you want to add and click OK. Tasks which are already assigned to the visit cannot be marked anymore – so it is only possible to assign each task once. After you linked a task to the visit following message will appear: Task Inform colleagues about possible planned structural changes of the customer was added successfully.

The principle for the surveys through the Activity Plan is exactly the same as for the tasks. Navigate to the Survey tab and here you will also see that survey HHH – At a Glance has been Assigned Automatically. Here you can also see the Mandatory information column. To add more surveys to the visit, click on the Add button here as well. In the figure below you can see that there are even two Activity Plans. In the popup you will find two groups Summer Activity Plan – 2022 and Product Collection Plan, each with two surveys attached. After you linked a survey to the visit following message will appear: The survey Competitor Risks was added successfully.

As long as not all mandatory tasks and surveys are processed, you will not be able to complete the business object. During the visit you receive the following error message: This visit contains mandatory tasks or surveys that are incomplete. Even though we have only explained the chapter on the basis of one visit, everything that has been explained also applies to the other Business Objects, such as tickets or sales quotes. Here you will also find the tabs Tasks and Surveys, where you can then find all attached tasks and surveys.

Do you need consulting from our experts?

The Customer Experience team at Camelot ITLab deals with exciting and challenging CRM related topics every day and serves a large portfolio of different customers from a wide range of industries. Trust in this collaboration and feel free to contact us at tlil@camelot-itlab.com.

Was this article helpful?

If you like our content we would highly appreciate your review on Trustpilot


#SAP C4C #SAP Cloud 4 Customer #Cloud 4 Customer #Cloud for Customer #SAP Sales Cloud #Sales Cloud #Plan #Routing Rules #Acitivty Planner #Survey #Mandatory #Assign Automatically #Processor #Activity Plan #Involvement #Organizational Units #Category #Condition

Receive the latest news

Subscribe To our SAP Sales & Service Cloud Newsletter

Get notified about new articles