Search
Close this search box.

Ticket Intelligence

Machine Learning
Ticket Intelligence

Ticket Intelligence in SAP Sales Cloud and SAP Service Cloud is using the technologies of Machine Learning (ML) and Natural Language Processing (NLP). The training and prediction of these technologies does not take place directly in the SAP Sales Cloud, but via a ready to use interface to SAP Leonardo. Machine Learning is only available for customers who have an Extended License Version. So, check your commercial contract with SAP first

Under the Work Center Administration, you will find the Work Center View Prediction Services. In the Machine Learning Models tile click on the Model Setup menu item.

In the Model Setup section, you will find an overview of all Machine Learning Scenarios and the Models of each Scenario underneath it.

3.1. Benefits of using Ticket Intelligence

The goal of solving Service Tickets is to provide the customer the correct solution for his request as fast as possible. To achieve this goal, firstly the ticket must be routed to the responsible employee as quickly as possible, and secondly the employee must find the appropriate answer quickly. Ticket Routing Rules are one important function for the routing. In a regional service organization this function helps to derive the service team and territory into the ticket. Here, the customer master data and/or the information from the customer request are used to determine the routing. However, in large regional teams you also have experts on various customer requests, so you have to know about the content – which is descripted mainly by the categories of a ticket. Without Machine Learning you are facing following two major business problems:

  • Companies spend a lot of time manually classifying customer requests and routing them to the right person
  • Companies with a large customer base often get the same questions asked over and over again. The employee is spending time too much time in searching for the right answer or in formulating the appropriate response via e-mail

These factors cause your customers to wait longer for the appropriate response. With the Service Ticket Intelligence function, SAP Sales and SAP Service Cloud offers you a machine learning model with the following Machine Learning Scenarios:

Ticket Categorization

The machine learning model classifies incoming customer requests. The Ticket categories service, object, incident and cause can be predicted, as well as the priority. Based on the automatic classifications of the machine, Workflows or PDI Solutions can be developed to set further automatisms. This module reduces the service agents’ working time and gets the customer’s request to the right employee faster

Ticket NLP Classification

This Classification helps to predict the language and sentiment of the incoming customer request. Based on the language and customer sentiment, you can also route the ticket to the responsible employee. As an example, you can route emails from certain customers, where there is a risk that the business will burst, directly to the group leader in case of bad mood emails. The Group Leader can take his time to deal with this customer directly. At the same time, this module provides the services that the Product ID, Serial ID or OrderID can be extracted, so that the service agent can process such requests faster

Email Template Recommendation

In the service area, templates can be created for frequently recurring customer requests. On the one hand, this has the advantage that employees do not have to repeatedly formulate and format e-mails and, on the other hand, that your company responds in a standard manner. This Machine Learning Model helps to find the corresponding Email Template automatically, based on the incoming customer request

Similar Ticket Recommendation

This machine learning model compares new incoming customer concerns with existing tickets. The service agents can therefore easily check whether a co‑worker has already sent the appropriate response to another customer in another ticket. This model helps a lot in speeding up the resolution process

Machine Translation

This module simply translates the work description into a target language. The benefit is that your service agents are not busy translating texts on their own and can therefore process the ticket more quickly

Ticket Time to Completion

Based on past tickets, this machine learning model can be used to predict a time for completion. This brings two key benefits: first, you can let your customers know how long the waiting time is with an autoreply, and second, you can get a better overview of your own service agent workload

Text Summarization

This module summarizes the subject and interactions in one overview. Thus, service agents can get a faster overview of the entire ticket interactions. All non-essential information is thereby filtered

3.2. Implementation of Machine Learning in Service

The implementation of the individual machine learning scenarios basically consists of five steps. In the first step Explore Data, it is important to understand the data structure and to know all the basic requirements for the data so that an appropriate machine learning model can be used in a suitable way. For this step check chapter Data. In the second step Check Readiness, the requirements for the data can be checked using the readiness function. For this step check chapter Readiness. In the third step Train Model, you use the data to train a machine learning model whose performance you can check in the fourth step Review Performance. In the last and fifth step Go Live, you prepare the Go Live and monitor the execution. For step three to five check for each Machine Learning Scenario the Chapter Use Case.

3.3. Explore Data

The subject and description of the ticket are used as the data basis for Ticket Intelligence. The description of a ticket is set up with:

  • The body of an e-mail if a ticket was created out of an incoming mail
  • The notes of a phone call if a ticket was created out of an incoming call
  • The notes of the employee if a ticket was created manually

while the subject of a ticket results as follows:

  • The subject of an e-mail if a ticket was created out of an incoming mail
  • The matter of a phone call if a ticket was created out of an incoming call
  • The topic of the employee if a ticket was created manually

3.3.1. Data Requirements

To create an accurate machine learning model, the following requirements for data are important:

Volume

As a guideline for the data base, the more historical data you have in your system, the better. For the prediction model the tickets of the last 12 months are used. An overview of minimum and recommended values can be found in the chapter Readiness.

History

Only the current data status at the time of training is taken into consideration. Changes in a ticket are therefore not in the scope of the model.

Quality

The more structured the data, the higher the accuracy of the model. Therefore, you should encourage your Business Users to pay attention to the ticket subject and description as follow:

  • For tickets opened due to an email, the subject and description should not be changed
  • For tickets created manually or from a phone call, you should provide your employees with a protocol on how to fill in the subject and description, so that this becomes more structured

The following contrast can be given as an example: A ticket is opened on the basis of a web form (structured) or a ticket is opened on the basis of an e-mail formulated by the sender as free text (unstructured).

Consistency

For some Ticket Intelligence scenarios (e.g., Ticket Categorization, Email Template Recommendation, etc.) it is important that your data is consistent. This means that users’ categorization decisions follow a consistent pattern over time. So don’t permanently change your categories in the Service and Social Media Work Center View or always give high priority to different customer requests

Balance

The balance of your data plays an important role when using a machine learning model. If your service area handles 95% of the same customer requests, you probably don’t need the Ticket Intelligence module. As an example, the categorization of tickets can be used as a scenario. If you have five categories and each category describes 20% of your data universe, the use of Machine Learning makes sense.

3.3.2. Supported Languages

The machine learning scenarios are supported in the following languages (As of 11.05.2022):

Machine Learning Scenario

Language

Ticket Categorization

Chinese, English, French, German, Japanese, Portuguese, Russian, Spanish

Ticket NLP Classification

Arabic, Catalan, Chinese, Danish, Dutch, English, Finnish, French, German, Hindi, Italian, Japanese, Korean, Norwegian, Polish, Portuguese, Russian, Spanish, Swedish

Email Template Recommendation

German, English

Similar Ticket Recommendation

Dutch, English, Finnish, French, German, Greek, Italian, Polish, Slovak, Spanish

Machine Translation

Source

Language

Code

Target Language

Code

Arabic

ar

English (United States)

en

Catalan

ca

English (United States)

en

Chinese

zh

English (United States)

en

Danish

da

English (United States)

en

Dutch

nl

English (United States)

en

English

en

Arabic

ar

English  

en

Bulgarian

bg

English  

en

Catalan

ca

English  

en

Chinese (Simplified)

zh

English  

en

Chinese (Traditional)

zf

English  

en

Croatian

hr

English  

en

Czech

cs

English  

en

Danish

da

English  

en

Dutch

nl

English  

en

Estonian

et

English  

en

Finnish

fi

English  

en

French (France)

fr

English  

en

German

de

English  

en

Greek

el

English  

en

Hebrew

he

English  

en

Hindi

hi

English  

en

Hungarian

hu

English  

en

Italian

it

English  

en

Japanese

ja

English  

en

Kazakh

kk

English  

en

Korean

ko

English  

en

Latvian

lv

English  

en

Lithuanian

lt

English  

en

Malay

ms

English  

en

Norwegian

no

English  

en

Polish

pl

English  

en

Portuguese (Brazil)

pt

English  

en

Romanian

ro

English  

en

Russian

ru

English  

en

Serbian (Latin)

sh

English  

en

Slovak

sk

English  

en

Slovenian

sl

English  

en

Spanish (Spain)

es

English  

en

Swedish

sv

English  

en

Thai

th

English  

en

Turkish

tr

English  

en

Ukrainian

uk

English  

en

Vietnamese

vi

Finnish

fi

English  

en

French (France)

fr

English  

en

German

de

Bulgarian

bg

German

de

Chinese (Simplified)

zh

German

de

Croatian

hr

German

de

Czech

cs

German

de

English  

en

German

de

French (France)

fr

German

de

Hungarian

hu

German

de

Italian

it

German

de

Polish

pl

German

de

Romanian

ro

German

de

Russian

ru

German

de

Serbian (Latin)

sh

German

de

Slovakian

sk

German

de

Slovenian

sl

German

de

Spanish (Spain)

es

Hindi

hi

English  

en

Italian

it

English  

en

Japanese

ja

English  

en

Korean

ko

English  

en

Norwegian

no

English  

en

Portuguese (Brazil)

pt

English  

en

Romanian

ro

English  

en

Russian

ru

English  

en

Spanish (Spain)

es

English  

en

Swedish

sv      

English  

en

Ticket Time to Completion

All

Text Summarization

English

3.4. Check Readiness

With the readiness function, you can check for the respective scenario whether the data in your system meets the criteria for training a machine learning model. In the Readiness column you can see whether a scenario supports this function (empty entry as in row Email Template Recommendation) or not (Not Supported entry as in row Machine Translation). Select a supported entry – as in this case Email Template Recommendation – and click on Run Readiness Button.

Next, you need to give permission for your data to be evaluated by SAP Cloud for Customer. To do this, click the Allow button.

In the next step, the data is processed, and the evaluation is performed. The Readiness Status will change from empty to Generating Report. It takes a few seconds for the system to run this function. After refreshing you can see the new Status of the Readiness to View Report, where you can click on.

Overview of status:

Successful – Data can be used for training a Machine Learning Model

Warning – Data can be used for training a Machine Learning Model, check warning points before training
Error – Data shall not be used for training a Machine Learning Model, check error points and try to “fix” them

Overview of Readiness Check Factors:

Machine Learning Scenario
Readiness Check Factor
Minimum Value
Recommended Value
Email Template Recommendation
Data Volume (Last 12 Months)
5.000
50.000
Total number of templates
3
100
Number of eligible templates
2
100
Percentage of eligible templates
60
100
Percentage of records covered by eligible templates
60
100
Number of records covered by eligible templates
1.000
200.000
Ticket Categorization
Data Volume (Overall)
3.000

5.000

Data Volume (Last 12 Months)

1.000

3.000

Service Category Volume (Without Missing Values)
1.000
2.000
Percentage of Service Categories Used
40
50
Percentage of Records Assigned to Used Service Categories
60
75
Incident Category Volume (Without Missing Values)
1.000
2.000
Percentage of Incident Categories Used
40
50
Percentage of Records Assigned to Used Incident Categories
60
75
Cause Category Volume (Without Missing Values)
1.000
2.000
Percentage of Cause Categories Used
40
50
Percentage of Records Assigned to Used Cause Categories

60

75

Object Category Volume (Without Missing Values)

1.000

2.000

Percentage of Object Categories Used
40
50
Percentage of Records Assigned to Used Object Categories

60

75

Ticket Time to Completion
Data Volume of Completed/Closed tickets(Last 12 Months)

5.000

22.000

Availability of ticket History(Last 12 Months)

5.000

22.000

3.5. Use Case – Ticket Categorization

In this Use Case, ticket categorization is explained using the Incident Category characteristic. You will understand more about the relationship of the prediction to the catalog structure and how the machine learning model is trained. This Use Case will guide you through the Go Live and show you how to analyze and evaluate the performance of the model.

3.5.1. Catalog Structure

The catalog for the categories can be built in two different ways: Flat or Hierarchical. It is important to understand the mechanics associated with the catalog when making predictions. In the case of the hierarchy, the context is as follows: If the machine learning model predicts a category of a lower node, all categories of the upper nodes are automatically determined. An example: You have the incident category (Type: Incident) Purchase Order, which is suspended as a node under the service category (Type: Process) Customer Relations. In case the machine predicts the Purchase Order incident category and enters it as a value in the service ticket, Customer Relation is also automatically entered as a value in the service category.

In a flat catalog structure, there are no such relationships, which is why only one category can be entered in the service ticket at a time.

3.5.2. Train Model

To train the machine learning model for ticket categorization, go to the Work Center Administrator and then navigate to the Work Center View Prediction Services. In the Machine Learning Models tile click on the Model Setup menu item. Under the Machine Learning Scenario section, select the Ticket Categorization scenario and then click the Add Model button under the Models section.

Assign a Name for the model – here you can, for example, assign an internal project name for the model or a composition of date and the word model is also recommended. Next Select Fields to Predict. You can select Process, Incident, Object and Cause Category as well as the Priority. In the screenshot shown, the Incident Category is selected. Then confirm your settings with OK.

After the model has been created, you will now find this model in the Models section. The Status is set to Created. But before you train the model consider the Category Mapping.

Category mapping is useful when categories have changed over time. For example, you can map categories that are no longer active in your category catalog. To do this you have to create a CSV File with following columns:

Category ID: Fill in the category ID of the category which you want to map into a selected category ID. For example CA_25 is not active anymore and should be mapped into Category ID CA_18 (mandatory)

Type Code: Note the Type Code of the Category. You can select between Incident for Incident Category, Object Part for Object Category, Activity for Process Category and Cause for Cause Category (mandatory)

Reason:  Specify the reason why you mapped this category (optional)

Mapped Category ID: Specify the category number which is to be mapped (mandatory)

In the Category mapping section click on Add and then on Local File to upload your prepared csv file.

As an Attachment Type you can stay with Standard Attachment. Confirm your upload with Add Button.

As a last step for the Category Mapping select your uploaded csv file and click on the Upload Button in the right top corner. Now the mapping is completed.

After the upload you will return automatically to the Models section where you can click on the Train Button. The Status will be changed from Created to Training In Progress. From experience, it takes about 24 hours for the training to be completed. Click on the Get Status button at any time and get a percentage of the Training progress.

3.5.3. Review Performance

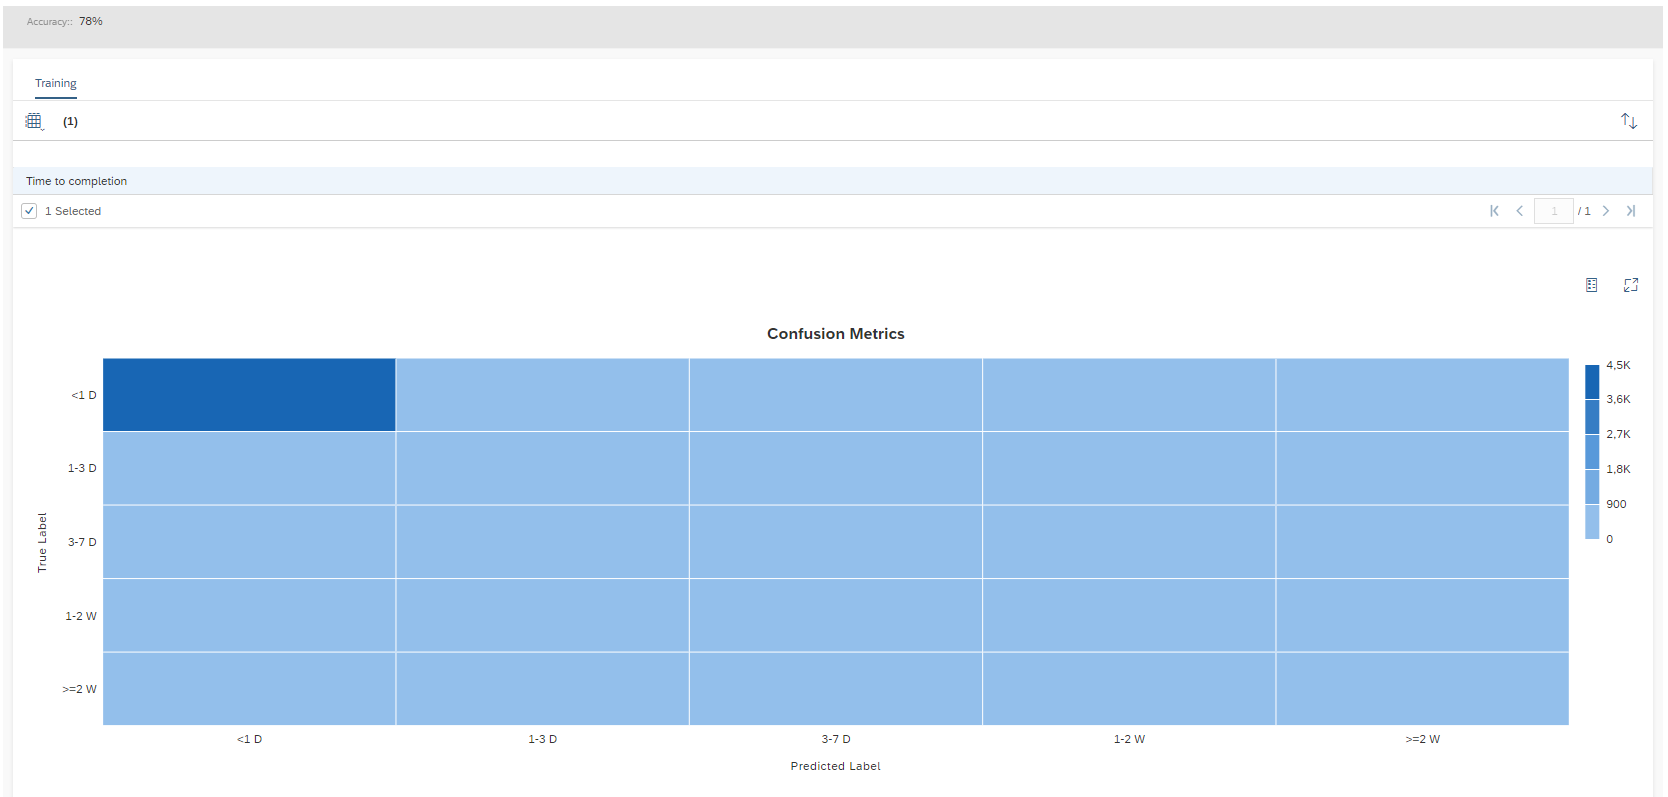
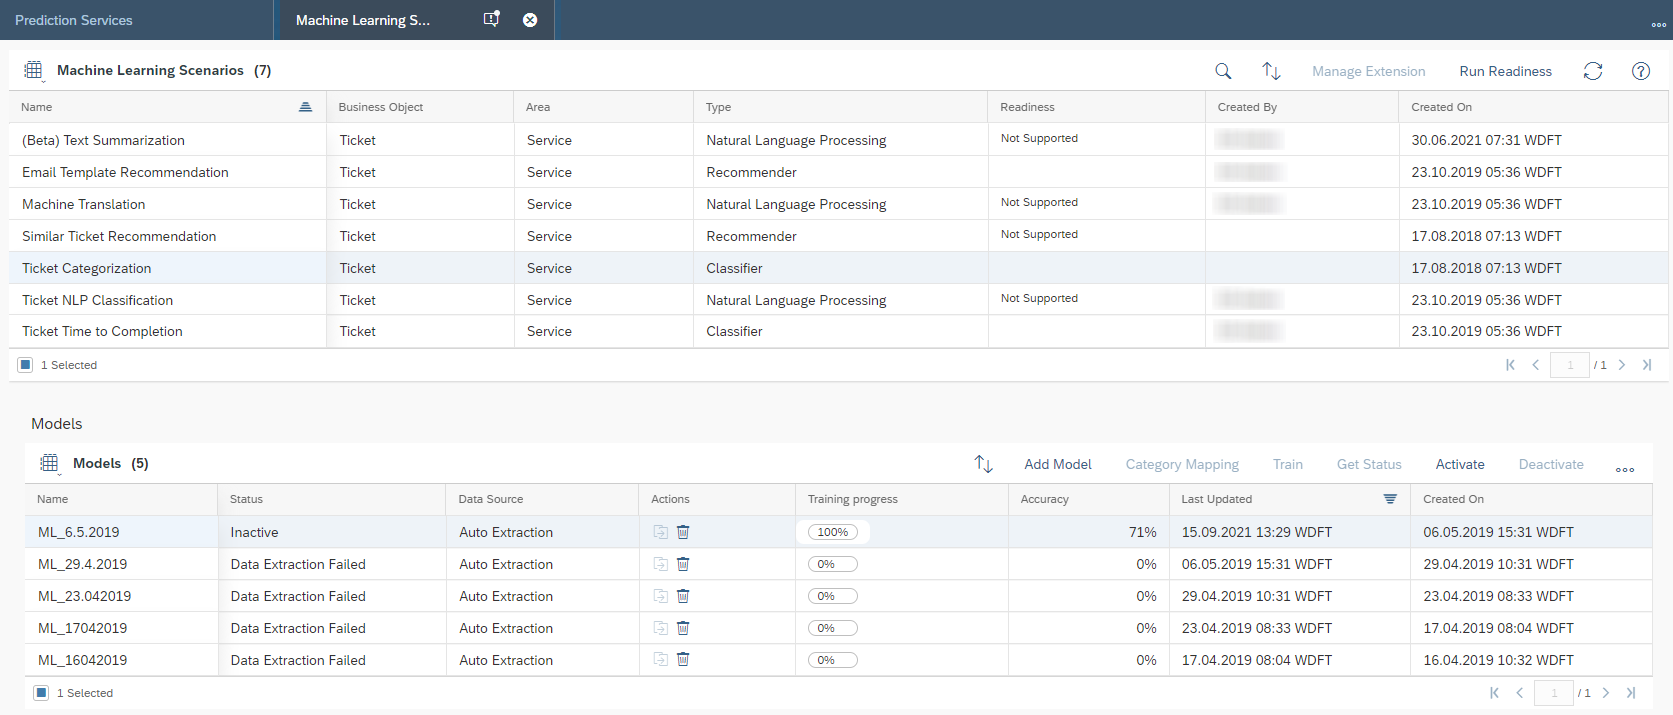
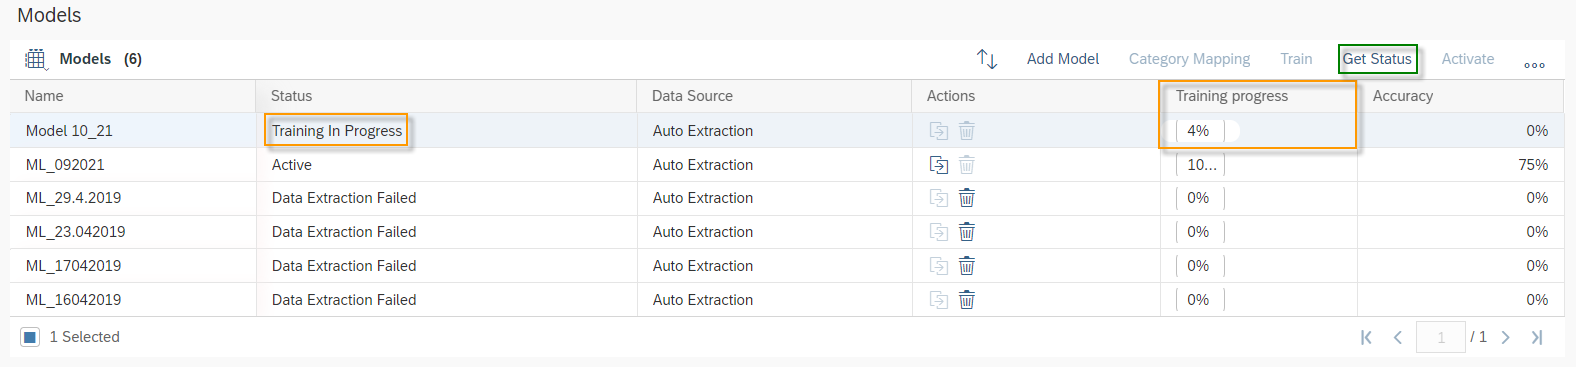
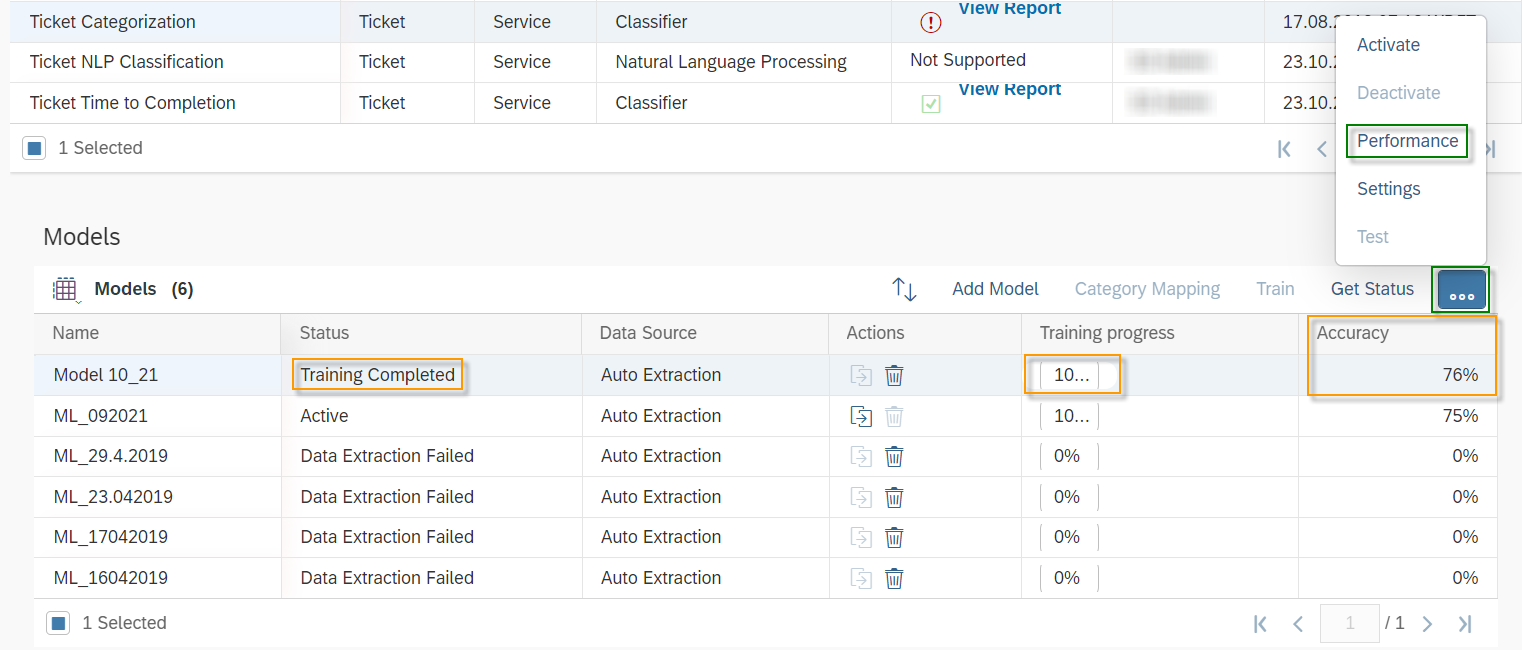
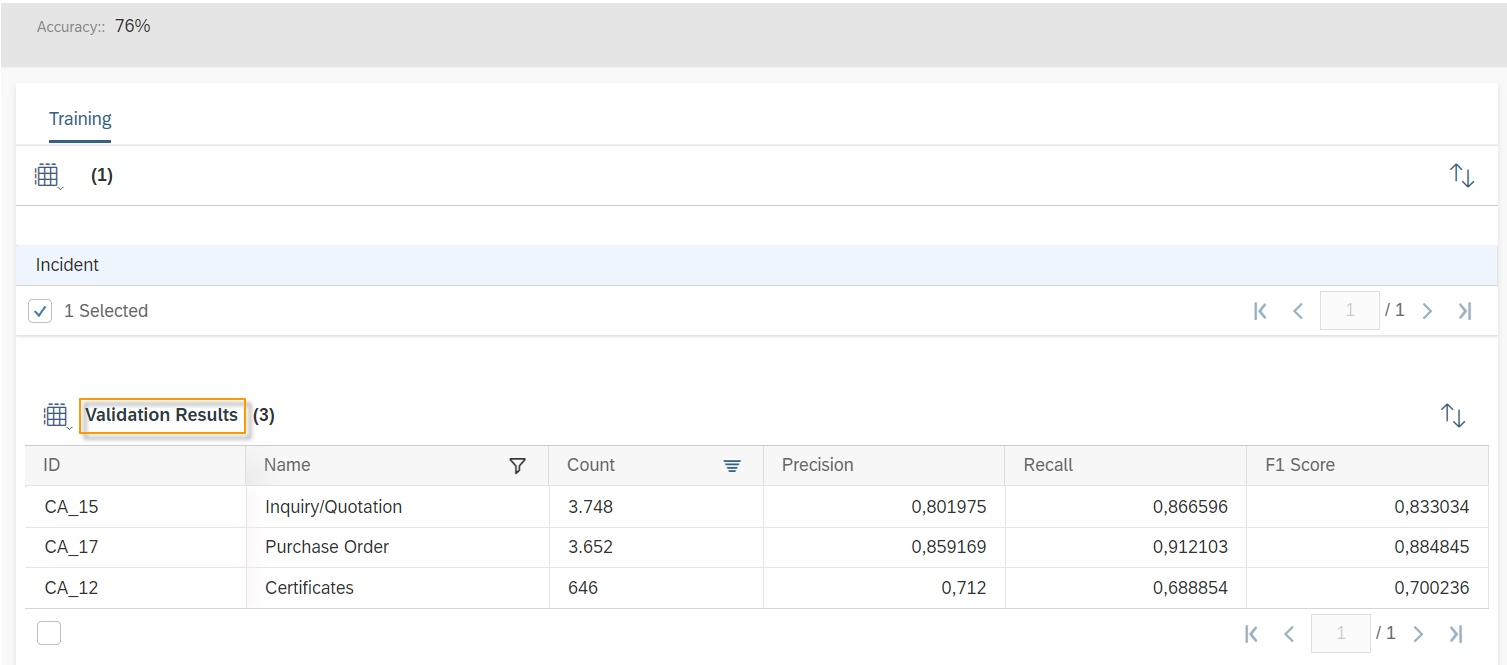
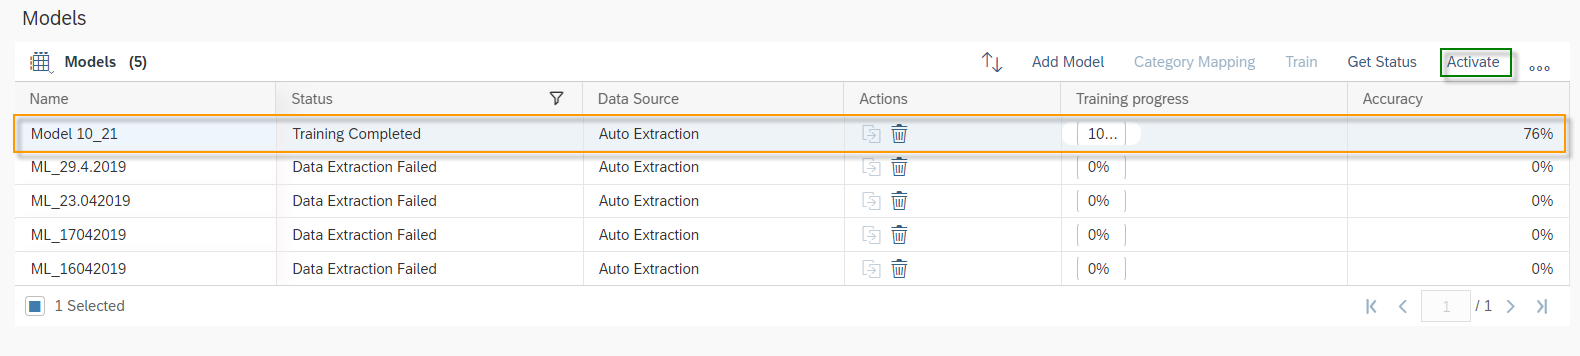
Once the training is completed the Status will be changed to Training Completed and Training progress will be on 100%. SAP Leonardo® component returns an Accuracy of the model. The Accuracy is defined as the percentage of correct predictions for the test data. This means that after training, each ticket is categorized by the machine and compared with the actual category. The 60% mark can be seen as a good thumb value for a good accuracy of a model. In general, of course, the higher the accuracy, the better. However, an accuracy of 60% or more is considered good. In the shown example the Accuracy is 76%, which means 76% of all trained data would be predicted to the correct Incident Category. Further data on the performance of the model can be viewed by clicking on More Options Button  and then on Performance.

In the performance area you will find the Validation Results and a Confusion Metrics for each selected character. In this use case it is the Incident Category only. In the Validation Result table, you will find per Category the key figures Count, Precision, Recall and F1 Score. So, when you look at the Incident Category Inquiry/Quotation you will see following key figures:

Precision = 0,8019

This means that, out of all incoming tickets the model is correct 80% of the time when predicting the Incident Category Inquiry/Quotation.

Recall = 0,8665

This means that out of 3.748 Tickets 86% were predicted as the Incident Category Inquiry/Quotation and 14% where predicted as other Incident Categories.

F_{1}Score= 0,8330

Describes the balance between Precision and Recall with 83%.

Next Result you fill find is the Confusion Metrics for the selected Character – in this case Incident Category. In the Confusion Metrics, you can take a close look at the performance in detail. You will find the Predicted Label of the machine learning model on the horizontal axis and the True Label on the vertical axis. In the figure shown below the Incident Category Inquiry/Quotation as a true label is considered. 3.600 tickets are correctly predicted by the machine and for example out of 3.748 tickets (see screenshot above) 50 Ticket are predicted as Certificates instead of an Inquiry/Quotation. The target is, of course, that the Value for the True and the Predicted Label are the highest. You can see on the scale for Inquiry/Quotation and Purchase Order the blue color is dark blue – which means it has a high value.

If the key figures or Confusion Metrics is unclear to you, please check again Chapter Key Figure of Machine Learning.

3.5.4. Go Live

A Go Live can be separated into three phases: 1st phase Pre Go Live, 2nd phase Go Live and the 3rd phase Post Go Live. In the Pre Go Live phase you can set and activate the Threshold. In the second phase you activate the machine learning model in the productive client and do an initial testing immediately afterwards. After activation, it is then important in the third step that you monitor the performance of the machine – especially in the initial phase.

3.5.4.1. Settings – Pre Go Live

In fact, there is only one parameter that can be set when using the automatic ticket categorization: The Threshold value. Categorization is basically done in two steps when a new ticket is created. The first step is the calculation of a confidence. In this step, the subject and description of the ticket is analyzed and the machine returns a predicted Incident Category and a Confidence. In the second step, this confidence is compared with a set threshold. If the confidence is smaller than the threshold, then the machine does not act, and no categorization is performed. If the probability is greater or equal than the threshold, the system acts and categorizes the ticket with the predicted category.

Confidence  \text{\textless}  Threshold  \longrightarrow  No  Categorization
Confidence  \geq   Threshold  \longrightarrow   Categorization

To set the Threshold navigate to the Models section in the Work Center View Prediction Services and click on Settings.

First you must Enable the Automation Threshold. Afterwards you can select a value for the Threshold. The Confidence Level shows you the last set Threshold value.

In general, the following guiding principle should be observed when setting the Threshold: The higher the value is set, the lower the error rate, but also the rate of automatic categorization. The lower the value is set, the higher the error rate, but many tickets will be categorized automatically. It is best to start with a threshold value that is 15% smaller than the accuracy of your machine learning model. If necessary, you can increase or decrease the threshold at any time.

3.5.4.2. Activate Model – Go Live

The activation process is very simple. Select the machine learning model you want to activate and then click the Activate button.

Since the Machine Learning Model is now active, you can start with the initial testing. For this you have two procedures. The first one is a provided test simulation. To start this, select your active Model and click on the Test Button via More Options.

In the Single Input section, you can simulate a description of a Ticket. Just type in or copy any text to the free text field. Once you are done with your text you can click on the Classify Button. The Model will return the Type – in this use case Incident Category – the Value for the type and a Confidence value. Shown below you will see an example that for the given text, the model returns the Incident Category of a Purchase Order with a Confidence of 50%.

You can also use the Multiple Input function, where you can upload a .csv-File (comma-separated value), which contains up to 100 data samples. The File should contain the following two columns: Ticket ID and Description and should be UTF-8 encoded. So here are the detailed steps:

1. Create a .csv-File with 100 data samples

A good approach is to use already existing data from your system. You can easily download your tickets with their descriptions. Go to Work Center Data Workbench and then to the Work Center View Export. If you are not familiar with the functions of the Data Workbench, then check out Data Worbench first. However, select under Service Request the data source Service Request Notes and add the filter for the Type Code 10004 – Incident Description.

In the next step you should select only the columns ServiceRequestID – which is the Ticket ID for your .csv-File – and the Text – which is the Description for your .csv-File. Click on Export Data to confirm your download.

In the next step it makes sense to download a second data set. This data set should then contain the incident category so that you can evaluate the test results from Multiple Input via a VLOOKUP with your actual incident categories. Go again to the Data Workbench Work Center and download the Tickets from the Data Source Service Request.

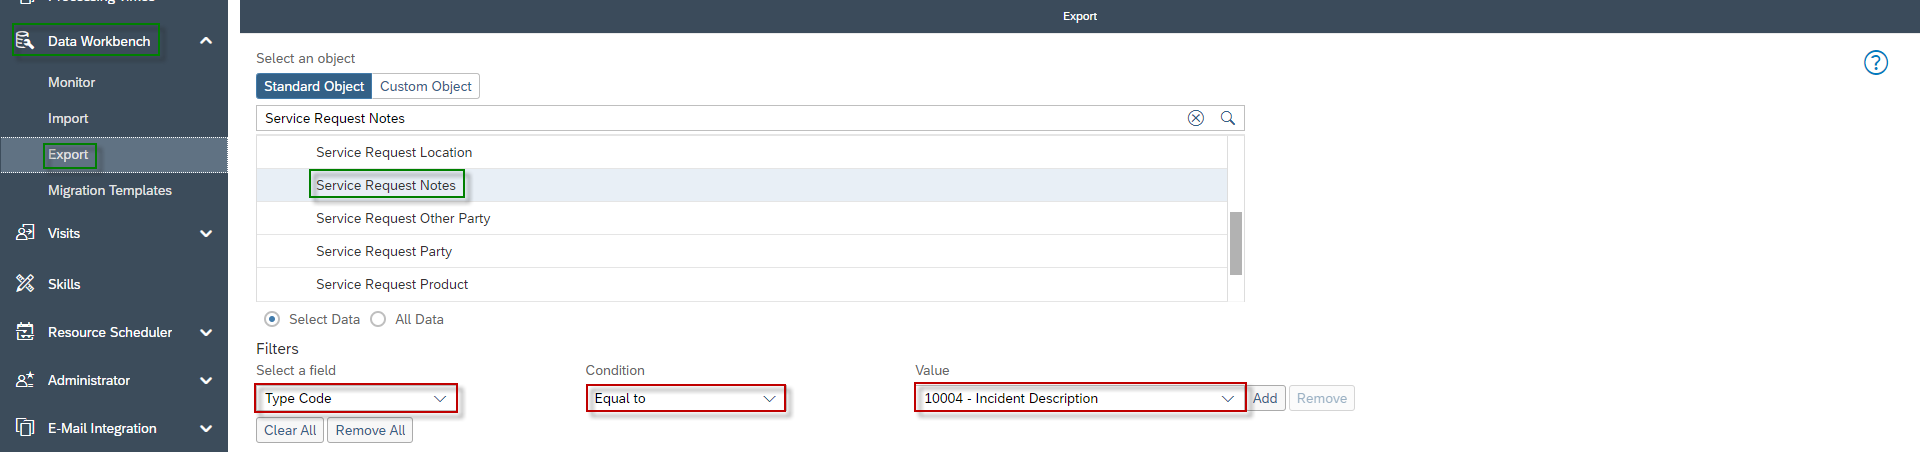
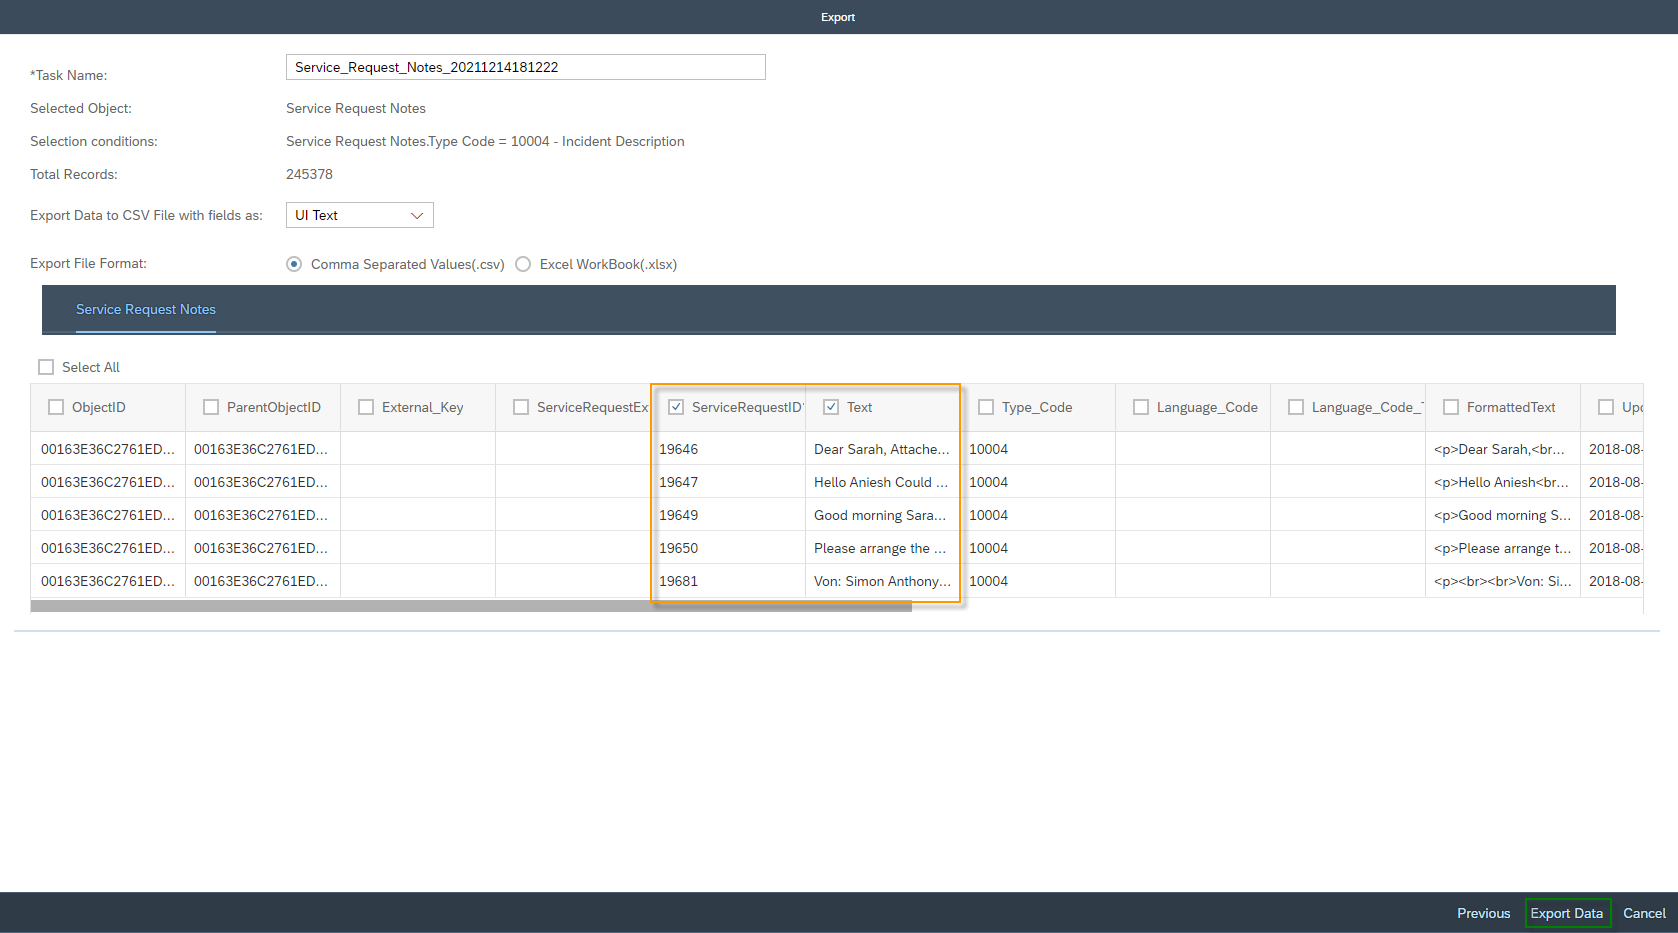
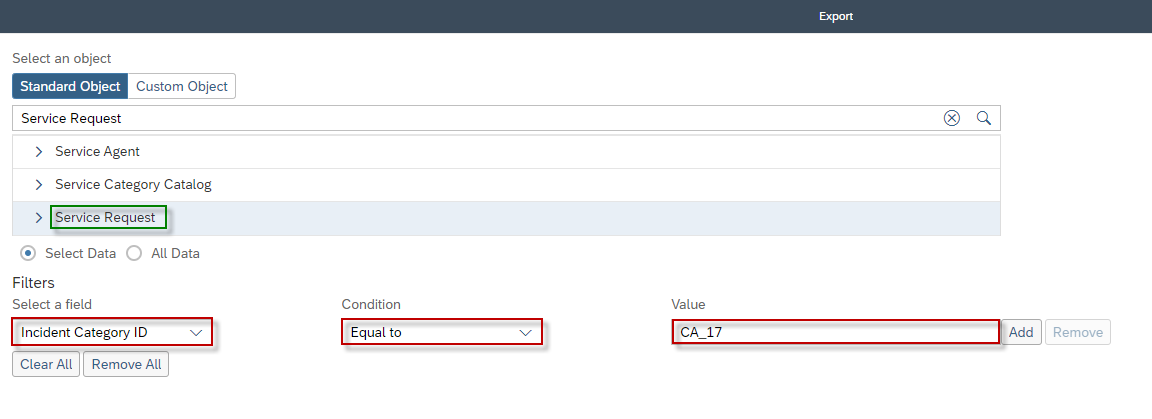
Open the data export with the Ticket Description in a text editor – e.g. Notepad ++. Then make sure that the maximum of characters of each Ticket Description is below 255. Otherwise, this will lead to errors, while uploading the .csv-File. Since the ticket description is the initial customer mail, it can contain breaks, commas, and semicolons. All these characters you don’t want to have in a .csv file. To remove these characters, use the Find and Replace function of your editor and proceed as follows:

  • Marc all text in your file – mostly with CTL + A
  • Replace ,” with …” to keep the comma between Ticket ID and Text, when you remove the commas later
  • Remove all commas and replace , with nothing
  • Remove all semicolons and replace ; with nothing
  • Remove all breaks and replace \n with nothing
  • Get the comma between Ticket ID and Text back and replace …” with ,”
  • Replace “2 with “\n2 to get a break between each dataset back
  • Define the Header with Ticket ID and Description
  • Save the new .csv-File

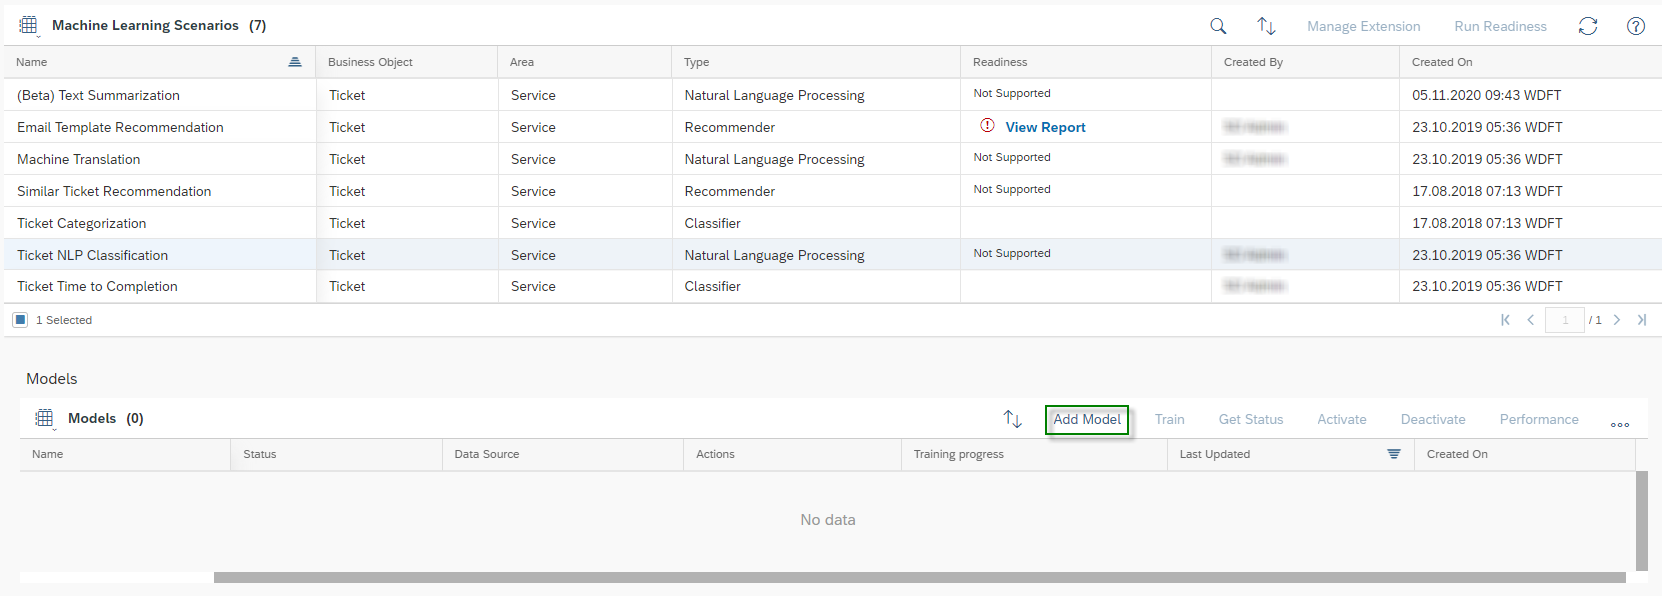
2. Upload the .csv File

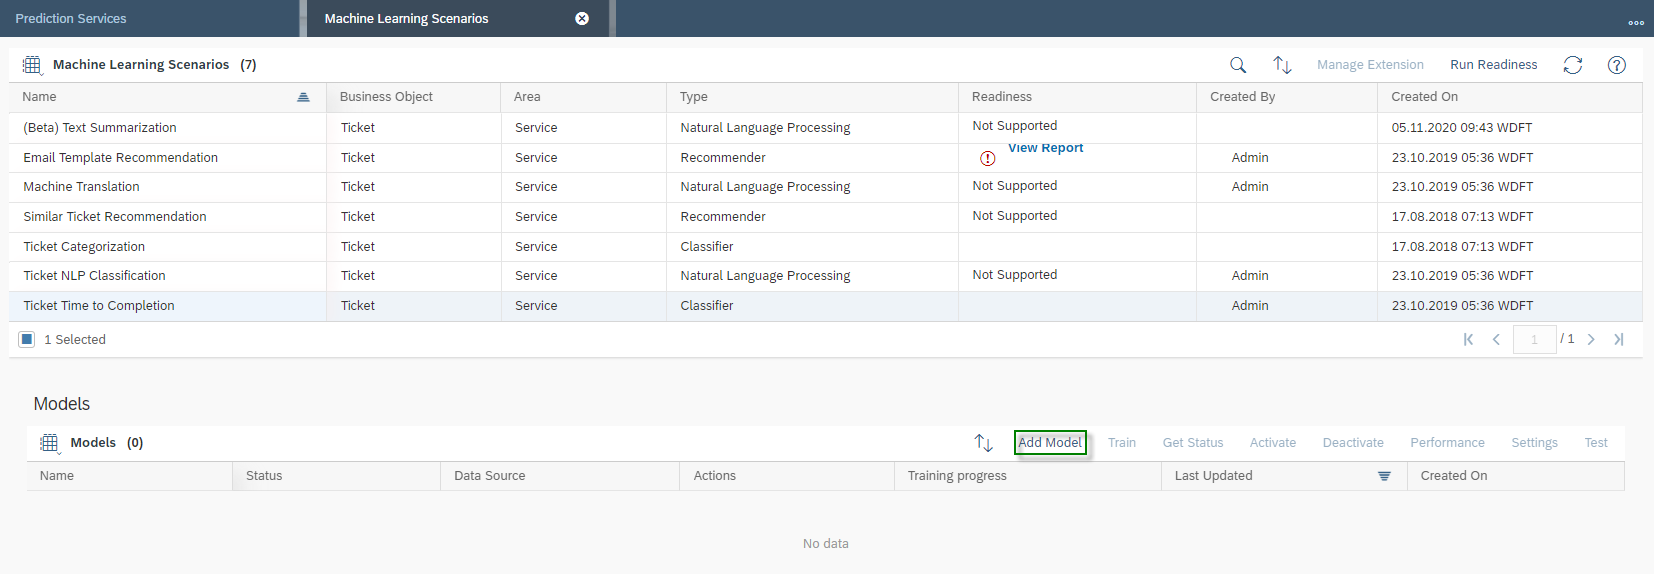
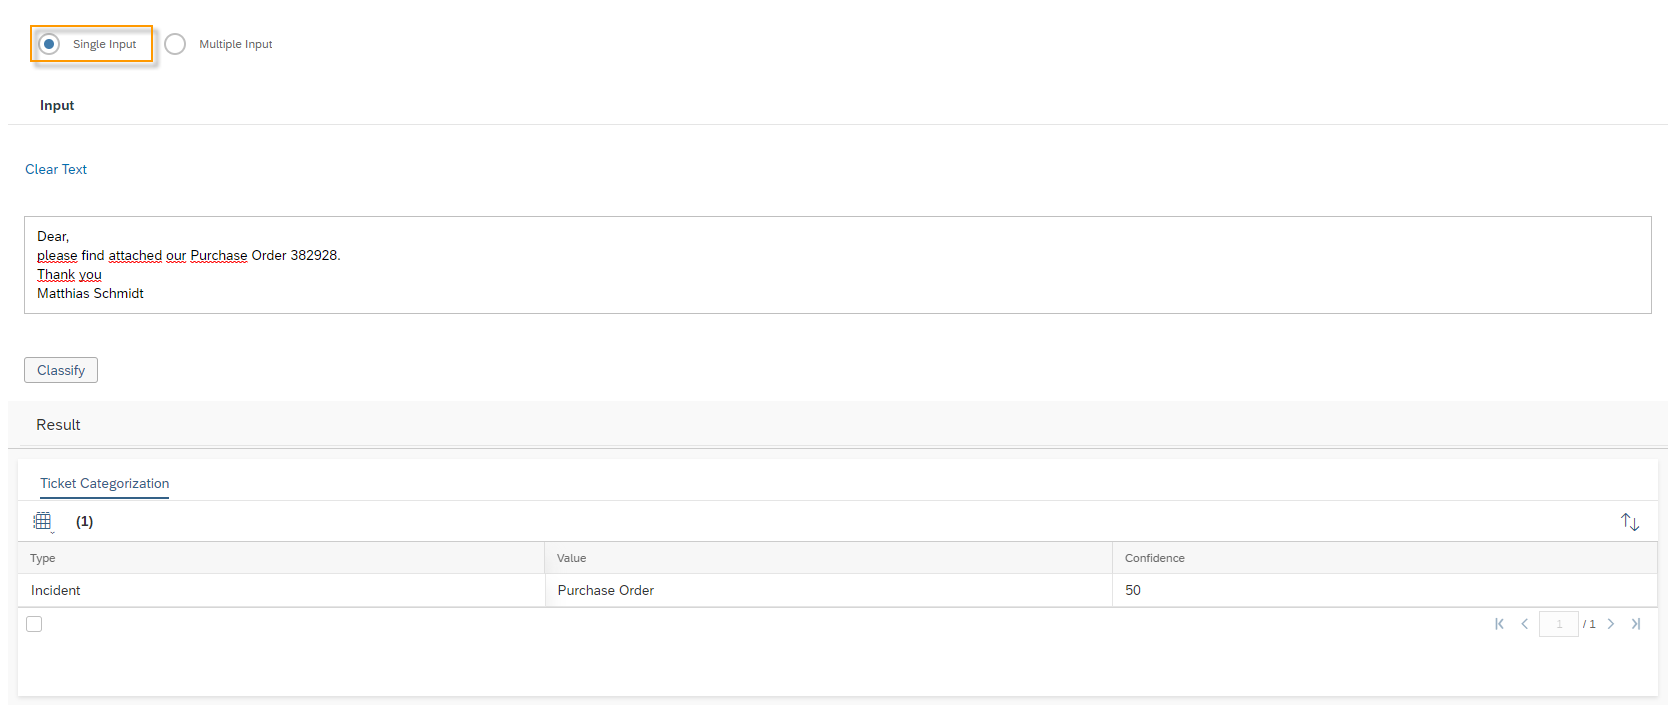
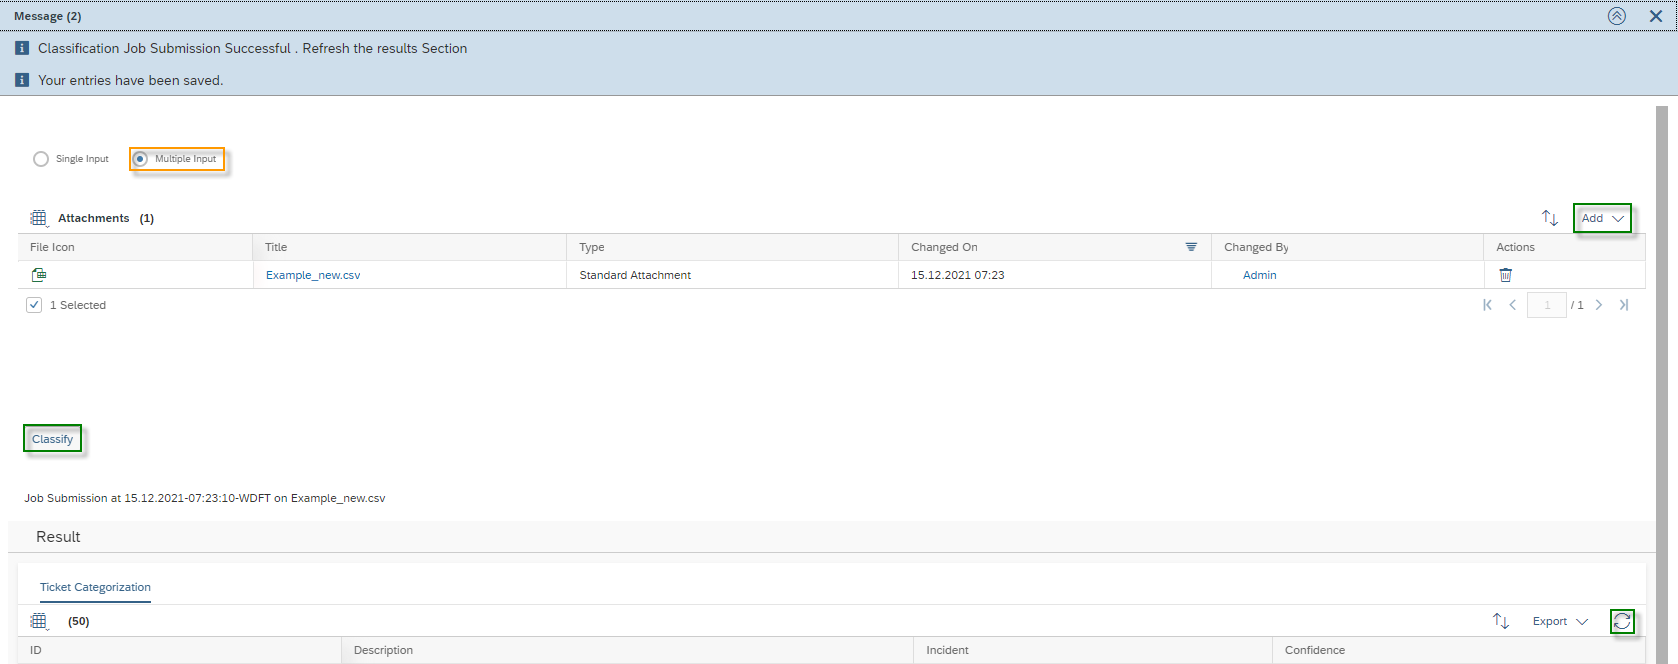
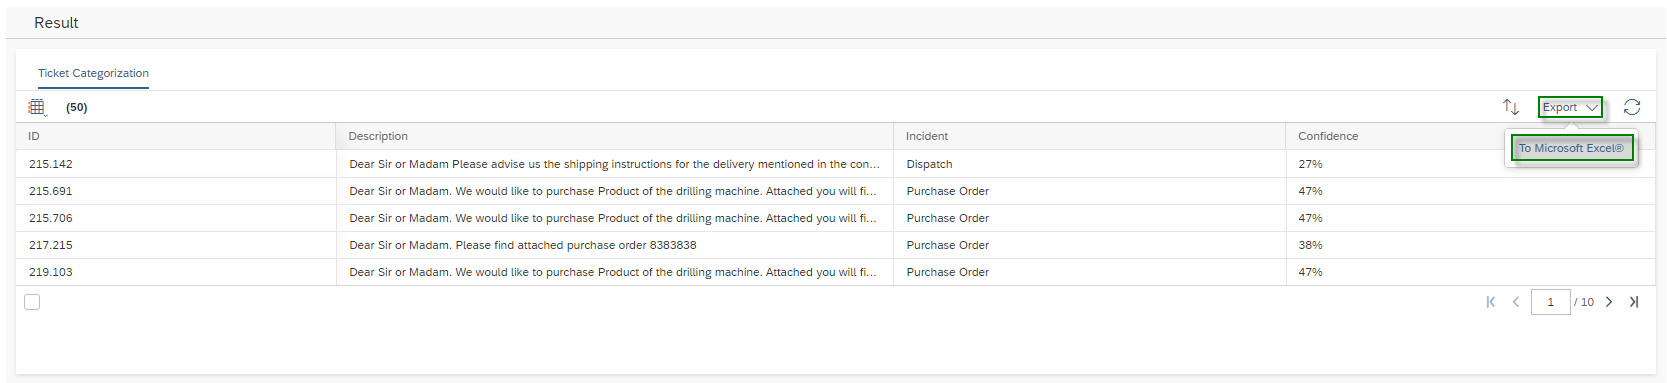
Select the machine learning scenario Ticket Categorization, then its activated model and click Test. Select the Multiple Input section. Upload your .csv file with the Add button and click on the Classify button. You will receive a message saying “Classification Job Submission Successful. Refresh the results Section”. Depending on how much data you have in your .csv file – a maximum of 100 is allowed – the analysis will take a little longer. However, click on Refresh  in the Result Section.

3. Check prediction performance

In the last step, you get a table with the predicted Incident categories and the corresponding Confidence. You can download this result via the Export button and make the comparison with the actual categories from your system via a VLOOKUP.

Another option to test the performance of your Machine Learning Model is to create Tickets – either by creating them manually or by writing an email to the system. In the ticket itself you will find the Tab Solution Center. If you don’t have this tab available in your Ticket View you have to use Adaption Mode. In the Solution Center you will do find the Section Service Category Proposal. In this section the Incident Service Issue Category ID and the calculated Confidence is provided. In the shown example Ticket 258892 the Model has a Confidence of 92% for the Incident Category ID CA_17 which is a Purchase Order.

In the Details section – right side – you can always see an Indicator (green Circle) when the predicted category was automatically set by the system.

3.5.4.3. Track Performance – Post Go Live

In the Category area, you can click on the Machine Learning Indicator – green circle – to read the Confidence in the ticket itself. At the same time, the most important Keywords are listed here, based on which the category is determined.

In addition to displaying the performance in the ticket, there is also the option to build yourself a report to measure the performance of your machine learning model. The appropriate data source for this is called Ticket Intelligence. If there is not already a report in your SAP Sales Cloud, then create a new report based on this data source. All these options and settings can be found in the Work Center Business Analytics.

The following figure is an example of how such a tabular report can look like. You see the Ticket itself and the comparison between the incident category of the machine – ML Incident Category ID – and the original Ticket Incident Category. This means that if a Business User would change the incident category after the machine predicted it, you can see the difference here. At the same time in this example a Counter and the Incident Category Confidence is displayed. Marked is an example where the predicted Incident Category deviate between the predicted value and the Business User selected value.

3.6. Use Case – Similar Ticket Recommendation

When a new ticket is received, the Similar Tickets functionality gives your service agents a listing of similar tickets. The idea is that in these tickets an already given answer can be quickly reused, so that the response time to the customer is shortened but also the capacity of your team is saved. Go to Work Center View Prediction Services, select Similar Ticket Recommendation in Machine Learning Scenarios section, and click on Add Model Button.

Next provide a Name for your New Machine Learning Model and confirm it with clicking on OK Button.

In the Section of Models, you do find your just created Model. Select it and click on Train Button to start the training for this feature. This takes approximately one day, but the time of course heavily dependent based on your data – which is used for the training.

Once the training is completed you can activate your Model by simply clicking on the Activate Button.

For this feature there is no possibility for testing and for performance monitoring. This is not a big deal, because with this feature enabled, nothing can happen to disrupt the user’s workflow.

In the Ticket you will find below the Details Section also the Recommendations section, where Similar Tickets are shown in descending order base on the Confidence. When you click on Show More in the Recommendations section the Solution Center tab of your Ticket will automatically open so that you can see more results of similar Tickets. The service agent can open a similar ticket, check the content and may can copy the answer also for his ticket.

3.7. Use Case – Text Summarization

You’re probably familiar with lengthy emails being exchanged between customers and service agents. Often, the customer can’t get to the point, a lot of pleasantries are exchanged – which, roughly speaking, have nothing to do with the incident – or the content can be misunderstood. Text Summarization helps you to summarize the important content and extracts all relevant information from each Interaction in a Service Ticket as well as the Subject. This part of the Ticket Intelligence is also using Neutral Language Processing (short: NLP) as a fundamental technology.

To use this feature, go to Work Center Administrator and then navigate to the Work Center View Prediction Services, select Text Summarization in Machine Learning Scenarios section, and click on Add Model Button.

Assign a Name to your New Model and Select a Usage Type. You can include in the text summarization the Subject Setting and/or Ticket Interactions Summarization. It is recommended to include both, since only the pair of each Interaction and the Subject makes the content of a Service Ticket completed. Confirm your adjustments with OK Button.

After your model has been created, it will be set to Created Status for the time being. Next, you can start the training by clicking on the Train button. The machine will now train automatically, which can take a few hours. With the Get Status button, you can check the current progress of the training. As a return you get a percentage value under Training progress.

When the model has finished training, the status changes to Training Completed. You can activate now the model by clicking the Activate button.

In the service ticket the service agents have the possibility to summarize the content. Here is an example: A customer reports a vibration problem on one of his machines. In the email, the first paragraph deals with how difficult it was for your Customer to find out the service support email address on the website. This point has nothing to do with the actual customer request – but was important for the customer to mention at this point. The service agent replies that he has forwarded the problem with the website to the responsible department. The service agent also reports to the customer that a service technician will take care of the vibration issue.

When the Service Agent clicks on the Summary Button, a summary is generated, which is split into three different parts. Overall Summary, Customer Summary, Agent Summary. In the following figure, you will notice that only the actual facts – namely those of the vibrating machine – have been summarized. This feature saves a lot of time for many service agents – especially for service managers or representatives who were not involved in the ticket from the beginning.

Of course, you can also test the model first before putting it into use for your service agents. To do this, select your model and click on the Test button.

Usage Context:                  Subject Setting

In this context you have the possibility to enter a text into the Input field. Here you can test how the machine summarizes the text. Click the Summarize button and evaluate the summarized content under Summary to see if it makes sense.

Usage Context:                  Ticket Interactions

In this context, you can test various tickets to see if the summary makes sense. To do this, enter a ticket under the Ticket ID that you want to test and then click on the Summarize button. Evaluate the Summary – which is divided into Customer Summary – all incoming interactions into the ticket – and Service Agent Summary – all outgoing interactions from the ticket.

3.8. Use Case – Email Template Recommendation

To be written…

3.9. Use Case – Machine Translation

For global operating companies, the service agent often faces the problem of having to understand 100% of the context in a foreign language in order to deliver the best possible answer to the customer. For this purpose, the SAP Sales Cloud offers the Prediction Service Machine Translation. To activate this module, navigate to the Prediction Services Work Center View, select the Machine Learning Scenario Machine Translation and then click on the Add Model Button.

Enter a Name for the model and confirm with OK.

After the machine learning model has been created by the system, the status is set to Created. Now click on the Train button to train the model.

After the training is completed through the API interface to SAP Leonardo®, the status changes to Training Completed and you can now click the Activate button to activate the model.

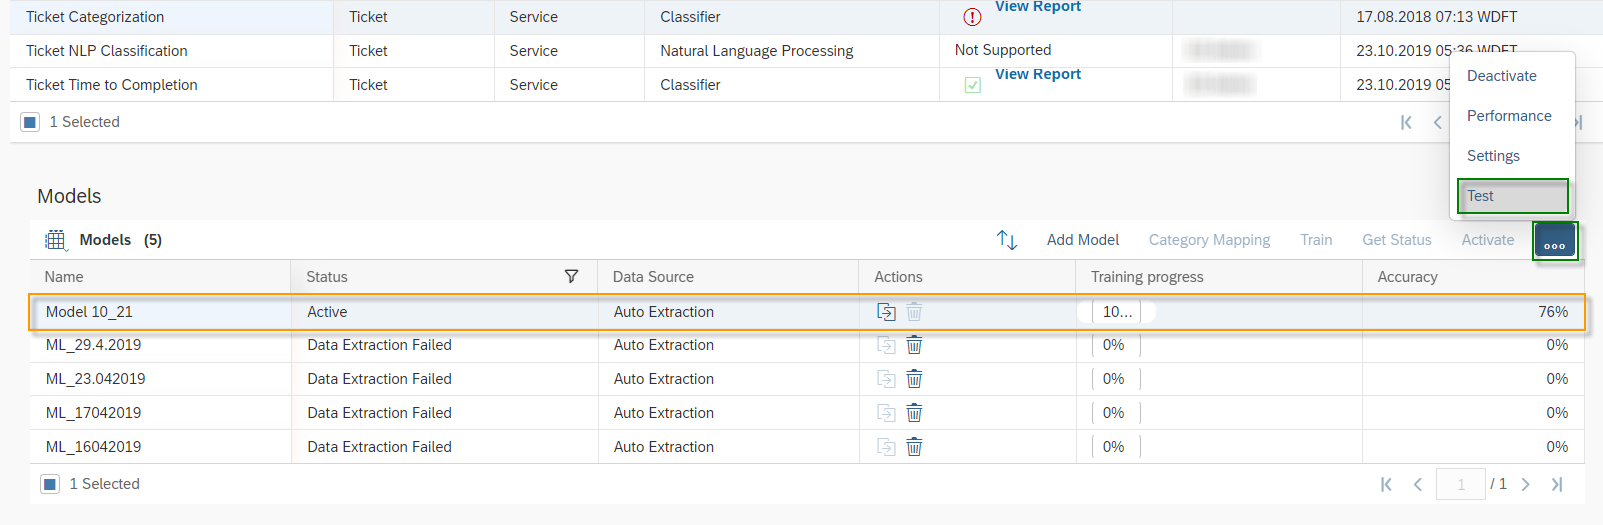
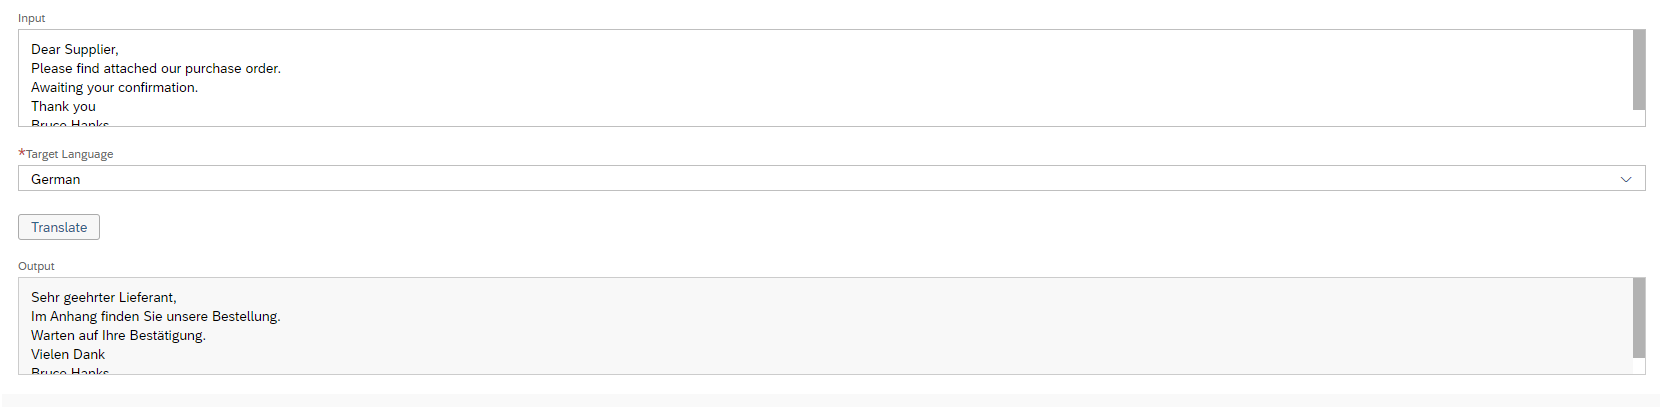
You have the possibility to test the translation capability of the module. To do this, click the More Options  button and then Test.

In the test section you can enter the text you want to translate in the Input field. To do this, select the Target Language from the drop-down menu – German in the example shown – and then click on the Translate button. The translated text is then displayed in the grayed-out Output field.

In the service ticket itself you can translate the initial received e-mail directly in the object. To do this, click on Actions and then on Translate. This button triggers that the text of the e-mail is translated into the logged-in language of the Business User. In the Description section, you will find the Translated Text information field, where the translated text is entered by Machine Learning for the responsible service agent.

3.10. Use Case – Ticket NLP Classification

This kind of Ticket Intelligence is using Natural Language Processing, which is the technology of understanding spoken and written human context. This service provides information firstly about the language and the mood of the customer. With this feature you can forward this ticket as fastest to a responsible employee, e.g. when the Customer speaks in Turkish and is a bad mood it would make sense to forward this incident to a Turkish speaking college. At the same time this service also provides information about the product – in form of Product ID, Serial ID or OrderID – which you can use to forward this ticket directly to an expert of this product. This of course should be implemented to provide your customer the best and fastest solution of his issue.

To use Ticket NLP Classification, go to Work Center Administrator and then navigate to Work Center View Prediction Services. Select under the section Machine Learning Scenarios Ticket NLP Classification and click on Add Model.

Assign a Name for this New Model and activate the entities you want to predict with NLP technology. You can predict the Language, Sentiment, Product ID, Serial ID and OrderID. Important to know is the fact, that you are only able to predict either the Serial ID or the Product ID, so one of these two is always grayed out. Confirm your selection with clicking the OK Button.

After the Model is created you can click on the Train Button to start the training of your Model. This takes some hours to finish. You can view the Training progress until this reaches 100% and the Status changes from Created to Training Completed. After the training is completed, you can activate your Model by clicking then the Activate Button.

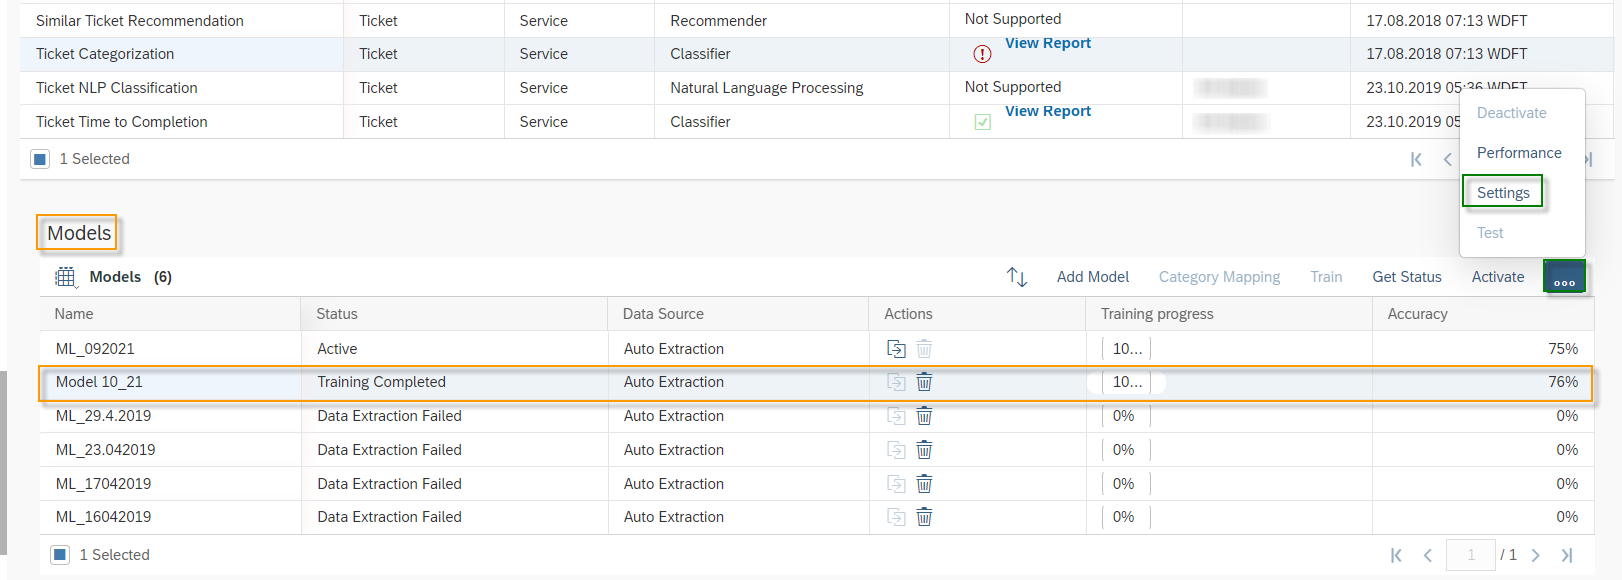
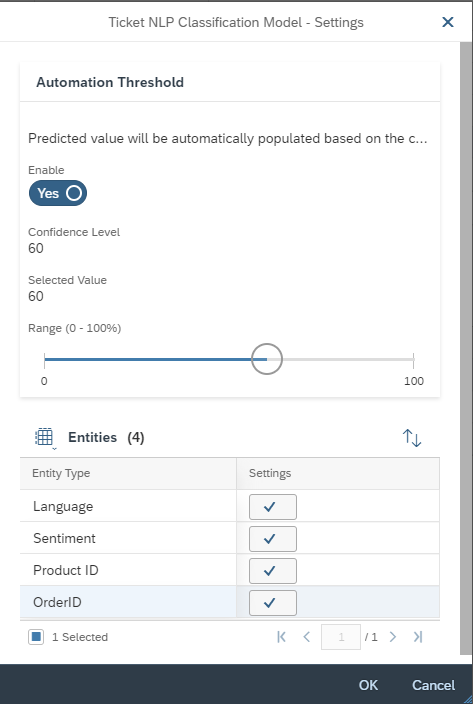
After the activation of the Model, you have to change the settings of your Model. Click on the More Options  Button and then on Settings. Here you have to set the threshold for the Ticket NLP Classification. The Categorization of a newly created ticket is done in two steps. The first step is the calculation of a confidence of the selected entities, e.g., Language, Sentiment, etc. In the second step, this confidence is compared with the threshold. If the confidence is smaller than the threshold, then the machine does not act, and no categorization is performed. You are also able to deactivate  entities here at any time or reactivate  them back again.

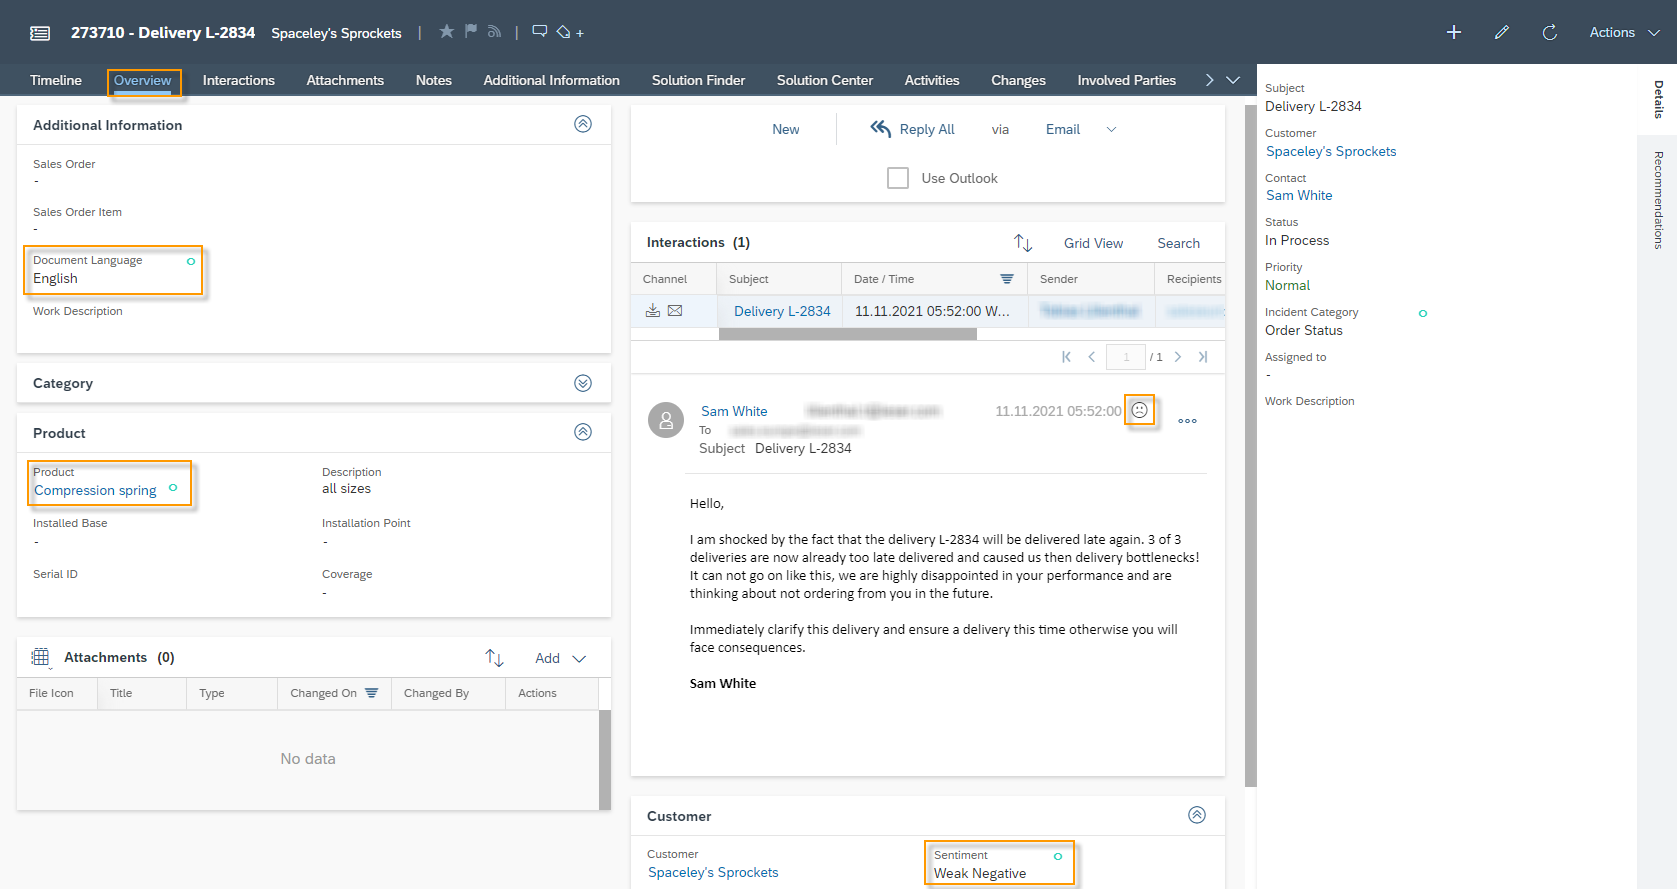
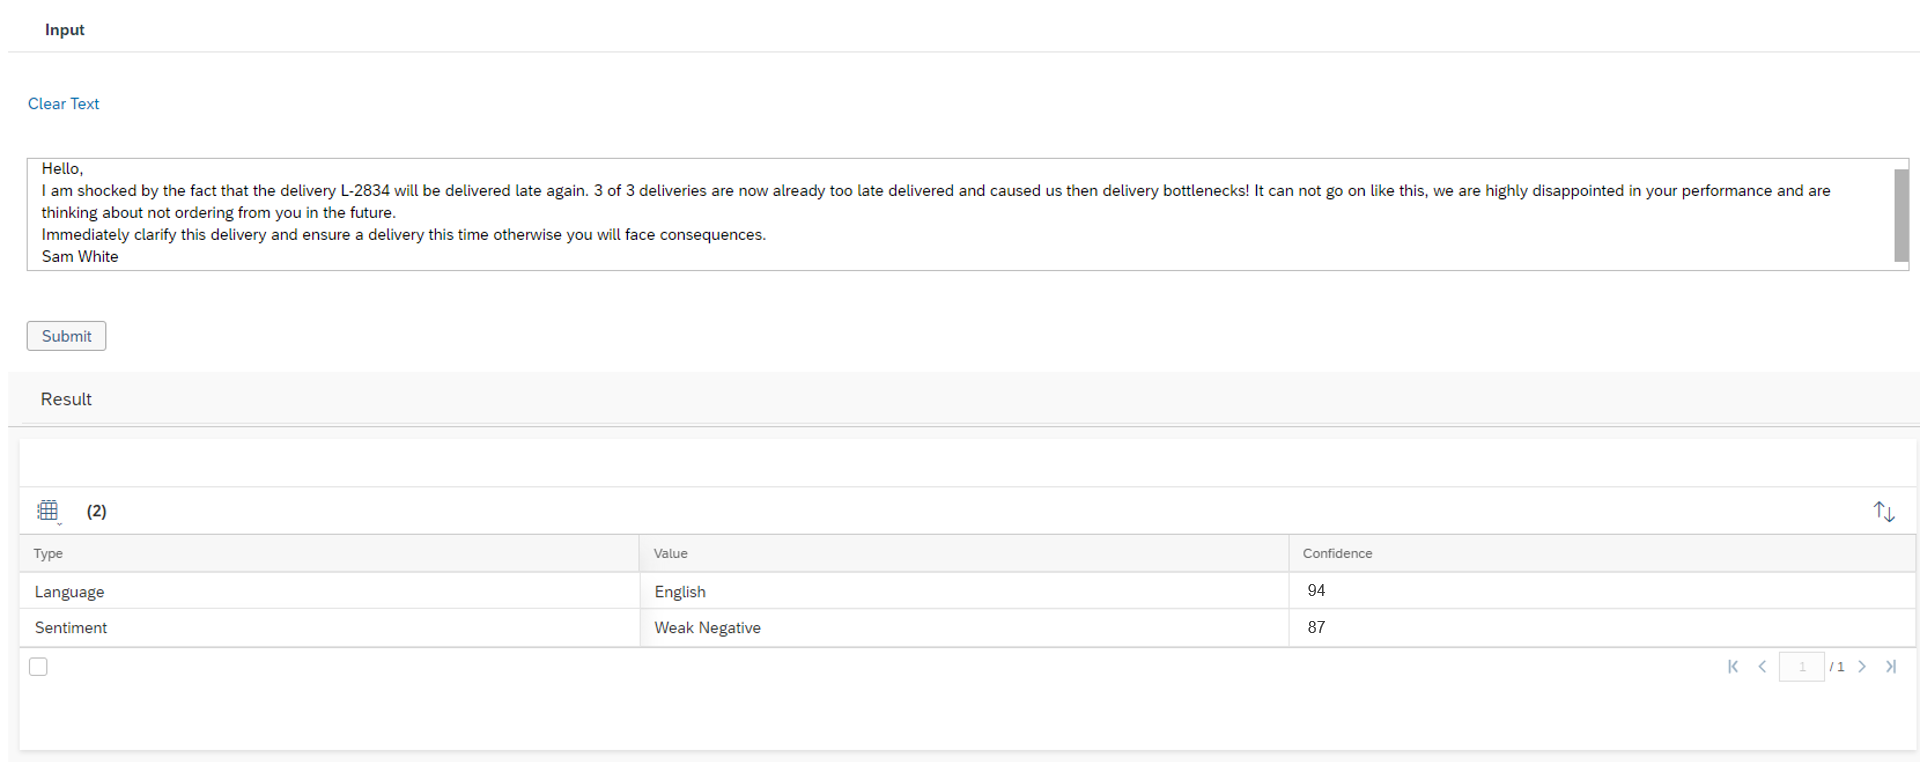
For this Model it is also possible to test the Prediction. To do so click on the More Options  Button and then on Test. Here you will find an input text field, where you can put a text of an email in. Click the Submit button. The Model will return the trained entities Type, with the predicted Value and the Confidence. In the example shown you see that the customer is complaining about a delayed delivery, the whole text is in English. The Model returns the entity Language the value English with a confidence of 94%. The second entity Sentiment – which describes the mood of the customer – is predicted with the value Weak Negative with a confidence of 87%.

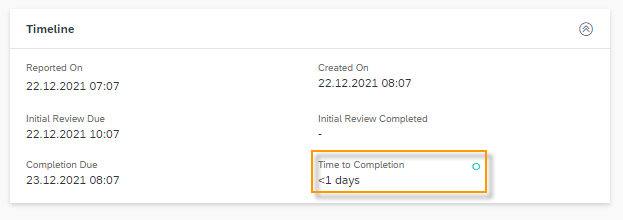
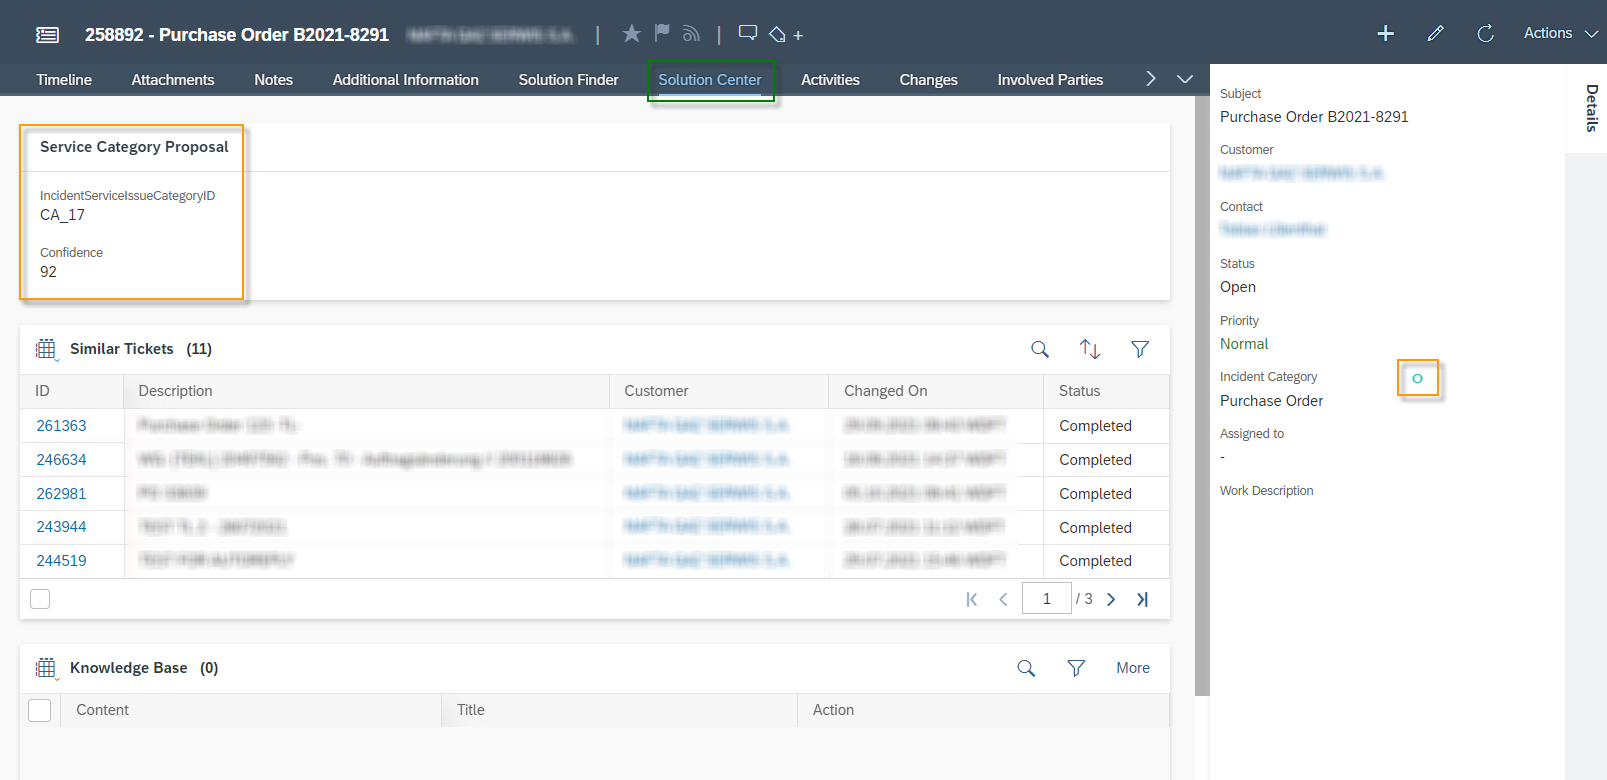
In the Ticket you will find the predicted values in the Overview Tab. The green circle indicates that this value was predicted by your machine learning model. For the Sentiment you will find following possible values:

  • Not Available
  • Strong Positive
  • Weak Positive
  • Neutral
  • Weak Negative
  • Strong Negative

Basically, what the NLP technology is doing here, is to extract the emotions from the written text by the customer and indicates if this are positive emotions or negative emotions. Where the type of emotion – e.g., happy vs. relieved are both positive emotions or angry vs. sad are both negative emotions – does not matter. Besides the Sentiment you will also find emoji’s next to an incoming e-mail in the service ticket, where you can check on the first view the emotional level of this e-mail:

  • Negative
  • Neutral
  • Positive

3.11. Use Case – Ticket Time to Completion

Based on your data from the last 12 months, a model can be created that predicts how long it will take to complete a new ticket. This parameter is called Time to Completion and can be displayed in the Detail section of a Ticket or also moved to the Time Section of the Ticket. This parameter helps managers to have a better overview of the outgoing responses, estimated time for there resources and to prioritize tickets. It has also advantages for your customer loyalty, because customers are seeking for help via a service ticket and expect a quick, effective and transparent response. So, it brings a lot of benefits in communicating your estimated Completion Due Date to your customers.

The Time to Completion will be calculated as the delta of the Reported Date/Time and the Completed/Closed Date/Time of a ticket. You should run first a Readiness Report, before you start training this model. If the Readiness Report runs successfully you can start with the training. For doing so, select Ticket Time to Completion in Machine Learning Scenarios and click in the Models section on Add Model.

Assign a Name for your Model and confirm with OK.

In the next step you can start with the training, while clicking on the Train Button.

Once the training is completed the Status changes from Training in Progress to Training Completed. Second, you will see a percentage value for the Accuracy of your model. Remember that an Accuracy of 60% or higher is considered as a good value.

You can also check the Performance more in detail as a confusion matrix. If you are satisfied with the performance of your model, you can activate it by clicking the Activate button. If you are not satisfied with the performance, you will need to collect more data and run the training again later.

Go to your Service Ticket and check if you have the field Time to Completion already display in the User Interface. If not, use Adaption Mode to change the field setting to visible. You will find this field in the header section of the Service Ticket. In our point of view, it makes mostly sense in the Timeline section of a Ticket, therefore we moved this field into there.

Here is one example of a predicted Time to Completion. You will find that this field is predicted as a range, never as an exact value (example 12h vs <1day).

Do you need consulting from our experts?

The Customer Experience team at Camelot ITLab deals with exciting and challenging CRM related topics every day and serves a large portfolio of different customers from a wide range of industries. Trust in this collaboration and feel free to contact us at tlil@camelot-itlab.com.

Was this article helpful?

If you like our content we would highly appreciate your review on Trustpilot


#SAP C4C #SAP Cloud 4 Customer #Cloud 4 Customer #Cloud for Customer #SAP Sales Cloud #Sales Cloud #MachineLearning #Prediction Service #Machine Learning Model #Machine Learning Scenarios #Ticket Categorization #Ticket NLP Classification #Email Template Recommendation #Similar Ticket Recommendation #Machine Translation #Ticket Time to Completion #Text Summarization #Check Readiness #Catalog Structure #Train Model

Receive the latest news

Subscribe To our SAP Sales & Service Cloud Newsletter

Get notified about new articles