
Store Layout
In retail sales, products from a wide range of suppliers and manufacturers are combined into an assortment and made available for easy purchase by the end consumer. There is a strategy in every store layout as to how these products are best sold. Most people know the situation where we just wanted to buy some milk and bread at the grocery store and then went home with a bag full of groceries. For a sales rep in retails sales, it is important to understand the strategy of such a store layout to advise them on sales of your products
Most people in the SAP CX environment have certainly heard the term Perfect Store, but what is this store actually and what makes it so perfect?
The SAP Perfect Store is an effective tool for retail sales, enabling Activities and Surveys that take place during a Store Visit. The goal of the SAP Sales Cloud Perfect Store is to increase your market presence, from which you can maximize sales opportunities and optimize the shopping experience for your customers and their end consumers. To better visualize how Perfect Store functionality can help you, here are examples of a possible Perfect Store usage:
- Your company manufactures paint rollers. Your customers include all the well-known Home Depot Stores. Your sales activity is to distribute your products optimally (=perfect) in your Customer Stores. This means to always have the right quantity in the store, to design the stand optimally and to discuss further strategies like pricing with the store manager
- Your company takes over the complete distribution for an oatmeal manufacturer in the upper price segment with correspondingly high quality. Your customers include all well-known supermarket chains around the world. The work of your employees consists of promoting the products in the stores in such a way that the consumers are willing to pay more money on oatmeal. You will advise the store manager on the positioning of special items and tasting stations
In short, the main focus of a manufacturer or supplier of products is always to be able to offer the right products, with the right price, at the right place at exactly the right time. With SAP Sales Cloud Perfect Store, you can improve your planning and executing for your Store Visits in best possible structured way.
With the help of the Engagement Map function within the SAP Perfect Store, you are provided with a virtual layout for the stores. You can create a layout for each store structure, which helps you move virtually through the store. Thus, you can optimally display the structures to your customers, analyze them and thus achieve optimization for the positioning of your products in the store. Another important feature is the Engagement Point, which you can specifically include in your engagement map. These points are locations within the Store, where you can find your products or should pay attention to. These locations should be visited by the sales rep.
This chapter will be explained in the further course on the basis of the following example: Headphones & Headsets Holding sells its Headphones and Headsets in several stores around the world. The sales manager Nick Brown has recently managed to win the customer Smith Electrical Stores for his company. The Smith store sells all kinds of electrical equipment to end consumers and has already opened many stores in Los Angeles Country. After winning this customer, it is now important that Mr. Brown helps the store managers to place the products correctly and to assist in the distribution. It was agreed that the products will be placed in the segment with other headphones and headsets. At the same time, there will be also a separate booth to sell the HP 828‑28 high-quality headphone product, which is currently popular among young people due to an advertising campaign featuring a well-known rapper.

In retail sales, products from a wide range of suppliers and manufacturers are combined into an assortment and made available for easy purchase by the end consumer. There is a strategy in every store layout as to how these products are best sold. Most people know the situation where we just wanted to buy some milk and bread at the grocery store and then went home with a bag full of groceries. For a sales rep in retails sales, it is important to understand the strategy of such a store layout to advise them on sales of your products.
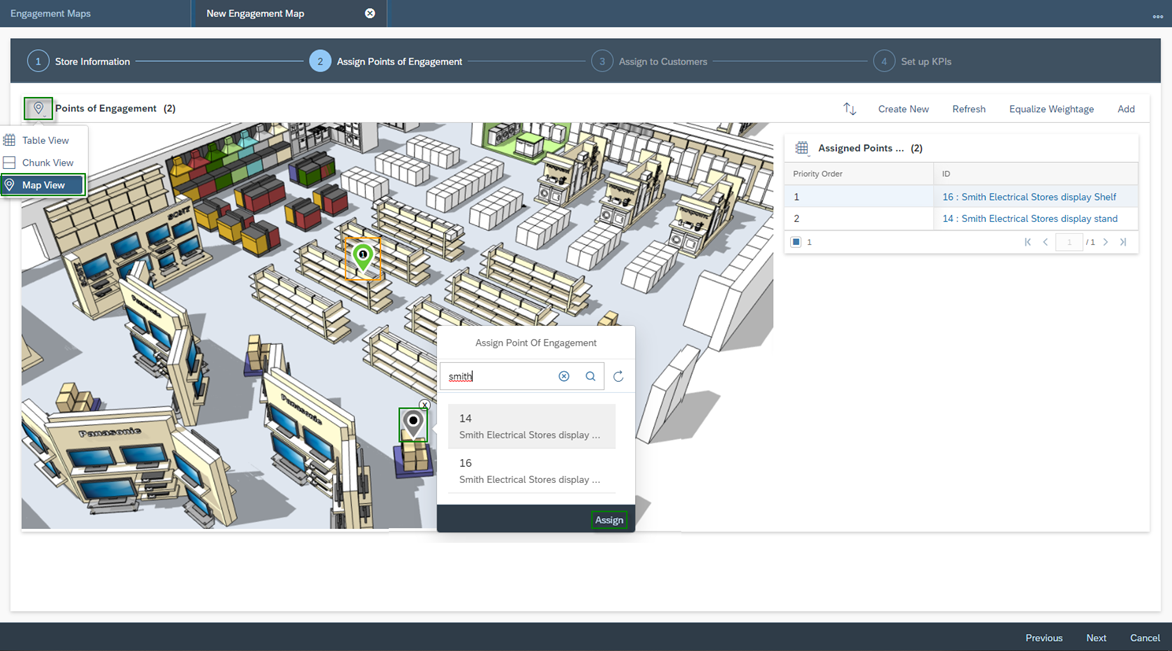
The following figure shows the store layout of Smith Electrical Stores. After the entrance, the end consumers for electronic equipment move directly towards three display stands, where the latest electronic products – such as the latest cell phone – are always marketed. Behind theses stand are two rows of four cross-shelf systems where small appliances are placed. The area marked in red is used for Headphones & Headsets Holding headphones. The stand for product HP 828‑28 is located directly in front of the TV sets, relatively close to the entrance. This example completes the specifications to display the store layout as an Engagement Map and the two Points of Engagements are given.

1.1. Engagement Maps
You can find the Work Center View Engagement Maps under the Work Center Activity Planner. Here you will find a list of all existing engagement maps. You can create new ones – either blank via the New Button or via More as a Copy of an existing one. An Engagement Map can either have the Status Active – when it is in use – the Status In Preparation or the Status Obsolete – when it is not in use anymore. The Consistency Status provides information about whether the entered data is valid. You can check this consistency with the help of a function in the Detail View and get Consistent or Inconsistent as return value.

You will be guided through the process of Creating an Engagement Map in four predefined steps.
Step 1: Store Information
In the first step Store Information you enter the basic data like Description, Validation Period and Notes. One the right you can determine the Threshold values for determining the Perfect Store using a point system. Use Scale 1, 50, 100 or 150 depending on how much variance you see in the allocation of points. You can decide whether you want to use a Two-Level Scoring Range or a Three‑Level Scoring Range. In the Two-Level Scoring Range there are basically only good (=green) and bad (=red). In the Three‑Level Scoring Range there are good (=green), OK (=yellow) and bad (=red). For the Three‑Level Scoring Range, enable the Enable Three-Level Scoring Range indicator. Now assign the points for your threshold value ranges either via the slider or enter the number in the Range fields. Behind the colors you will find a Range Description that you can freely define – in this case Bad, OK and Good. In the example shown, the sorting is from red to green. You can also change the sorting from green to red by clicking on the drop-down field of the red field shown here and then selecting green.
In the next section you define the Sales Organizations for which this Engagement Map is valid. Assign as many as needed using the Add button.
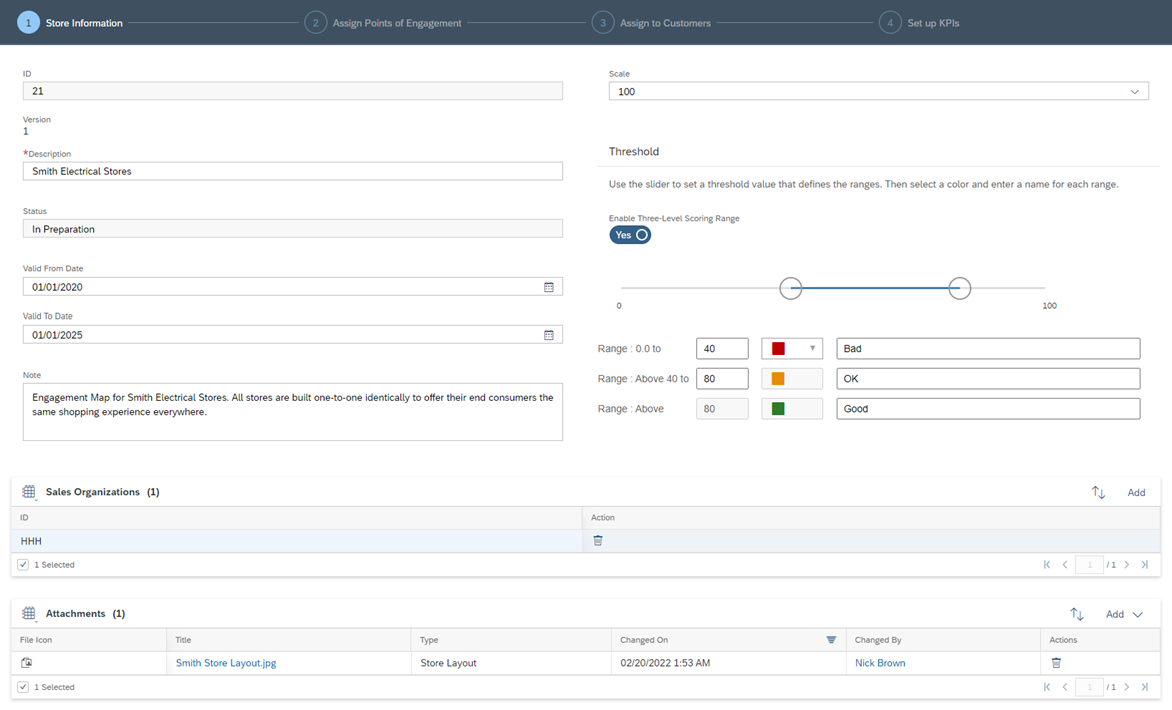
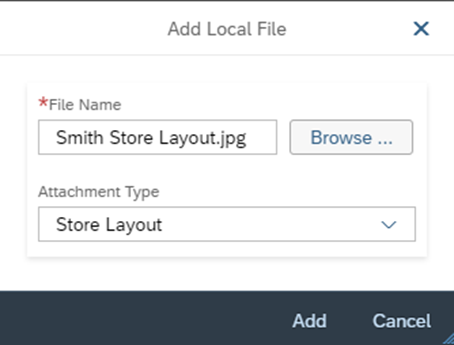
The last – but very important – setting is the Attachments. Here you can add the store layout. To do this, click the Add button. Now select the Store Layout and make sure to select Store Layout as Attachment Type. This way your attachment will be embedded into the Perfect Store Visit.
Step 2: Assign Points of Engagement
In the second step you can define and allocate the Points of Engagement to the Engagement Map. To do this, you can use the Add button to add existing engagement points from your collection out of the Work Center View Points of Engagement. Alternatively, you can create specific Points of Engagement for this Engagement Map using the Create New button.

To properly place the Points of Engagement in your store layout, you need to switch the view to the Map View. Here you can see the attachment that you have classified as a store layout in the first step. Click on a location in the map and a new Pin will be added which you can now assign to a Point of Engagement. Select it from the list and confirm with the Assign button. Repeat these steps until you have added all points.
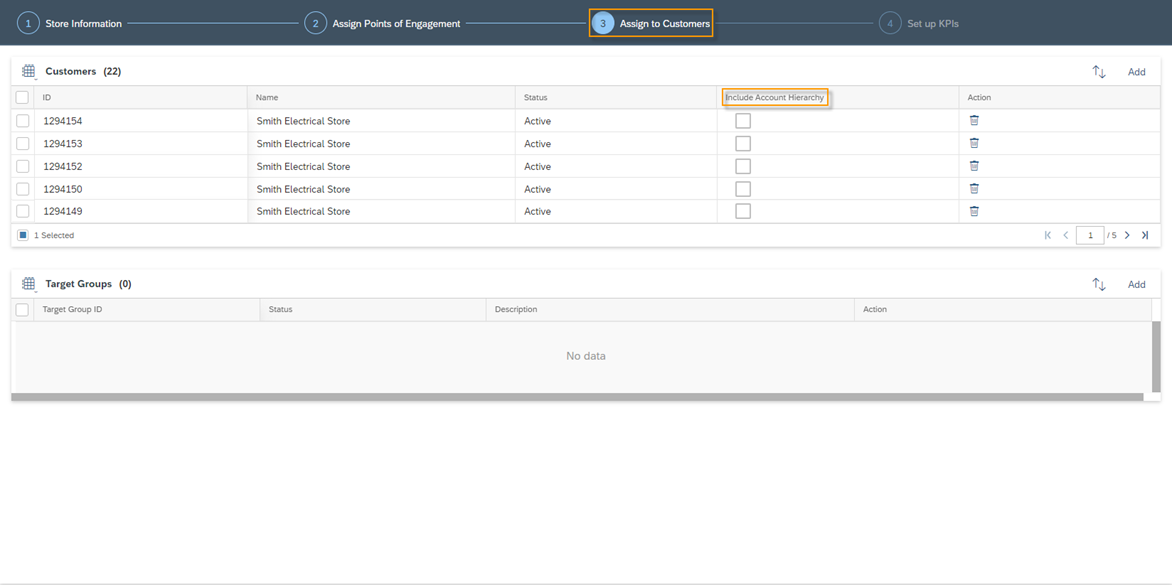
Step 3: Assign to Customers
In the third step Assign to Customers, you can now assign the engagement map to customers. You can select customers individually in the section Customer or a whole target group. With the indicator Include Account Hierarchy you have the possibility to include the complete account hierarchy of the customer for this engagement map as well.
Step 4: Set up KPIs
This part will be explained detailed in a later Chapter.
1.2. Points of Engagement
In the Work Center Activity Planner, you will find the Work Center View Points of Engagement. Here you can create and define all Points of Engagement for later usage in your Engagement Maps. To create a new on, simply click on the Create Icon ![]() or Copy an existing Point of Engagement via the More Button.
or Copy an existing Point of Engagement via the More Button.

When creating, enter the Description for the Point of Engagement and define the Asset ID. The asset is basically a product with sold quantities – thus registered products. If the product you select as an Asset ID has no sold Registered Products, you will get the error message Asset has no Registered Products and will not be able to complete the creation.

After creating the Point of Engagement, you can now also store the details such as Notes and Validation Period. In the next process you are forwarded in the Surveys tab. For each Engagement Point you have to define at least one survey or task, otherwise the activation is not possible, and you will get the following error message: Activation failed, assign at least one survey, question, or task. Insert surveys using the Add button and define the following settings:
Deactivated Indicator
After you have activated the Point of Engagement, you can no longer remove used surveys via the Trash Icon. However, you can deactivate the survey for usage with Deactivated Indicator
Relevant For Scoring
Determine if the survey is Relevant for Scoring and should be included in the calculation of the Perfect Stores value. Note that the Weightage field is grayed out until you activate this Indicator.
Weightage
Indicate in percent the weighting of the survey. This is especially important when using multiple surveys
Mandatory
Determine whether the execution of the survey is mandatory or optional

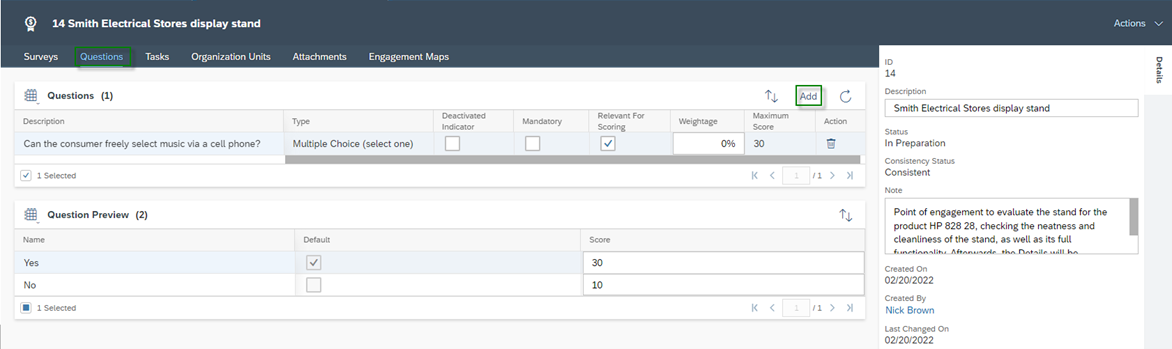
You can also insert individual questions from your Question Bank to the Point of Engagement via the Add button. To do this, select a valid active multiple-choice question. You can then assign a weighting specifically for this question in relation to this Point of Engagement by defining the Score for each answer option under the section Question Preview. The Maximum Score shows you the limit for the Scoring possible for this Question.
The Tasks tab allows you to define tasks that should be performed at this Point of Engagement. To do this, click on the Add button and enter all the relevant information such as Subject, Category, Planned Duration, etc.

In the Organization Units tab you can design the assignment to the sales organizations. The Attachment tab allows you to add attachments that are important in the execution specific to this engagement point. For example, in the case of the display for product HP 828‑28, this could be the product description. The last tab available is Engagement Maps, here you can see a listing of all engagement maps where this point of engagement is used.
In the Actions menu, multiple functions are available for the Engagement Point:
Equalize Weightage
With this feature, the system automatically calculates the equality for the weighting of all elements – surveys and questions – that you have added. If you have stored as an example three surveys, then each one will be weighted with 33.33%.
Check Consistency
The system checks if all stored data is consistent. This check should always take place before activation
Status
With Activate, Set as Obsolete and Set as In preparation you can adjust the status for the Point of Engagement
Copy
You can copy this Point of Engagement as a template for a new one

Do you need consulting from our experts?
The Customer Experience team at Camelot ITLab deals with exciting and challenging CRM related topics every day and serves a large portfolio of different customers from a wide range of industries. Trust in this collaboration and feel free to contact us at tlil@camelot-itlab.com.
Was this article helpful?
If you like our content we would highly appreciate your review on Trustpilot
#SAP C4C #SAP Cloud 4 Customer #Cloud 4 Customer #Cloud for Customer #SAP Sales Cloud #Sales Cloud #Retail Sales #Perfect Store #Store #Layout #Store Layout #Engagement Map #Point of Engagement #Engagement Point