Search
Close this search box.

Perfect Store – Execution

Perfect Store Execution

To make the execution of a retail sales visit effective, using the Perfect Store feature will help you. The cycle from the planning of the visit to the successful completion of the visit is covered in the SAP Sales Cloud

In retail sales, the day-to-day life of a sales representative essentially proceeds in the following steps:

  1. Planning and Preparation of the Visit

In the first step, the sales rep schedules his visits. Most of the time it is planned over several weeks. Often visits are also generated dynamically, while the sales rep checks which customers can still be included in routes


  1. Execution of the Visit

Here, the sales rep checks the store. The main points to be checked are availability of the products on the shelves, how is the pricing structured and are special promotions running


  1. Discussing of Findings with the Store Manager

Now that the Sales Rep has checked the products for various aspects, he discusses his findings with the Store Manager. Together, a plan for optimization is worked out and tasks are planned

When creating a Perfect Store Visit, make sure that the Perfect Store Visit indicator is enabled. Fill in also all other relevant fields.

In the Business Object Visit, you will notice that you will find the Engagement Map Description and Engagement Map ID information that you have assigned to this Customer. You will also find the Perfect Store Visit indicator – which you enabled when creating the visit – in the Business Object. However, this cannot be changed after the visit has been created. To start the Execution, click on Actions and then on Start Perfect Store Execution.

If you are using the Check-In / Check-Out functionality of SAP Sales Cloud, make sure that you are checked in, otherwise the execution cannot be started. The procedure is then as follow: Check In, click on Actions, then on Refresh Visit and then click again on Actions again and finally on Start Perfect Store Execution.

Now your engagement map opens with all settings – which you have made – and the Point of Engagements (short PoE). In the upper right segment, you can switch the view between Map View and Task View and navigate through the engagement points. This is of course helpful if you have multiply. In the upper left you can see the Perfect Store Score of the Last Visit. You can start performing the store visit by working through all the Surveys, Questions and tasks within each Engagement Point.

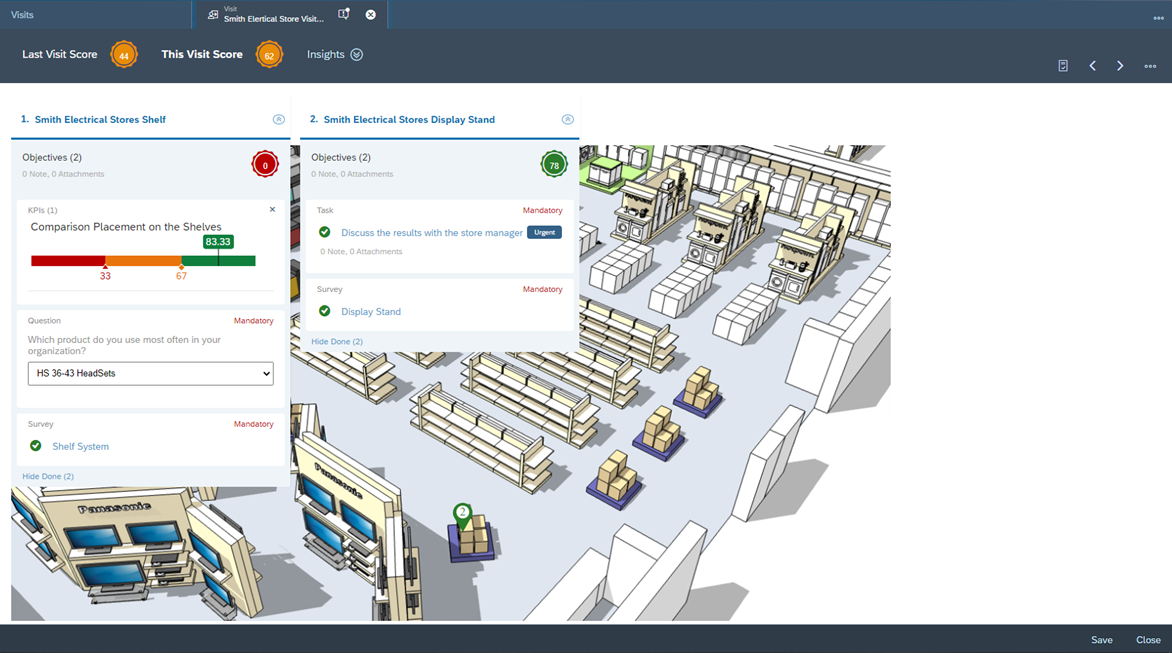
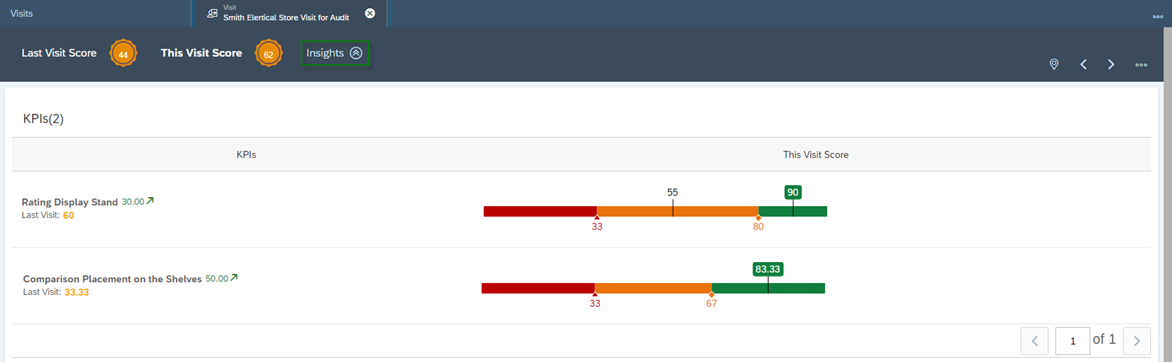
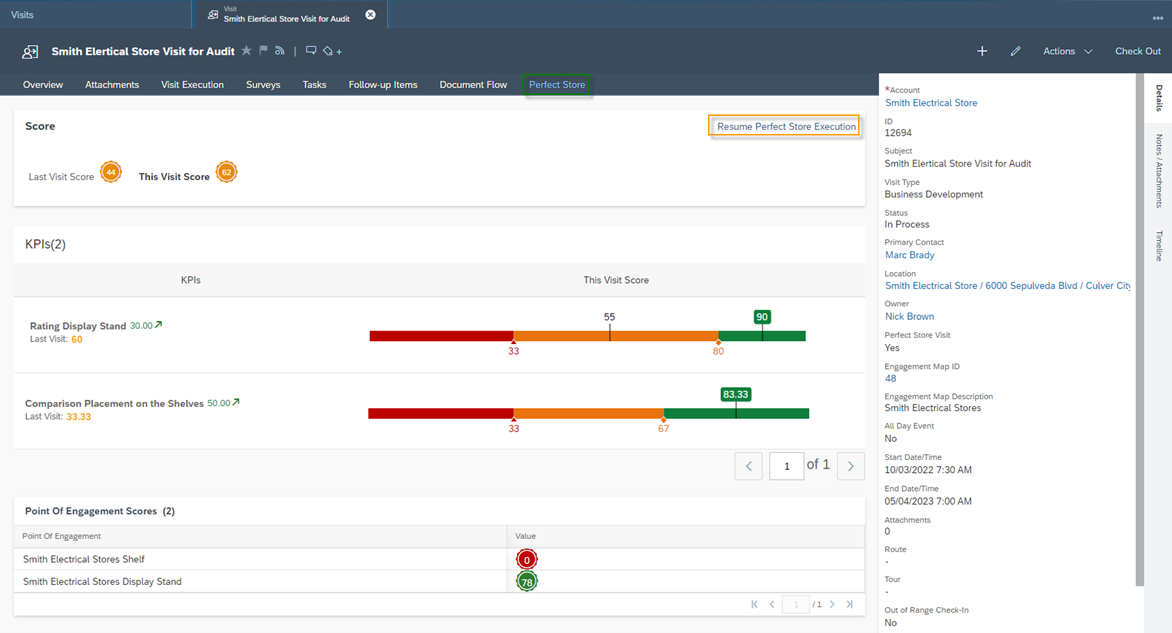
When you are done, click on the Score Icon  between The Visit Score and Insights to start the scoring calculation. You will now see the individual scores for all Engagement Points, as well as the Total Score for the Perfect Store Visit. You can also now find survey related KPIs in the Engagement Points tile.

To get a complete overview of all KPIs – including the Engagement Map related Advanced KPIs – click on Insights. Here you can also compare the KPIs retrospectively with the last store visit and see the development since then.

The calculation of the scoring values – for both the point of engagements and the total score – is as follows:

Perfect  Store  Score = Scale_{EM} \sdot \displaystyle\sum_{i=1}^n (W_{PoE} \sdot Score_{PoE})_i
Score_{PoE}= \displaystyle\sum_{i=1}^n (W \sdot \frac{Total  Score}{Total  Maximum  Score})_{Survey/Question}

where

            W        means Weightage in %

            PoE    means Point of Engagement

            EM      means Engagement Map

In the example shown above, the value is calculated as follows:

Point of Engagement 1:

One survey and one question are included. The survey has been given a Weightage of 100% and the question itself 0%. From this, the scoring is calculated as follows:

Score_{PoE}  1= (100\% \sdot \frac{0}{50}) + (0\% \sdot \frac{10}{30}) = 0

Point of Engagement 2:

There is only one survey included. This one has a maximum score of 1.200. When answering the questions, a score of 936 was achieved. This results in:

Score_{PoE}  2= 100\% \sdot \frac{936}{1200} = 0,78

Visit Score:

The weighting falls 20% on the first engagement point and 80% on the second engagement point. A scale of 100 was selected for the engagement map. Thus, the total score is calculated as follows:

Perfect Store Score = 100 \sdot ((0,2 \sdot 0)+(0,8 \sdot 0,78)) = 62

In the Perfect Store tab of your visit, you will also find once again an overview of all scores. From here you can continue your execution with the Resume Perfect Store Execution button or for already completed visits you will find the View Perfect Store Execution button here. These two function buttons can also be found under the Actions section.

Do you need consulting from our experts?

The Customer Experience team at Camelot ITLab deals with exciting and challenging CRM related topics every day and serves a large portfolio of different customers from a wide range of industries. Trust in this collaboration and feel free to contact us at tlil@camelot-itlab.com.

Was this article helpful?

If you like our content we would highly appreciate your review on Trustpilot


#SAP C4C #SAP Cloud 4 Customer #Cloud 4 Customer #Cloud for Customer #SAP Sales Cloud #Sales Cloud #Retail Sales #Perfect Store #Store #Layout #Store Layout #Engagement Map #Point of Engagement #Engagement Point

Receive the latest news

Subscribe To our SAP Sales & Service Cloud Newsletter

Get notified about new articles