Search
Close this search box.

Do your Activities

Activities

Each set goal can be broken down into individual elements. So, of course, each sales target can also be broken down into individual Sales Activities. If you look at the example of an offer cycle, this correlation quickly becomes clear. At the beginning there is the need that the customer must formulate an inquiry. In this phase, it can already be important to have contact with your customers so that the inquiry is also on your desk - and not just that of the competition. After the inquiry, the next activity is the preparation of the offer and then the sending of the commercial offer back to the customer. The offer follow-up phase begins, which can again consist of several activities. Various telephone calls can be made to customers, e-mails can be exchanged, appointments can be held with specialist colleagues, or individual tasks can be completed. With the help of SAP Sales Cloud, you can record all sales activities. This gives you the possibility to separate larger sales processes - such as opportunities or quotes - into different activities. In this way, you can ensure that you are on the finishing line, even for complex cases

In SAP Sales Cloud there are the following types of activities:

Appointments

Hold Appointments to discuss important details about customer projects or developments. You can invite colleagues as well as contacts. For customer visits you should use the Business Object Visits

E-Mails

E-Mails are the most chosen way of communication. You can quickly exchange information with customers

Phone Calls

With Phone Calls, you can talk to your customers in person at short notice. Thus, you can clarify important details and feel the emotions of your customers

Tasks

Manage your tasks in SAP Sales Cloud to meet your customer’s needs and complete important strategic work

You will find the Activities tab in many Businesses Objects in the SAP Sales Cloud Application. Here, there is a separate section for each Activity Type. From this section you can view all associated activities and create new follow-up activities via the New button.

Since the synchronization of each Activity Type with the client-side Microsoft Outlook® Plugin is explained in each subchapter, it is recommended to familiarize yourself with the basics of this Add-On beforehand. You will find all the basic information in Chapter Understand the Basics.

1. Appointments

In SAP Sales Cloud, you can manage and coordinate all customer-related appointments. Through the calendar and team calendar functionality, you can thereby create full transparency with your colleagues. If you also use Microsoft Outlook®, you have the possibility to synchronize your appointments in both directions between these applications.

1.1. Business Object Appointments

The Appointment in SAP Sales Cloud is structured as follows. On the one hand, you will find all associated Attachments in the Overview tab. Secondly, a list of Involved Parties, whereby these are separated into different roles such as Organizer, Employee Responsible and Attendee. The third section is the Notes, which you can use to prepare and then later summarize your appointment. In this regard, the appointment has the following important information fields:

Status           The status gives you information about the processing procedure. You will find the following entries: Open, In Process, Completed or Canceled. All status entries can be modified via the Action menu

Subject         Describe with the subject the purpose of your appointment

Category      Select a category of your appointment. These can be freely customized by your System Administrator

Owner           The owner is responsible for the appointment and leads it

Organizer     The organizer is the employee who prepares and organizes the appointment

Location       Specify where the appointment should take place. By default, the address of the selected customer is entered, but you can adjust this at any time

Date/Time    Enter the Start Date/Time and End Date/Time

1.2. Synchronisation of Appointments with Microsoft Outlook® (client)

With the client-side Outlook Plugin from SAP, you can synchronize appointments bidirectionally. To synchronize a new appointment from Microsoft Outlook® to SAP Sales Cloud, create a new appointment in the first step. To do this, switch to the Calendar View of you Outlook Application, select the time range for the appointment, right-click on it and select New Appointment.

Now enter all the basic information for your visit in the next step. Subject, Location, Notes, Attachments, etc. Then click Add Appointment in the top left corner of the SAP Sales Cloud section.

You will find a section about the details in your SAP Sales Cloud at the bottom of each synchronized appointment. Here you will find the synchronization status – for example, In Progress, Failed or Successful – and you can view the details of the synchronization via Appointment Details.

In the third step, Add a Reference to the appointment you want to synchronize. You can assign the appointment directly to an Account or to an Opportunity or Lead.

In the last step search for the Business Object to be referenced. In this case, the business object Account has been selected. Select the desired search result to finally assign and create the appointment via the Add Reference Button. With the Create button you have the possibility to create a new business object directly from Microsoft Outlook.

After successful synchronization, you will now also find all entered details in the SAP Sales Cloud application.

1.3. Out Of Office Feature

You can mark any appointment as Out of Office. To do this, select the Out Of Office entry while you create the Appointment in the Show As data field. The function is similar to Microsoft Outlook®, where a calendar entry is created to indicate that you are not in the office, but for example on a training.

You will then find this entry highlighted in purple in the calendar in the SAP Sales Cloud application. This can also be synchronized between the application and Microsoft Outlook® with this property in both directions.

2. E-Mails

E-mails are probably the most frequently used way of communication. With SAP Sales Cloud, you can manage both incoming and outgoing E-Mails. The Business Object of an E-Mail is structured as follows:

E-Mail Viewer          In this tab you can view the E-Mail in the original format and check the content

Overview                  In this tab you will find a listing of all TO and CC Recipients of this E-Mail. At the same time, you will find the plain text for this Mail in the Message Field

Attachments            This tab contains all related attachments

An important data field for this Business Object is the Direction field. The entry Inbound means that it is an incoming E-Mail and the entry Outbound means that it is an outgoing E-Mail.

2.1. Send E-Mails

You will find an Activities tab at several Business Object – such as Leads, Opportunity, Sales Quotes, Tickets, etc. – in your SAP Sales Cloud Application. For each activity type – such as E-Mails, Appointments, Tasks and Phone Calls – there is a separate section displayed in this tab. In the section E-Mails you have the possibility to send a new E-Mail directly from the Application via the New button. The E-mail is then automatically linked as an Activity with the respective Business Object from which you are sending. In the example below you can see the E-Mails section in the Sales Quote Business Object 43206.

After you clicked New, the E-Mail Editor will open. In the first step, select the To, CC and BCC recipients. To do this, click Select and choose from a list of Customers, Contacts or Employees. You can now formulate the Subject and the Email Body and add Attachments. As soon as you click on the Send button, the e-mail is sent from the system to the recipients and a business object e-mail is created in the background and simultaneously set to the Completed Status.

Besides all the standard functions for editing and formatting an E-Mail, you will find following additional functions in the E-Mail Editor:

c4ciseasy_sap_sales_cloud_icon_printer

Print

With the Print button you can print the e-mail or print as a file in PDF format

c4ciseasy_sap_sales_cloud_icon_signature

Signature

Choose a Signature from the System – see Chapter Service

c4ciseasy_sap_sales_cloud_icon_template

Template

Choose an E-Mail Template from the System – see Chapter Service

2.2. Incoming E-Mails

You can receive incoming E-Mails in two ways. The first one is via Synchronization with Microsoft Outlook® – which will be explained to you in detail in the following Chapter. The second way is via the Service Module. Here you can define E-Mail Channels, which will route incoming E-Mails directly to your CRM system. You can find more information about this in the Chapter Service.

2.3. Synchronisation of E-Mails with Microsoft Outlook® (client)

For incoming emails, you have two options for synchronization. The first – probably more handy – option is to drag and drop the email from the inbox to the business object to be referenced in the side pane. In the example shown below, you can reference the email from Mr. Mike McKinsey with the offer 106392. The second option is to manually add the email using the Add E-Mail button in the top right and then reference it with a Business Object. You can reference the E-Mail to following Business Objects: Account, Campaign, Sales Order, Sales Quote, Opportunity or Lead.

For outgoing emails, you have the option to start synchronization directly after finishing the email. Click the Save and Send E-Mail button in the upper left. This button triggers the e-mail to be sent to the recipients and the synchronization is automatically started in the background. The email will be referenced with the To recipients.

As soon as you have started the e-mail synchronization, you can see the status of the synchronization on the SAP e-mail icon.  stands for pending synchronization,  stands for successful synchronization and with no icon there is none.
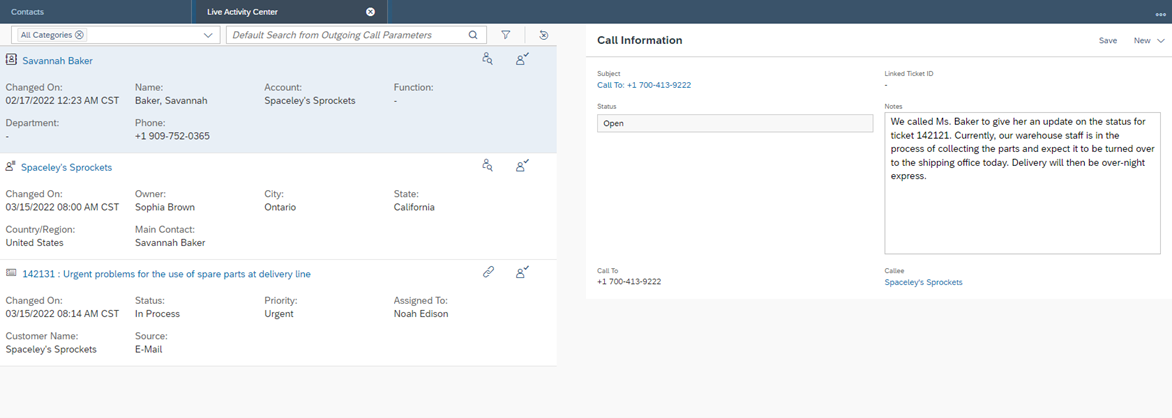
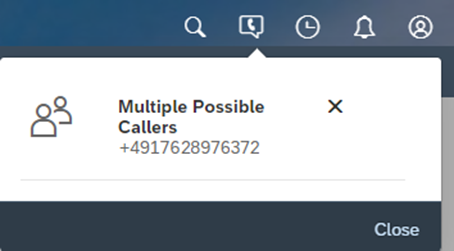
3. Phone Calls

The Phone Call Activity Type allows you to coordinate all Phone Calls related to Customers and their Contact Persons. With SAP Sales Cloud it is possible to record these calls as a calendar block – when you arrange to talk to customers on the phone – or to process incoming and outgoing calls directly and automatically.

The Business Object Phone Call is structured in detail with following important data fields:

Owner           The Owner is the main person in your company responsible for this Call

Organizer     The organizer is the person of your company who coordinates the Phone Call

Date/Time    Enter the Start Date/Time and End Date/Time

Direction      For Direction, specify whether the call is incoming or outgoing. You have the following options: Inbound, Outbound and Not Specified

Status           The status of a Call can be Open, In Process, Completed and Cancelled. You can adjust the status via the Actions menu

Besides these important fields, you can manage Attachments and Notes in each Phone Call. The notes can be used both as a Phone Call guide and later for the minutes of meeting. In the Participants section you can manage all the participants of the Call, so that this Call will be linked to them and completes the 360° customer view.

From each Phone Call, a new Service Ticket can be created via the Actions menu and the Convert to New Ticket button. Or the Call can be linked to an existing Ticket via the Assign to Existing Ticket button. In addition, you can generate a summary as a PDF using the Generate Summary function. This PDF is then attached in the Business Object Phone Call, and you can use this to send it to participants via E‑Mail.

3.1. Live Activity Center for Outgoing Calls

You will find the contact information of your customers and their contact persons in several places in the SAP Sales Cloud application. Both the phone and the mobile number are always stored as hyperlinks, so you can click on them. As soon as you do this, you create an Outgoing Call in your Application and, in the case of a CTI connection, your phone then also dials this number automatically. In the figure below the phone number is dialed from the contact Savannah Baker. In the header of the application, the screen pop appears under the Calls section. A Phone Call activity has already been created automatically in the background. You can now click on the Contact Person in the screen pop.

You will now be taken to the Live Activity Center. This can be also found as a Work Center View in the Work Center Service. In the Live Activity Center, you will find the call information of your created phone call activity on the right side. You can make Notes about the call and find important field information like Callee, Call To and Status of the activity. On the left side, the default search opens, and you can initially see the contact person and customer data as well as all service tickets that are linked to this contact person. You can adjust the search and the filter setting here if the default search results are not sufficient – for example if a contact person calls for a service ticket of a colleague.

Basically, there are now the following follow up decision that you need to make:

Save

With the Save function, all changes in the Live Activity Center are applied to the Phone Call Activity. You can then complete the call later. With this function you do not link this call to any other object.

New

You will find the following options under the New Button:

  • Create new Customer
  • Create new Contact Person
  • Create new Individual Contact
  • Create new Service Ticket

Link to an existing ticket

In the search results on the left, you will find the Link to Phone Call Icon  in each entry of the Service Ticket type. Use this function to link the call as an activity to the service ticket. This completes the ticket by managing all E-Mails related to an Activity as well as the Phone Calls. In the figure below you can see a service ticket where you can see the e-mails as well as the phone calls listed as interaction.

Filter on Caller

The Filter to Caller  function allows you to navigate back to the default search results for each search.
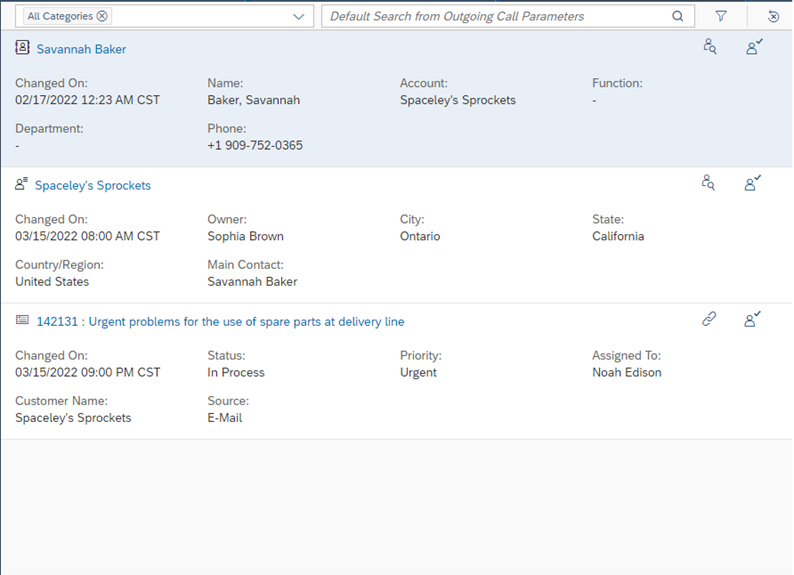
Set up Filter by a Business User

Set up Filter by a Business User

Confirm Customer

With the Confirm Customer  function you can confirm the call with a contact person and/or a customer from your search results, so that this customer and/or contact person is then taken over as information in the Phone Call Activity.

3.2. Live Activity Center for Incoming Calls

With a successful CTI connection, SAP Sales Cloud can process incoming calls automatically. This means that as soon as you receive a call from a customer, the phone popup appears at the top of the header and shows who is calling you. At the same time, a Business Object Phone Call is created automatically in the background, which you can then edit again via the Live Activity Center. All functions explained for outgoing calls are also available for incoming calls.

The clear advantage of such a connection is that you can immediately identify all tickets related to this caller in the Live Activity Center, even if you are not actively working on these tickets yourself. You thus immediately show the customer that you always have an overview of all his concerns and can quickly provide information at any time.

The customer master data is again an important topic for the calls. Of course, the correct customer or contact person can only be shown, if the phone number has been clearly assigned. Otherwise, you will get the messages Multiple Possible Callers or Unkown Caller.

c4ciseasy_sap_sales_cloud_activities_23
c4ciseasy_sap_sales_cloud_activities_24

A unique caller

An unknown caller

The phone number is assigned to several contacts

3.3. Microsoft Outlook® Synchronistion of Phone Calls

You can also create scheduled and agreed phone calls with your customers using the SAP Sales Cloud client-side Microsoft Outlook® plugin. To do this, create an appointment and store all the necessary information for your phone call – subject, notes, attachments, arranged times, etc. Then mark the appointment as a Phone Call (top left) by activating the checkbox. After that you can start the synchronization by clicking the Add Appointment button. In the next step you can create a reference for the phone call, which means that you can now link the phone call to an Account, Opportunity or Lead.

All information is transferred from Outlook to SAP Sales Cloud automatically in the background. The phone call then looks like this:

4. Tasks

In the Business Object Task, you will find all relevant fields and relationships to perform your task in an optimal way. You can manage Attachments, Notes and Involved Parties in the Overview tab. Using the Actions button, you can adjust the task Status. There are the following four statuses: Open, In Progress, Completed and Cancelled. The Completion field allows you to manage the percentage of completion of your task. When you enter 100%, the status of the task automatically changes to Completed. In addition, the following data fields are important for managing your tasks:

  • Start DateTime Specify when the processing of the task will begin
  • Due DateTime Specify when the processing of the task should be

Completed

  • Planned Duration Specify how many working hours are necessary to

complete this task

  • Actual Duration Indicate how many working hours you actually used to

complete this task. Thus, you can draw lessons for the future of such tasks by comparing planning and actual

With the fields Created By, Activity List, Campaign and Survey you can trace from which source these tasks originated. The Created By field is always empty, when the Task was created automatically from a different source, such as a Campaign or as a Follow-Up from a Survey.

4.1. Microsoft Outlook® Synchronistion of Tasks

In the Tasks section of Microsoft Outlook®, you can manage all your tasks and keep them in sync with SAP Sales Cloud. Here, you get a quick overview of all pending and overdue tasks. The synchronization icon  tells you whether this task is synchronized with SAP Sales Cloud. In the details of the task, you will find the links Task Details and Click here for more details. With the second link, you can navigate to the task in the SAP Sales Cloud application, while the first one shows you the referenced details of the task.

At the top right in your Outlook, you will find two functions Add Task and Remove Task. With Add Task you can synchronize not yet synchronized tasks into the SAP Sales Cloud and with Remove Task you can delete the task from Outlook as well as from the SAP Sales Cloud.

Of course, you can also synchronize tasks with SAP Sales Cloud directly when you create them. After you have entered all the details of your task – subject, notes, attachments, etc. – you can synchronize it with SAP Sales Cloud. – click Add Task at the top left. In the next step you have to select the referenced business object again.

The Plugin will synchronize all the details from your Outlook application to your SAP Sales Cloud application and the task will then looks like this:

5. Activity List

With the Activity Lists in SAP Sales Cloud, you have the possibility to combine several activities in one group and create them via a mass creation. You can create these tasks per customer, contact person or individual customer. The function of the Activity List can be found as a Work Center View of the Work Center Activities.

When creating an activity list, fill in the following information:

Type                          Choose between the following entries which Activity Type you want to create via the Activity List: Appointment List, Phone Call List and Task List

Name                         Assign a Name to the Activity List

Owner                       The responsible Employee for this Activity List

Start Date/Time      The Start Date/Time when the first Activity should be performed

After saving the activity list, you can make further settings in the business object itself. The following properties are important for your activity list:

Status                                   The status of the Activity List can be In Preparation or Active. You can adjust this attribute via the Actions menu

Subject                                 Define the Subject for your Activities

Duration                               Determine the length of your activity

Gap                                        This field allows you to specify whether the Activity List should be run at regular intervals

Category                              Assign the Category of your Activities with this List

Priority                                  Assign the Priority of your Activities with this List

Owner Determination       If the Owner Determination Indicator is turned as disabled, the Owner of the Activity List will be assigned as the Owner of each Activity. If the Indicator is enabled, then the Owner of the Account, Contact Person to who the Activity will be assigned, will be the Owner of the Activity.

Notes                                    Leave Notes and important information for the execution of the Activity

In the Overview tab, you will find the appropriate activity section depending on the selected type of asset. In the shown example: Phone Calls. Via New you can now select Accounts, Contact Persons or Individual Customers for whom you want to create an activity via the activity list. By default, the meta information Subject, Notes and Start time is entered for each added activity. The start time is always the start time of the previous activity plus duration. However, you can also make individual changes to this information for each entry and adjust the Participants. In the Attachments tab, you also have the option of transferring attachments to the individual activities. Finalize your Activity List by activating it via Actions and then Set to Active.

In the respective activity types, your business users can filter and search for the activity list. You can also find the information in the activity details. In this way, lists can be called up and then processed in a structured manner.

Do you need consulting from our experts?

The Customer Experience team at Camelot ITLab deals with exciting and challenging CRM related topics every day and serves a large portfolio of different customers from a wide range of industries. Trust in this collaboration and feel free to contact us at tlil@camelot-itlab.com.

Was this article helpful?

If you like our content we would highly appreciate your review on Trustpilot


#SAP C4C #SAP Cloud 4 Customer #Cloud 4 Customer #Cloud for Customer #SAP Sales Cloud #Sales Cloud #Appointment #E-Mails #Phone Calls #Tasks #Activity #Activities #Owner #Organizer #Category #Outlook #Out of Office #Show As #E-Mail Viewer #Attachments #Inbound #Outbound #Synchronisation #Direction

Receive the latest news

Subscribe To our SAP Sales & Service Cloud Newsletter

Get notified about new articles