Search
Close this search box.

Realignment Rules

Territory Management
Realignment Rules

With the functionality of the realignment rule there is the possibility in the SAP Sales Cloud to derive the territories for the accounts. First, you define the selection of your accounts. In the second step you define the rules, i.e. which criteria an account must fulfill so that he can be assigned to a territory. You can apply different Realignment Rules for Sales, Marketing and Service

Navigation for Chapter Territory Management

3.1. Accounts for Sales

The first thing to understand is the logic of SAP Sales Cloud. If an account is assigned to a territory, this information is inherited into other objects. For example, if you create a quote for an Account in the California territory, the quote will also contain the California territory information. When you change the territory of the account, however, the related objects will not change automatically, but the newly created objects will then contain this new information. Therefor you will get explained how you derive the Territories of Accounts and how to realign territory information.

3.1.1. Territory Realignment for one Account

To Realign a Territory for a single and specific Account, simply navigate to the Account and flag the Indicator Override Territory. Now in the Territory field you can select any Territory you want to assign this Account to. After you click on the Save Button the Sales Territory Team will be assigned automatically to this Account and you can view them under the Tab of Account Team. Note that all, Accounts which are manually assigned to a Territory are skipped from Realignment Runs, as long as the field Override Territory is flagged.

3.1.2. Territory Realignment for mulitple Accounts

With the Realignment Runs you have the possibility to change several accounts and also sales objects – such as offers or orders – in a performant way. This function is mostly used when implementing SAP Sales Cloud or when your company reorganizes.

3.1.2.1. Creation of Realignment Runs

To create a new Realignment Run navigate to Work Center Sales and go to Work Center View Realignment Rules. Click on New Button to create a new Realignment Run.

First Step: Select Accounts

As a first step it is necessary to Select Accounts. You can either select an already created selection under Account Selection or create a new selection by clicking Define Account Selections.

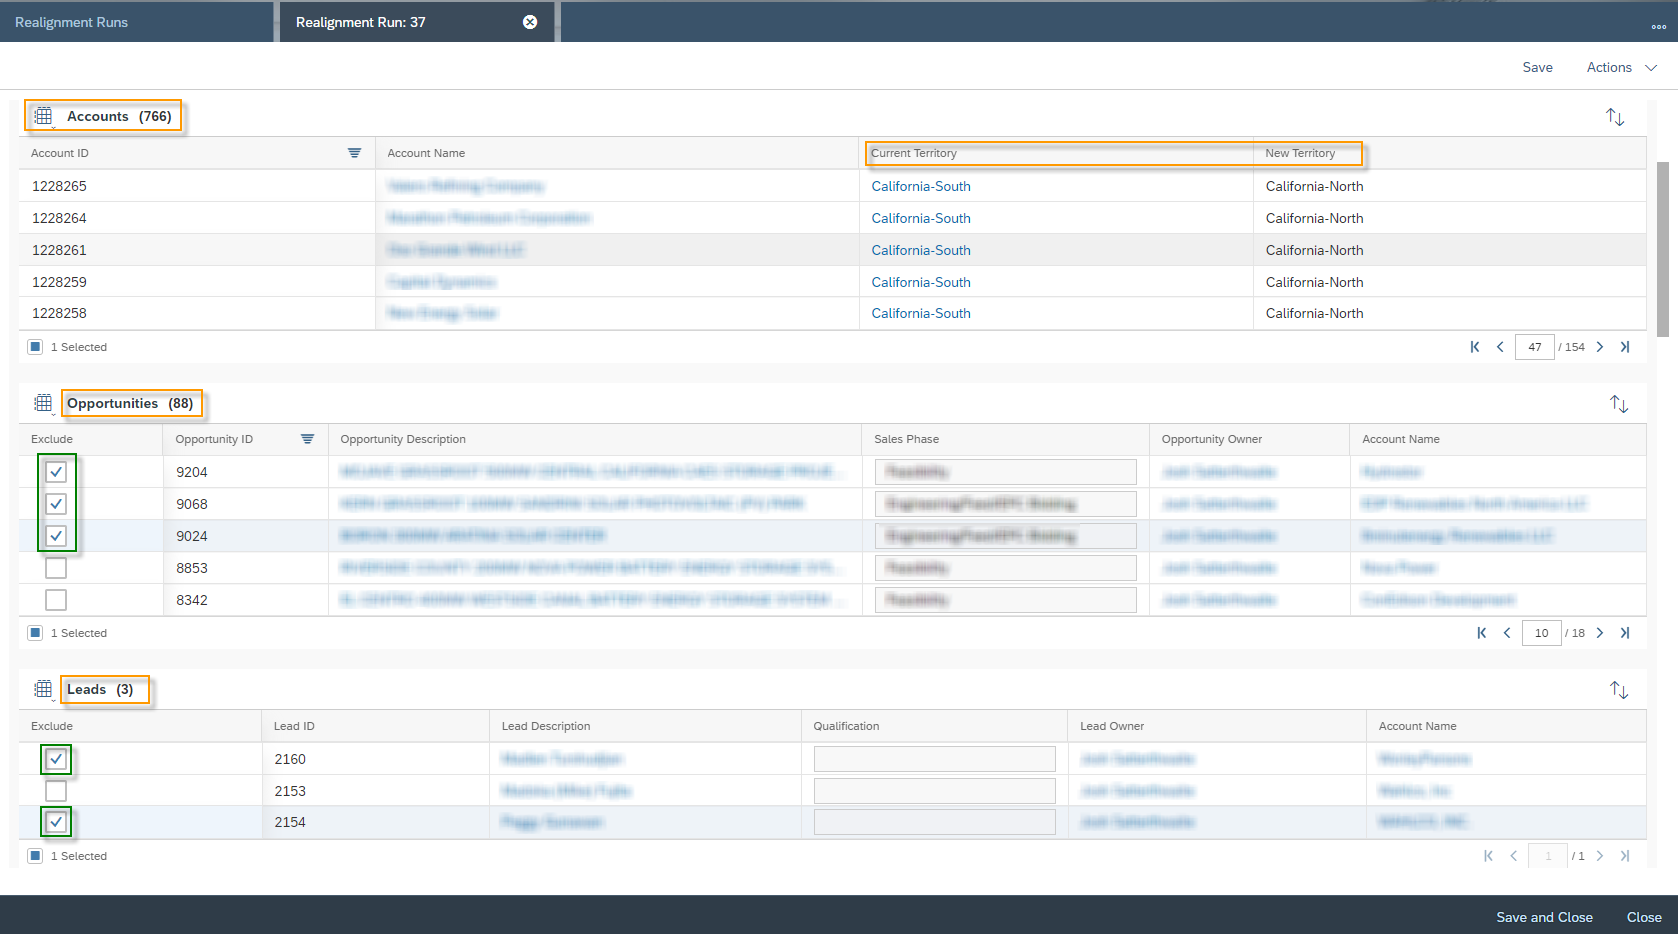
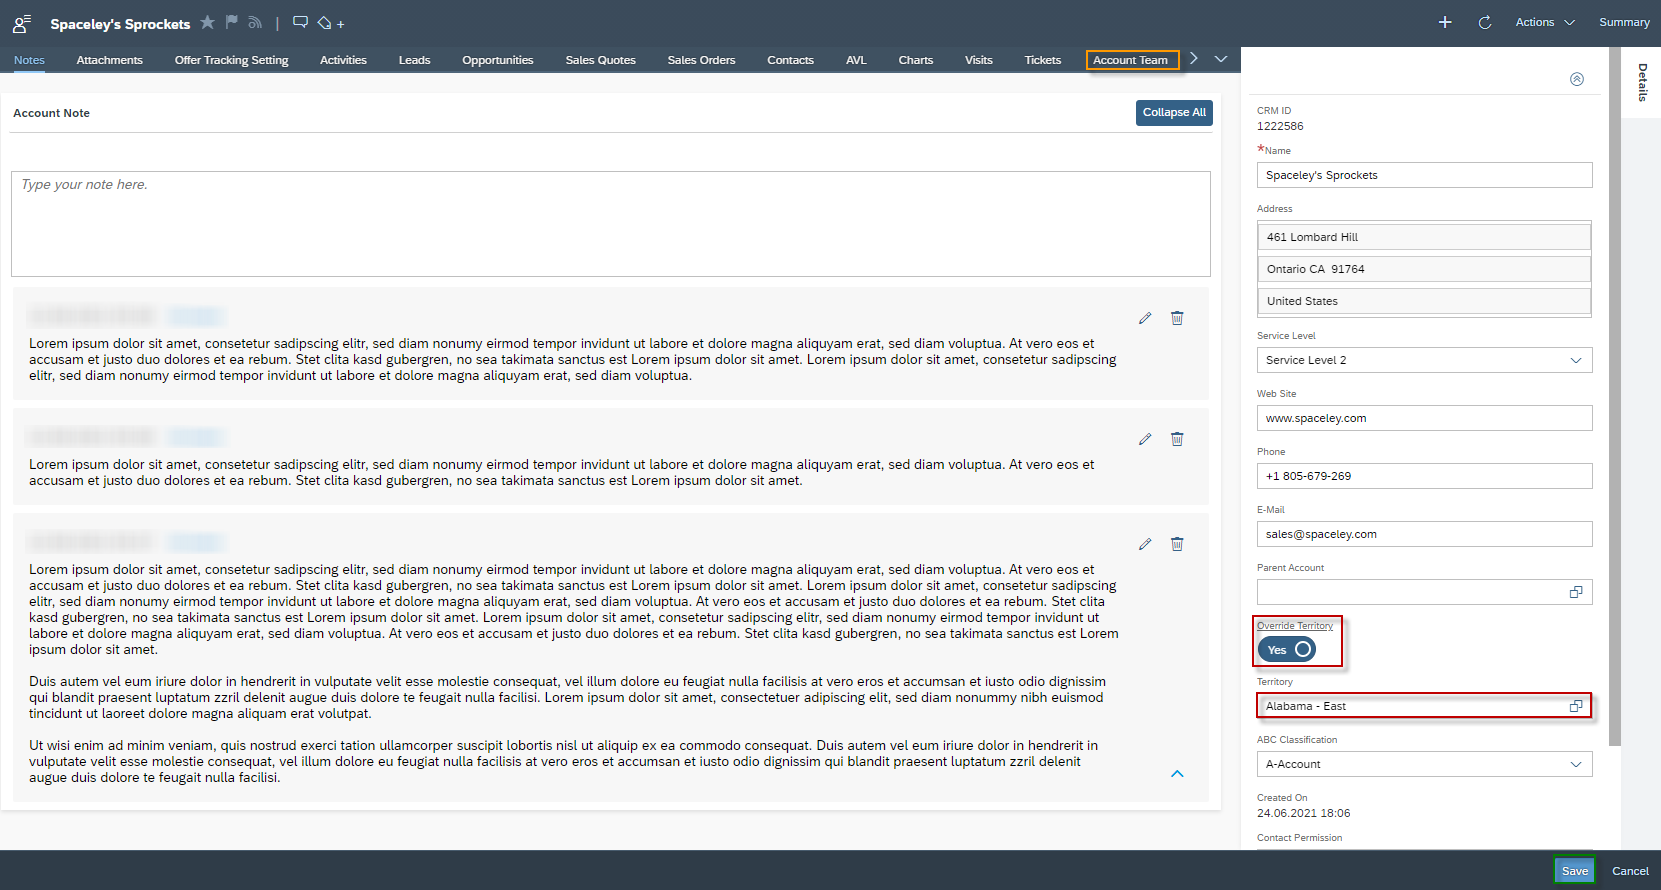
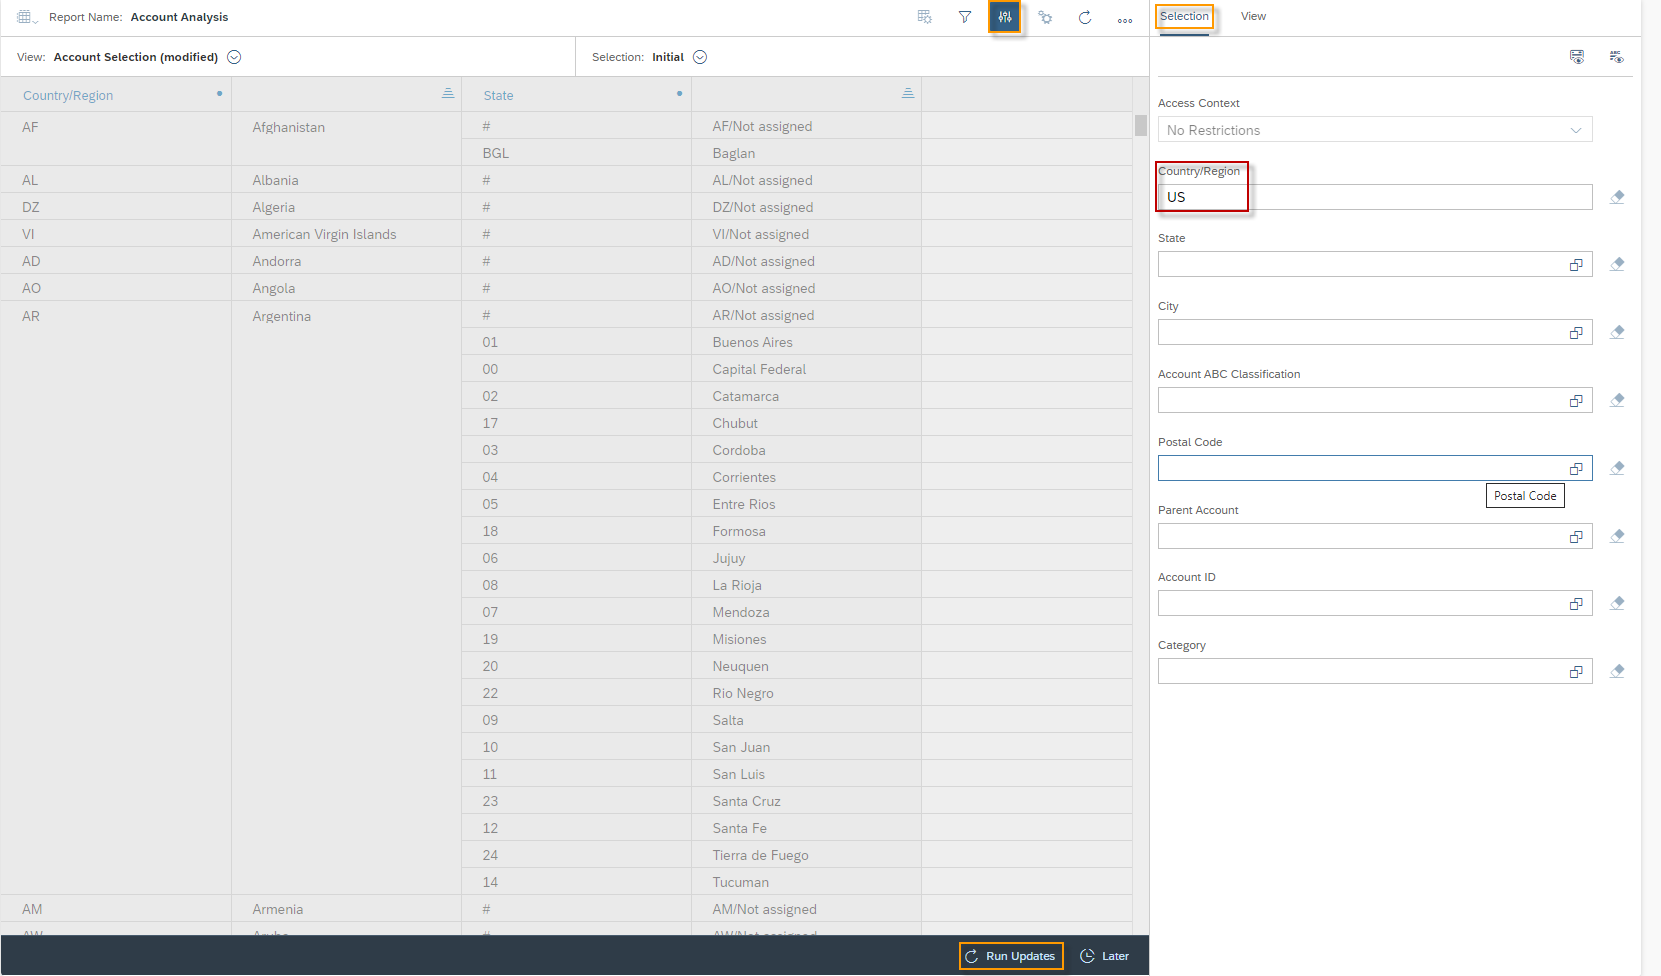
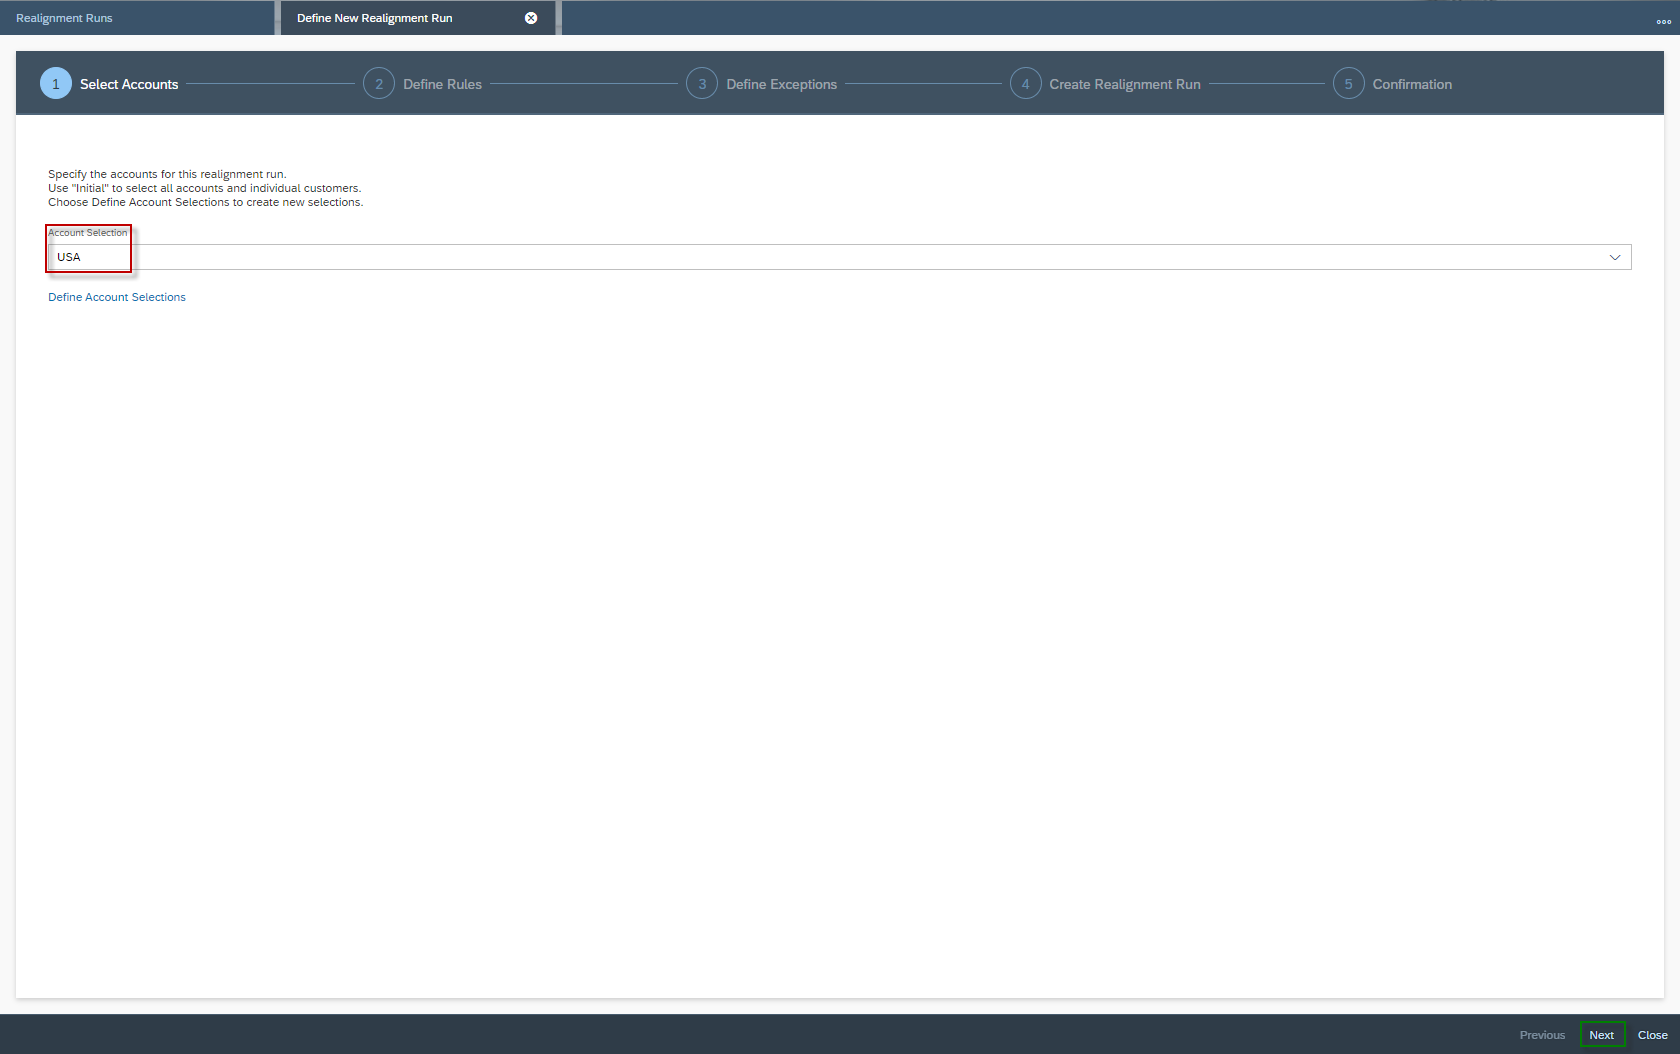
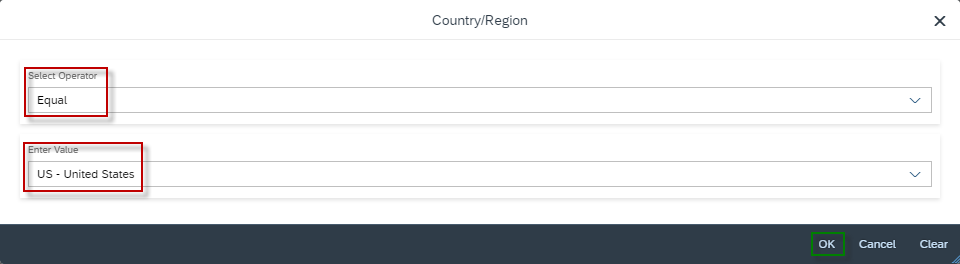
In the next screen you see the Account Analysis report. Here you can select all Accounts to which you want to apply the Realignment Run. To do this, click on the Organize Data Button and select the Selection tab in the upper right corner. Now you can make your selection based on any, criteria which is related to the account database. In the example shown, all customers in the Country/Region of the United States will be selected. Then click Run Updates to apply your selection. 

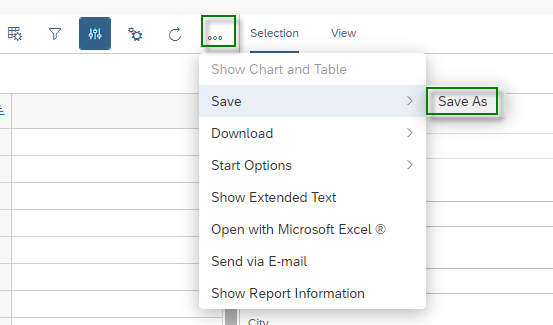
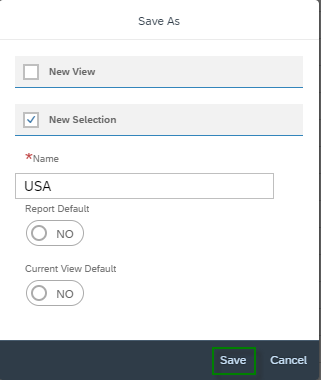
To finish the Account Selection step click on More Options Button  and then click on Save As via Save.

In the Save As popup, uncheck the New View section and check the New Selection section, since only a new selection is needed. Enter an appropriate Name – in this example USA – and then finally click Save.

You can now use your new created Selection under Account Selection and finish the Step 1 Select Accounts by clicking on Next.

Second Step: Define Rules

In the second step Define Rules you create and adjust the rules for your selection. To do this, click the Maintain Territory Rules hyperlink.

First, the focus is on the decision table.

You have three areas here. In the first area you will find the columns Sequence and Enable Rule. As in database technology, the Sequence is the primary key and is automatically assigned by the system. It is important to understand that SAP Sales Cloud processes the rules from Sequence 1 to the n-th Sequence. The first hit will be applied. This means that you should build the rules from very detail to less detailed. An example: Sequence 1 checks only for the country USA and assigns the territory USA. While Sequence 2 checks for the country USA and the state Alabama and makes the assignment to Alabama. Any customer in the USA – no matter what state they are in – would now be routed to the USA territory, as Sequence 1 is always found first. So it makes more sense to swap these Sequences with each other. Enable Rule is an indicator and can be either true or false. If you want to enable a single rule, then set this indicator to true. If the single rule should remain disabled – because you might want to use it later – then select false.

In the second area you define the data fields which should be checked for the derivation of the territory rule. In the example shown, the data fields Role, State, City and Postal Code are criteria’s for the derivation.

The third area represents the result in the form of the Territory. This means that if an Accounts meets the criteria from the second area, then this territory is derived at the Account.

Second, the focus is on the functions for adjusting the rules. By clicking on Add Row a new line will be added as a last entry. The system automatically increases the Sequence by 1 and leaves all other columns with the wildcard character *, which means any. To adjust – for example the Country/Region information – simply click on the wildcard characters hyperlink.

In the popup, choose the Select Operator and enter the value in the Enter Value data field. Confirm your entry by clicking on the OK button.

After selecting the Territory USA for Sequence 7, the line can be read like this: If the line Rule is Enabled, and the Country/Region equals the value United States, and the State, City and Postal Code can be any value, then the Territory for this Account is equal to the USA.

All values in this table are hyperlinks. So whenever you click on a value in the table – for example, in Sequence 1 on the State of New York – you can change the value.

The next function is Insert Row. This can be used to add a line at any place. To do so simply select one entry in the table, where you would like to place a new line above it. As example Sequence 4 is selected. Now you can click on Insert Row. A new empty row will be displayed then.

Before:           Selecting Sequence 4

After:               Sequence 4 is now an empty row

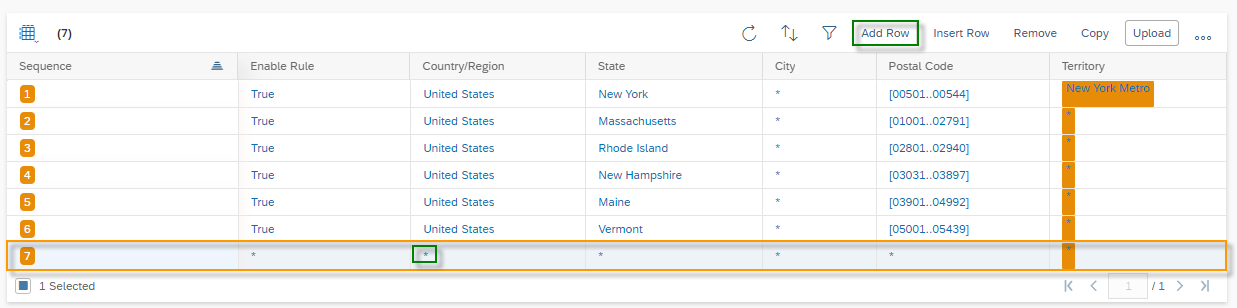
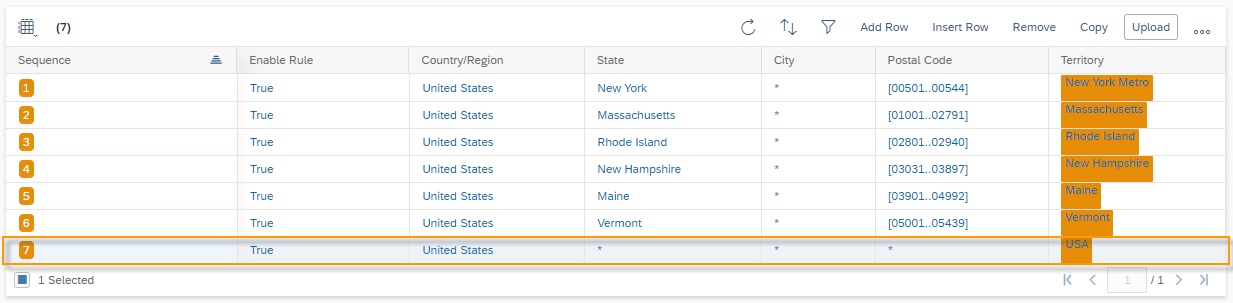
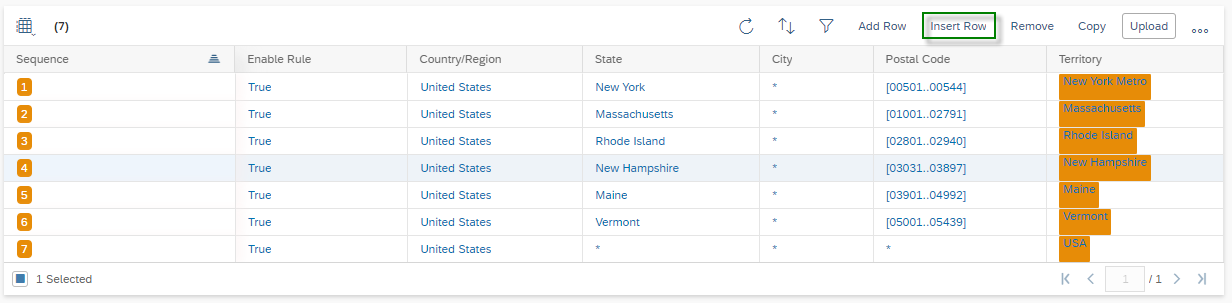
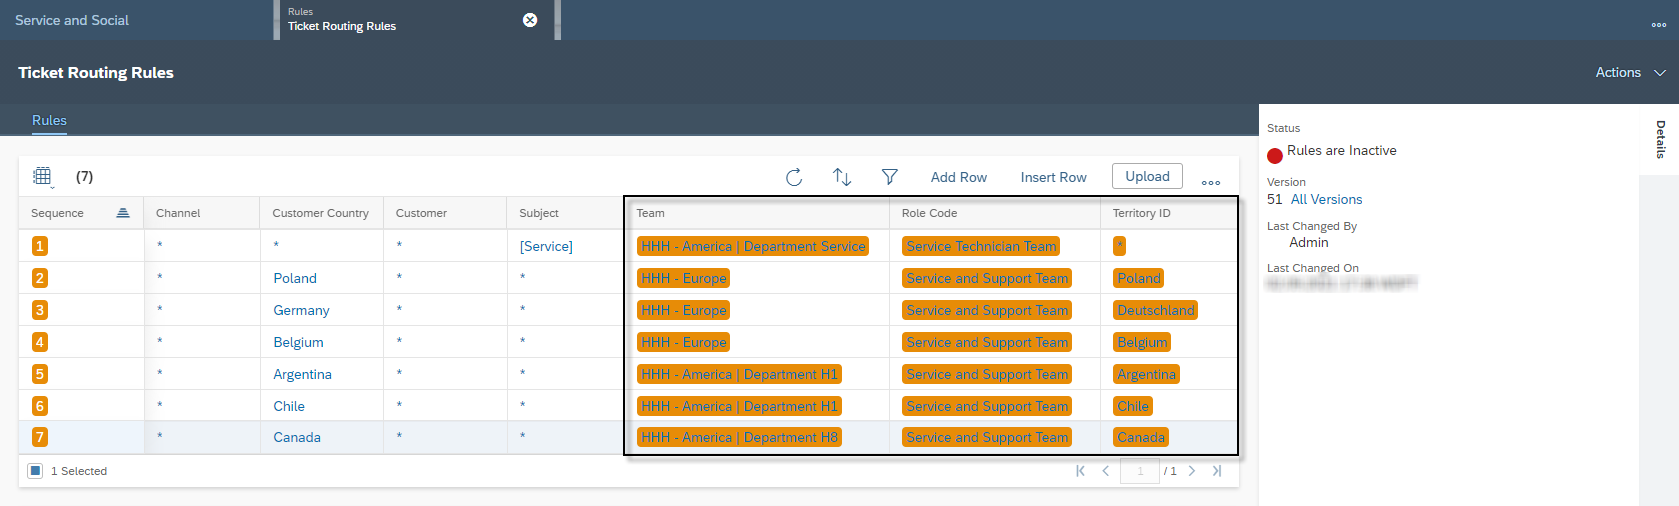
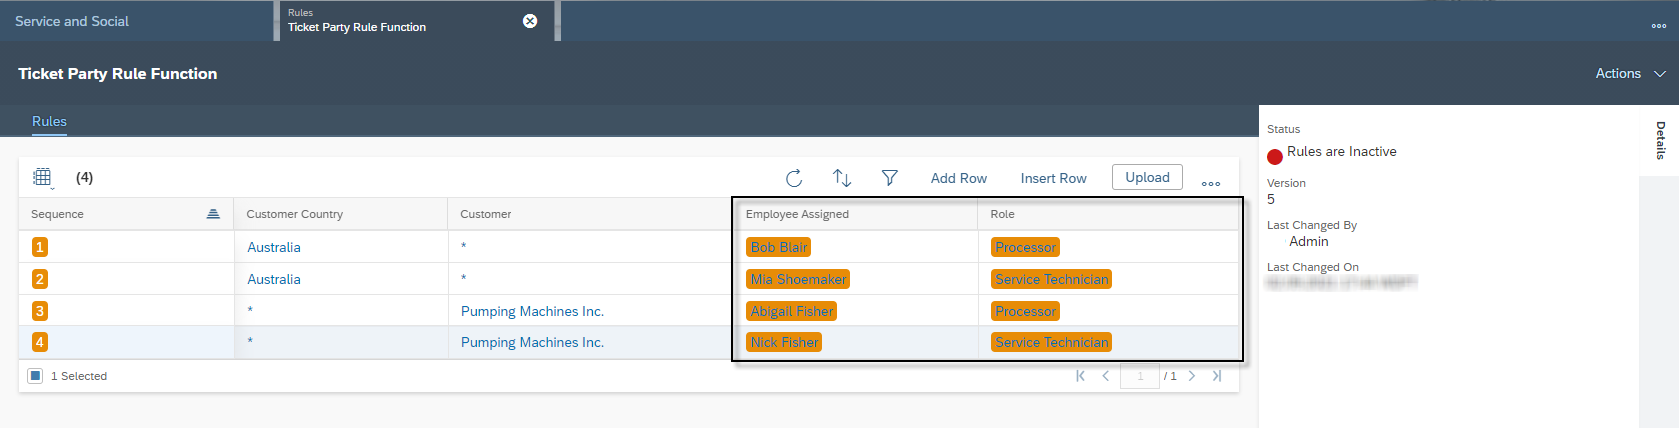
The next two functions are the Remove and Copy function. When you use the Copy function you have to select a row, which you would like to copy. As a second step select an empty Row – so use Add Row or Insert Row before – and then click on More Options  and then on Paste. In the shown example a copied row will be paste into row four.
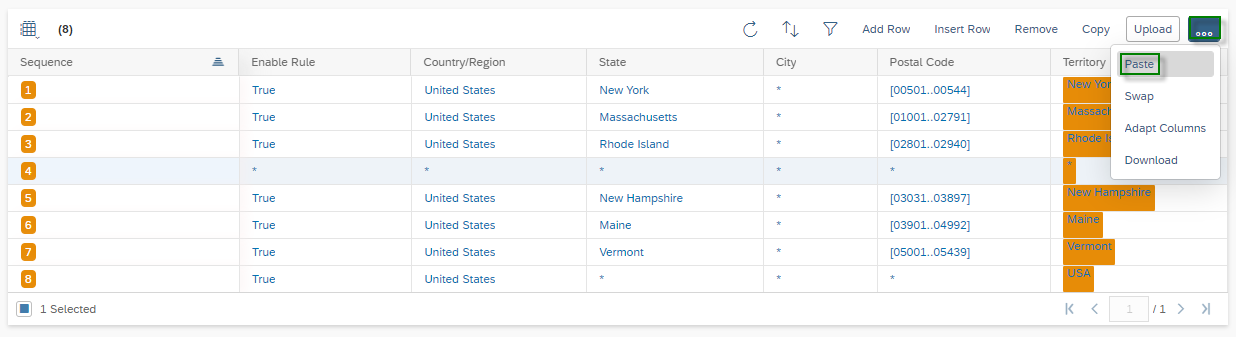
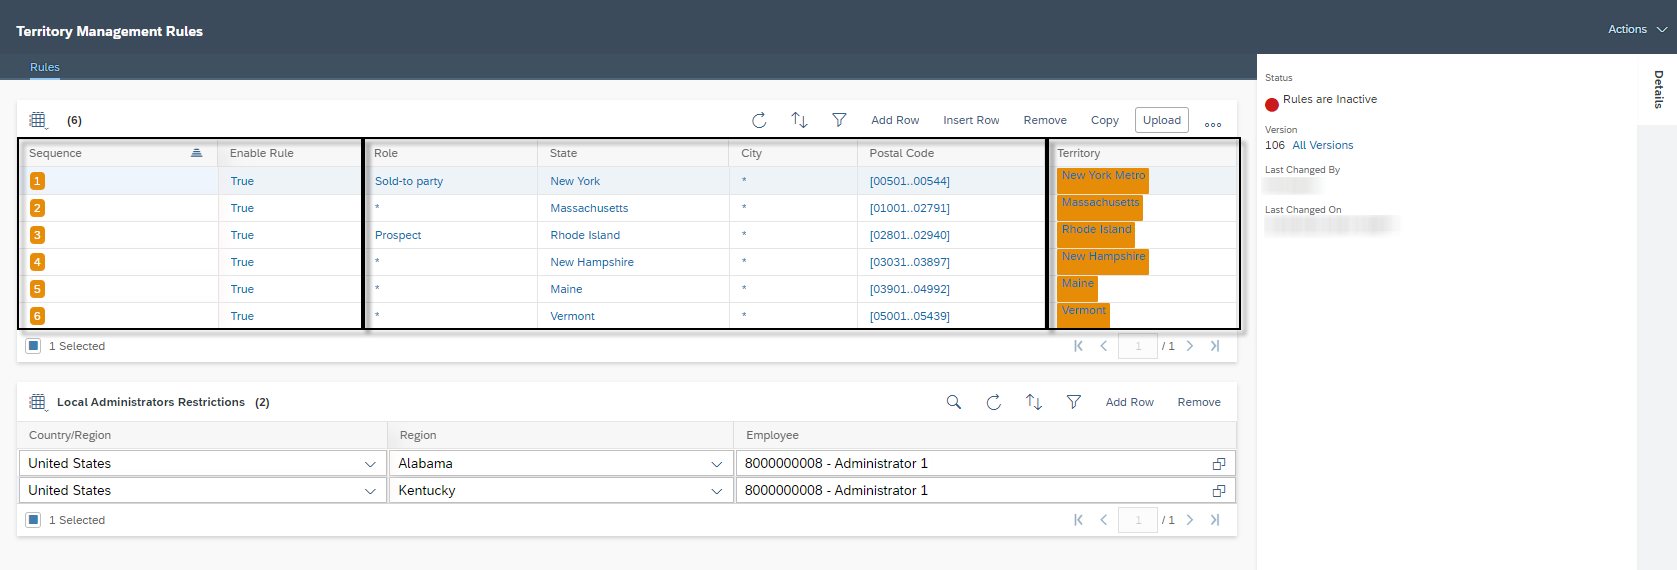
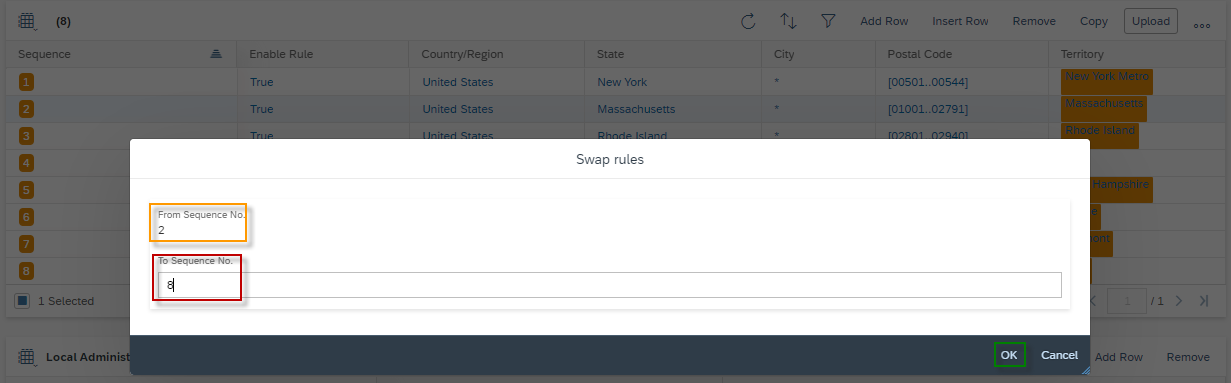
Under More Options you also do find the function Swap, which gives you the opportunity to swap sequences. Select a row which you would like to swap and then click on the Swap Button via More Options. In the Popup Swap rules enter the sequence number which whom the selected row should be swapped. Finish with click on OK Button.
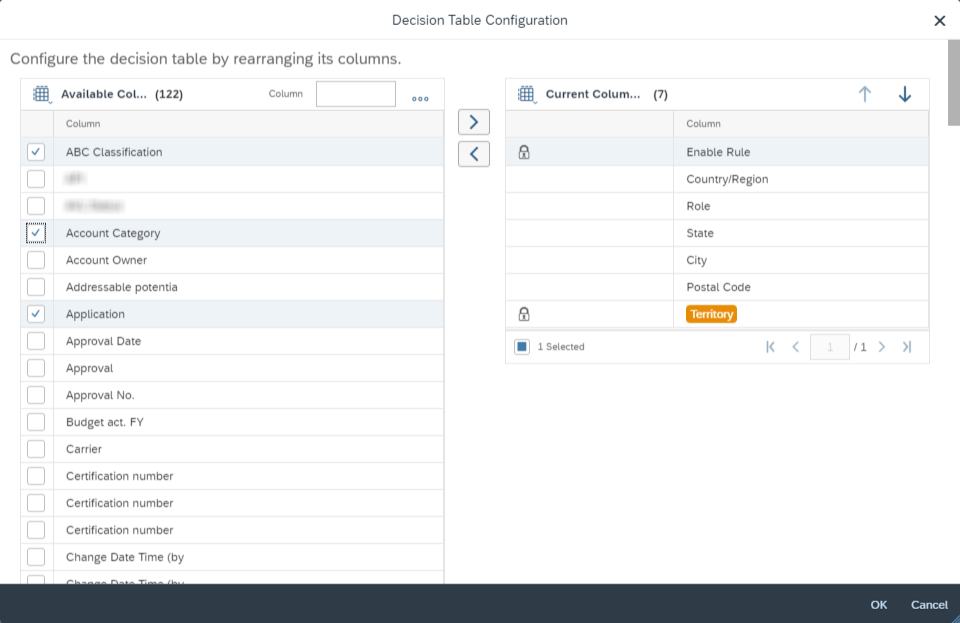
The next function under More Options is the function Adapt Columns, which gives you the possibility to adjust the decision table. You can select multiple entries from the Table Available Columns and move them with the Add Selected Items Button  to the Current Column Table. With Remove Selected Items Button , you can also remove selected rows from Current Columns back to Available Columns. The Enable Rule and Territory entries have a Lock Icon , which means that these entries can’t be removed and are therefore mandatory. With Move Up and Move Down Buttons  you have the possibility to sort the table of Current Columns. When you are done adjusting your decision table, confirm by clicking on OK.

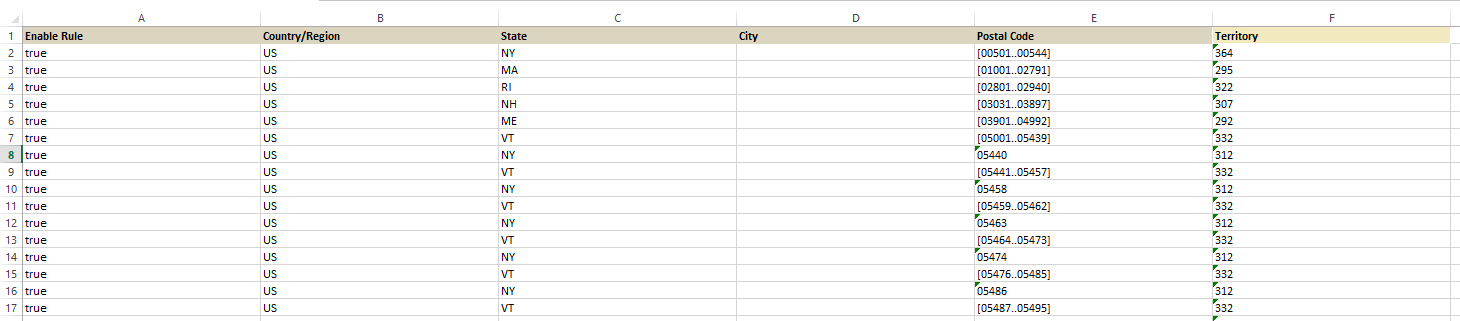
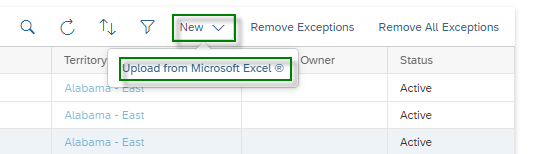
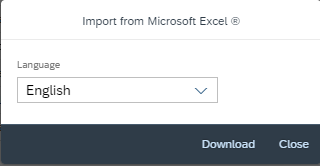
As the last function you can Download the decision table to Microsoft® Excel – via More Options  – and Upload from Microsoft Excel. When downloading, you will notice that there is no column for the sequence and that the result column Territory is marked in a different color than the criteria columns. It is much easier to adjust a big amount of data in Microsoft® Excel and then Upload them to SAP Sales Cloud.

In the tab Input Help you will find a guideline for entering data into the decision table.

Once you are done adjusting in Excel, save the file and then use the function Upload in SAP Sales Cloud to upload the saved filed. Always make sure that the Columns in Excel are the exact same as in the decision table, otherwise the upload will not work. Important to know is also that all existing entries in the decision table will be deleted out first before the entries from the excel file will be uploaded. So make sure that you keep entries in the excel file when you just adjust some entries.

Third, the focus is on the version history. In the Details Pane you do find the number of Version – in the shown example there are 106 Versions. With a click on the hyperlink All Versions a table will appear and you can Download older Versions to Microsoft Excel®. When you want to get back to an older version make sure the columns from the downloaded Excel List are the same as in the decision table.

Whenever you edit the decision table, the status is automatically set to Rules are Inactive at first. Once you are done with the settings, click Actions and then Activate Rules. This will change the Status to Rules are Active.

Third Step: Define Exceptions

In this table you will find a list of all Accounts where the territory was adjusted manually. All accounts in this table are not considered for the realignment run. You can remove selected entries with Remove Exceptions or delete all entries with Remove All Excepetions, this has the consequence that the realignment run will also run for these accounts and the manually entered territories will be overwritten.

It is also possible here to manually assign multiple accounts and take them as an exception. You can do this by clicking on New and then on Upload from Microsoft Excel ®.

In the Popup select the Template Language and then click on Download to download the Excel Template for the Upload.

Enter in the template all Accounts with the. Do this by using the Account ID and the Territory ID. Once you are done make sure that you have the SAP Sales Cloud Microsoft Excel ® Add In installed and that you are logged in. Confirm your Account Exceptions with clicking on Save data to. It is important to consider here that this is not a delta upload, which means that all entries from the Account Exceptions will be deleted and only the entries from your Excel list will apply then as an Exception.

Fourth Step: Create Realignment Run

In the fourth step name the Realignment Run by entering the name in the Title field. Click on Create Button to finish this step.

Fifth Step: Confirmation

In the last step of Creating a Realignment Rule you simply have to confirm your settings, which are already saved at this point. Finish the Creation with clicking on Close.

3.1.2.2. Functionalities and adjustments of Realignment Runs

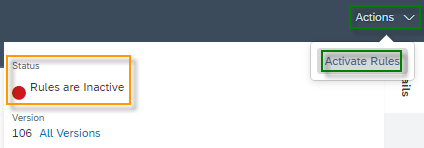
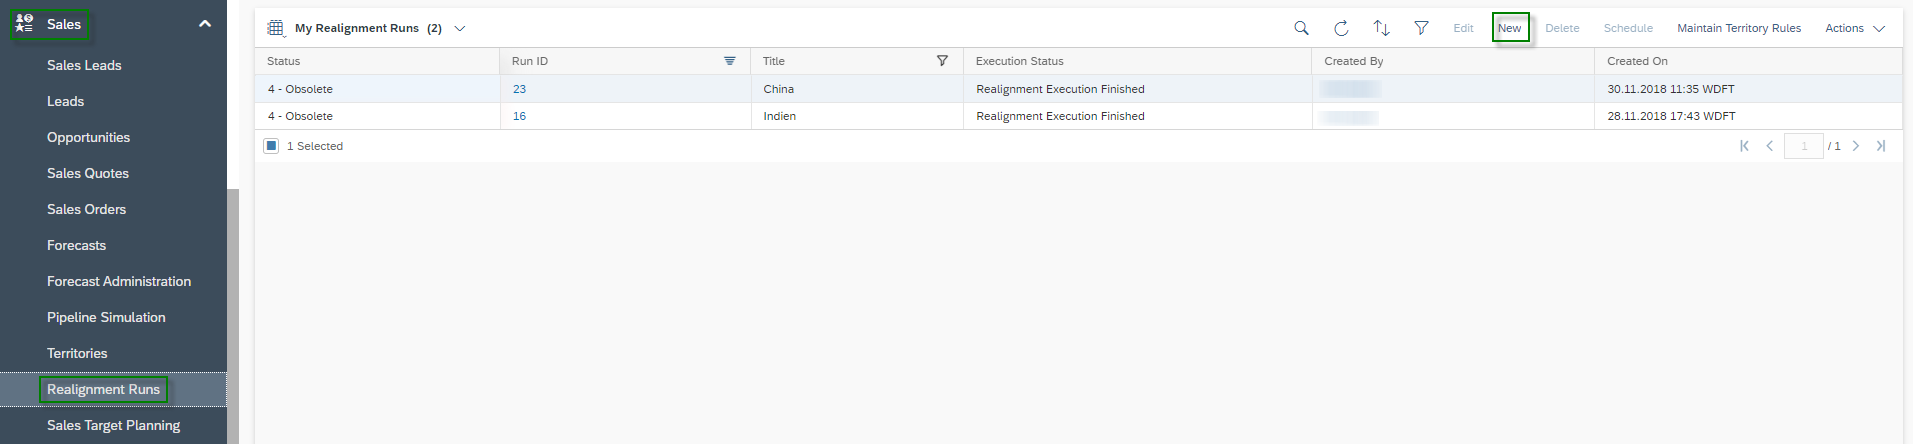
Each Realignment Run which is in the Status of In Preperation can be Deleted. This Function is not available for the other statuses – Active and Obsolete – which can be set under the More Options Button , via Actions. Here you can Set to Active, Set to Obsolete or Undo Obsolete Status.

It is also possible to Maintain Territory Rules from the Overview. Note that the Rules are applying for all Realignment Runs.

After Creation of a Realignment Run the Execution Status is on Simulation Started. Once the Simulation is done the Execution Status will be changed to Simulation Finished. After the Simulation you can edit the Run either by clicking on the Run ID or on the Edit Button. In edit mode, you will find an overview of all SAP Sales Cloud objects – such as offers, tasks, etc. – which, according to your selection, will be used in this run. It is also possible here to Exclude Documents – such as shown in the example shown Appointment Activities, Email Activities and Sales Quotes.

In the overview of the affected Accounts you can see the simulation results: the Current Territory and the New Territory, if the Realignment Run will be activated. In the Documents – such as shown here Opportunities and Leads – you can also Exclude specific IDs for the Run. Finish your Adjustments with clicking on Save and Close.

After the edit you are ready to set the Status to Activate. Next schedule your Run by clicking on the Schedule Button.

Here you have three options to schedule your Realignment Run. The First one is to Start Immediately, which will operate as soon as you click on Save and Close. The second option is Run After Job, which periodically runs the realignment run always after a defined job. And the third and last option is Single Run. Here you can enter date and time – for example overnight or over the weekend. Consider the time zone when entering the time.

After you have scheduled the Realignment Run you will find in the table Details: Territory Realignment a Log. As soon as the Status of the Log changes to Finished you can click on the Application Log ID to get details information about the Results of your Realignment Run. The Log provides information about errors, warnings and information which may occurred during the run.

3.1.3. Workflow to derive a Territory automatically

A Workflow helps to automatically derive a territory at the Account when the master data is changed. Of course, you also have the option to do this manually. To do this, simply click on Action in the Account and then on the Derivy Territory button. The system now checks the Account’s master data and assigns it to the correct entry according to the Territory Rules. If there is no Territory Management Rule which fits to the Master Data of an Account you will receive following Error Message: “No territory could be derived for this account”.

However, if you want to create a workflow for the automatic assignment, then navigate to Work Center Administrator and then click on the Work Center View Workflow. Here you will find a detailed overview of all Workflows in your System. Click on New Button to create a new Workflow.

As a first step you have to Enter Basic Data: Description – which is kind of the name of the workflow – the Business Object – which is in this case the Account – and last the Timing – which can be On Every Save. Confirm your settings with a click on the Next Button.

As a second step you have to Define Conditions. In most of the cases you derive the Territory based on the adress information of the account. In the following example we have three different groups. You can add a new group with a click on button Add Group and later, if needed, you can also delete a Group with a click on the button Remove Group. Each condition within a group has an AND relationship and the groups have an OR relationship to themselves. So as you can see is that in each group it is set up that Overrite Territory indicator shall not be set to Yes in the Account – so that the manuell setting will be not overwritten. Group 1 asks whether the Country is changing. In Group 2 it becomes more specific, here it is queried whether the Country is USA and the Postal Code changes, since the territories are derived from the ZIP codes. In Group 3 it is queried whether the country is France and the state changes, since the territories of France are derived via the Départements. So you should always check a change in a workflow, so you make sure that the workflow runs performance optimized and it’s only executed if relevant data for the derivation of a territory changes. Confirm your settings again with clicking on the Next Button in the lower right corner.

In the thrid Step you Define Actions. Select the Rule Type Action and Select Action Derive Territories. Confirm your settings one more time with clicking on the Next Button. In step 4 Review and 5 Confirmation you can Activate and Save the Workflow.

3.2. Leads for Marketing

In SAP Sales Cloud, you have the option of defining rules for lead acquisition so that leads are assigned to the right employees. To do this, go to the Work Center Administrator and click on the Sales and Campaign Settings View. In the Work Distribution section, click Define Rules for Lead Assignment.

As you can see is, that the Leads Distribution Rules are looking very similar as the Rules for Defining the Sales Territory. So please have a closer look to Chapter above to get to know about all functions.

Different here for the Lead Rules are the Result Columns – which are, for Leads, the Owner, Marketing Unit, Territory and Owner (Sales). With Owner itself the Marketing employee is meant, so the employee who is responsible to nurse the lead before Sales Department takes over for the pre sales phase.

3.3. Tickets for Service

In SAP Sales Cloud, it is also possible to define rules for the service tickets in order to route the incoming customer e-mails to the responsible department or employee. To do this, go to the Work Center Administrator and then click on the Work Center View Service and Social. Also in the tile of Work Distribution you can click on Ticket Routing Rules by Organization or Territory – to define rules to route the tickets to the correct Service Territory or Service and Support Team – or you can click on Ticket Routing Rules by Employee – to define rules for the derivation for the responsible Employee. It is also possible to use both Routing Rules together.

You can see that the Ticket Routing Rules are also looking very similar as the Rules for Defining the Sales Territory. So please have a closer look to Chapter above to get to know about all functions.

For the Ticket Routing Rules by Organization or Territory the difference here for the Ticket Routing Rules are the Result Columns – which are here the Team, Role Code and Territory ID. In the Role Code you can differ between Service Technician Team and Service and Support Team – so the difference is more or less between the Headquarter – which is receiving phone calls and are organization visits of the Service Technician – and the Service Technician – who is solving the issue at the Customer Place.

For the Ticket Routing Rules by Employee you can also set different conditions to align the Result Columns Employee Assigned and Role. In the column Employee Assigned you can assign the responsible Employee and Select in the Column Role his role – where you can choose between Processor and Service Technician.

Do you need consulting from our experts?

The Customer Experience team at Camelot ITLab deals with exciting and challenging CRM related topics every day and serves a large portfolio of different customers from a wide range of industries. Trust in this collaboration and feel free to contact us at tlil@camelot-itlab.com.

Was this article helpful?

If you like our content we would highly appreciate your review on Trustpilot


#SAP C4C #SAP Cloud 4 Customer #Cloud 4 Customer #Cloud for Customer #SAP Sales Cloud #Sales Cloud #Territory Management #Territory Realignment #Override Territory #Define Rules #Account Territory Mapping #Derive Territory

Receive the latest news

Subscribe To our SAP Sales & Service Cloud Newsletter

Get notified about new articles